
Daily & No-Show Reports
Apptoto can email you two recurring reports so you don’t have to log in to see how your schedule looks:
- Daily Report - the coming day’s appointments and their message statuses.
- No-Show Report - the preceding day’s appointments and their participant check-in statuses, so you can spot who did not arrive.
You get one email per connected calendar, and each report has its own send time and its own on/off switch. You can turn a report off for your whole account, or leave it on and silence it for individual calendars.
Turning reports on or off for your whole account
Section titled “Turning reports on or off for your whole account”Both reports are controlled from Tools > Reports > Daily Reports.
- Navigate to Tools > Reports and click the Daily Reports tab.
- Daily Report: check the box to receive it, or uncheck it to stop it for every calendar in your account.
- No-Show Report: check or uncheck it the same way.
- Send daily report at: pick the time of day each report goes out.
- to: optionally enter an email address to send that report to. Addresses here are added to your normal recipients rather than replacing them.
- Click Save Changes at the bottom of the tab.
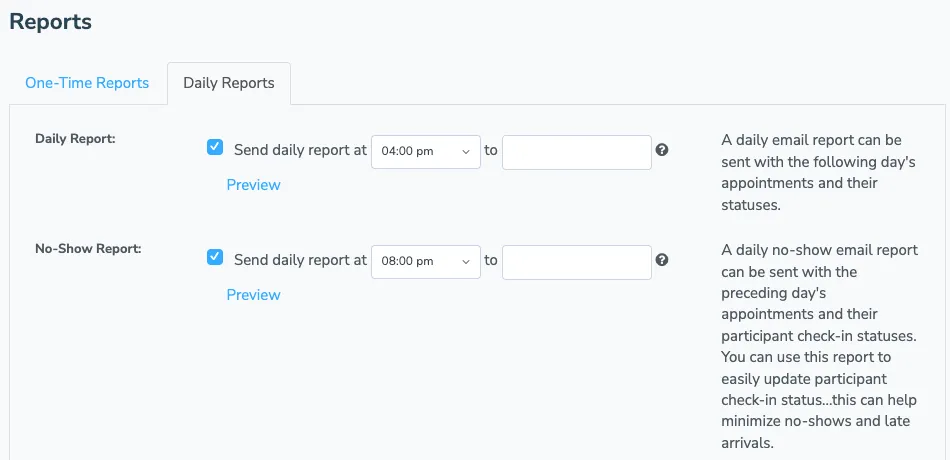
Use the Preview link beside either report to see what the email will look like with your current appointments, without waiting for it to send.
When each report covers which day
Section titled “When each report covers which day”The send time you choose also decides which day the report describes:
- Daily Report - sent before 10:00 am, it covers today’s appointments. Sent at 10:00 am or later, it covers tomorrow’s.
- No-Show Report - sent before 5:00 pm, it covers yesterday’s appointments. Sent at 5:00 pm or later, it covers today’s.
Turning reports off for a single calendar
Section titled “Turning reports off for a single calendar”If most of your calendars should keep sending a report but one should not, turn it off on that calendar instead of account-wide.
- Navigate to Settings > Calendars and click the calendar you want to change.
- Open the Advanced tab.
- Under Reports, switch off Daily Reports Enabled, No-Show Reports Enabled, or both.
- Click Save.
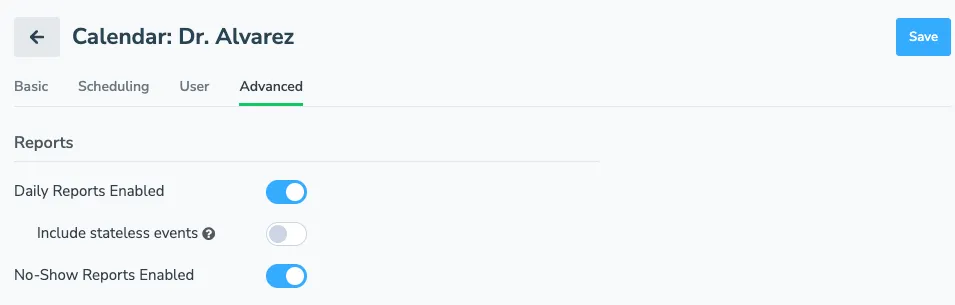
Include stateless events controls how much detail each report lists for that calendar. Switch it off and the reports include only appointments that have already had a message sent or have one scheduled, which keeps personal or internal events off the list.
Who receives the reports
Section titled “Who receives the reports”Recipients are set once and apply to both reports, under Report Recipients at the bottom of the Daily Reports tab.
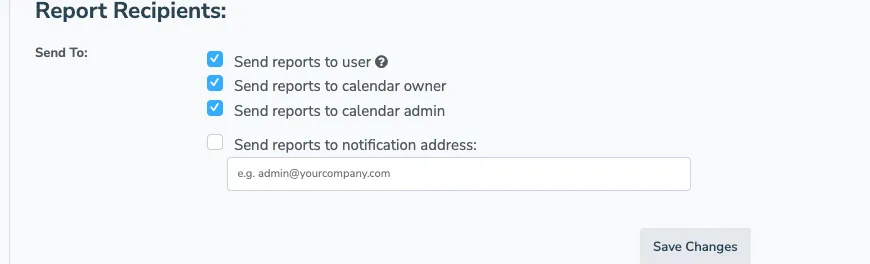
- Send reports to user - the email address on Settings > Contact Info.
- Send reports to calendar owner and Send reports to calendar admin - the owner and admin addresses set on each individual calendar, so different calendars can reach different people.
- Send reports to notification address - one extra address, such as a shared front-desk inbox.
If you clear every option, reports still go to your account’s own email address so they cannot go nowhere.
Unsubscribing from the email itself
Section titled “Unsubscribing from the email itself”Every report email ends with a link to unsubscribe from that report for that calendar. It does the same thing as switching the report off on the calendar’s Advanced tab, which is handy for staff who receive a report they do not need. To stop a report everywhere, uncheck it on the Daily Reports tab instead.
Related
Section titled “Related”The No-Show Report is built from participant check-in statuses. For how to mark participants as on-time, arrived, late, or no-show - and how to chart that data over time - see Participant Check-In States.