Estimated reading time: 12 minutes
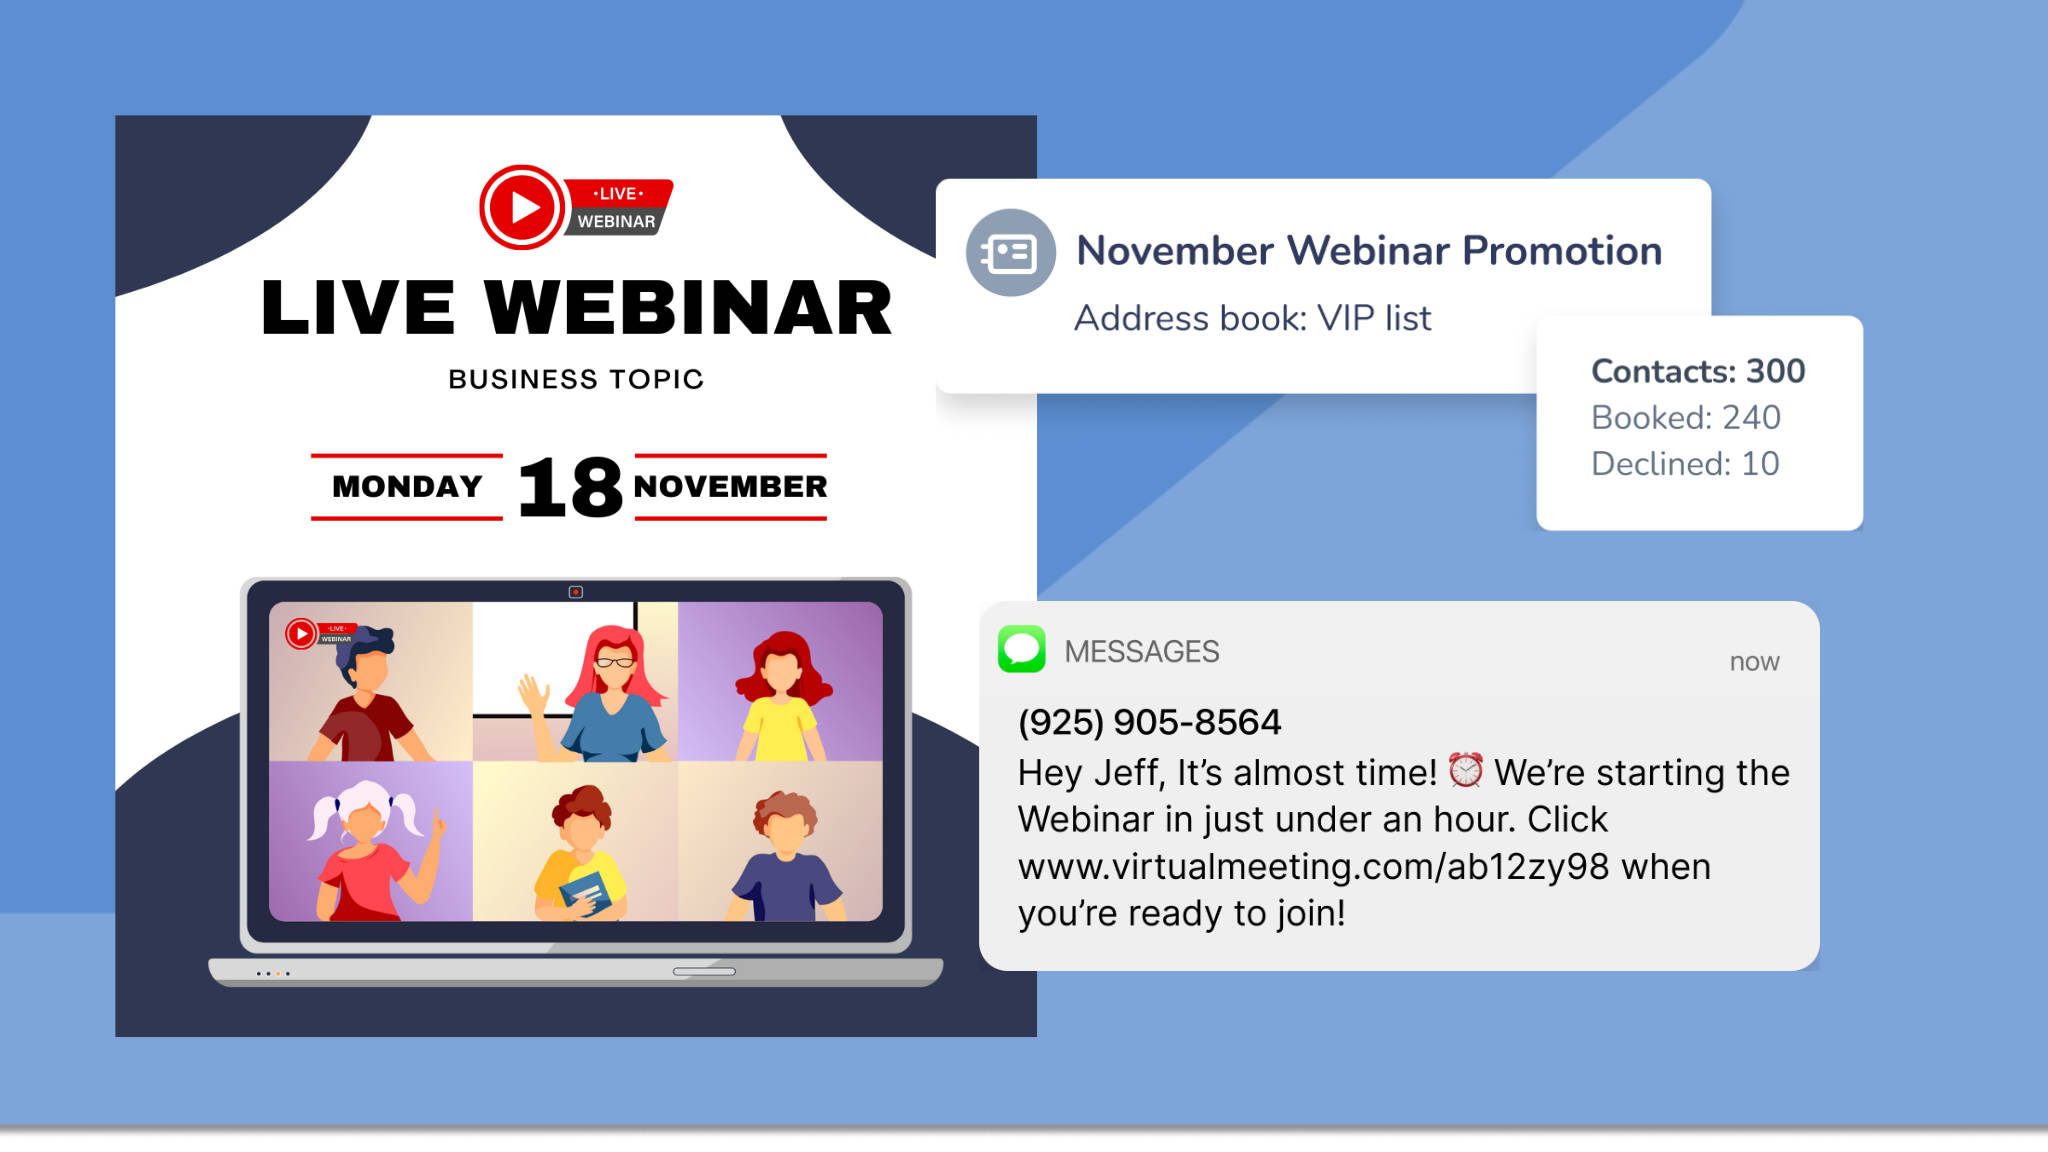
Webinars are a powerful way to connect with clients, educate prospects, and build credibility in your industry. But getting people to register—and show up—isn’t as simple as sending a single invite. That’s where automation can make all the difference.
In this second installment of our “Automation Recipe” series, we’ll break down the essentials of promoting and hosting a high-impact webinar. You’ll learn how to attract registrants with a targeted campaign, streamline registration through a booking page, boost attendance with pre-event reminders, and follow up afterward with resources and thank-you messages.
With a straightforward recipe and the right tools, any business can host webinars that engage audiences and drive results.
What this Automation Does
This automation recipe walks you through:
- Sending a targeted webinar “booking” campaign to entice prospects/clients to register
- Generating a booking page to collect registrations
- Sending pre-event reminders to maximize attendance rates
- Sending follow-ups after the event to deliver recordings and thank attendees
Industries
Best for: Law Firms, Financial Advisors, Tax Firms, Health Providers, Educational Institutions and Tutors, Sales and Marketing Organizations
What You’ll Need
- List of Target Contacts
- Apptoto’s Desktop portal
- Virtual Meeting Tool
Instructions
- Generate your Webinar meeting link using your preferred Virtual Meeting tool.
Importing Your Target Registrants into Apptoto
- Export your list of targeted webinar registrants from your CRM (or other into a CSV.
- Minimum required fields: “Email Address” and “First Name”
- Log into Apptoto and navigate to the “Contacts” tab.
- Click “Import Contacts” in the upper right-hand corner.
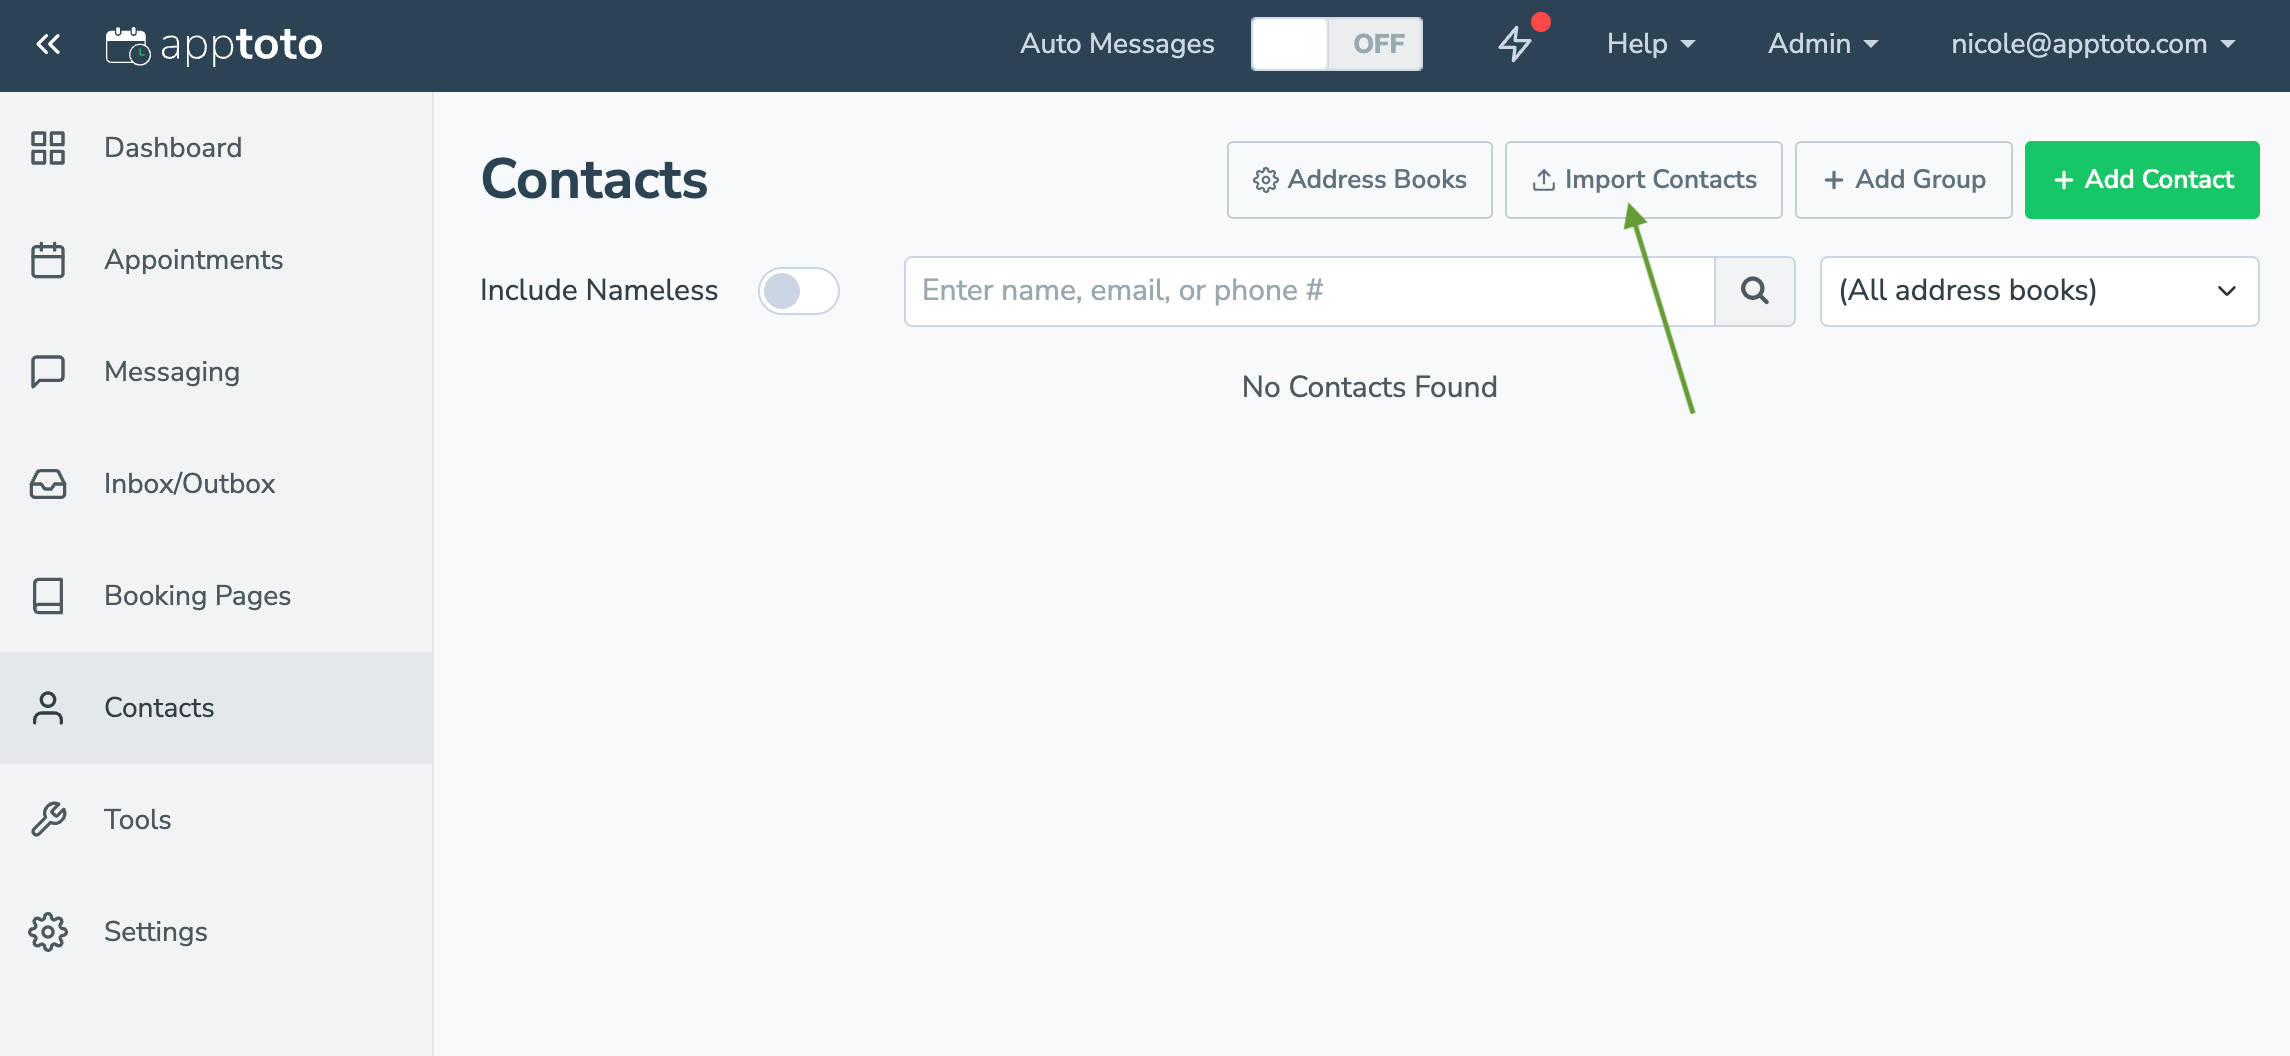
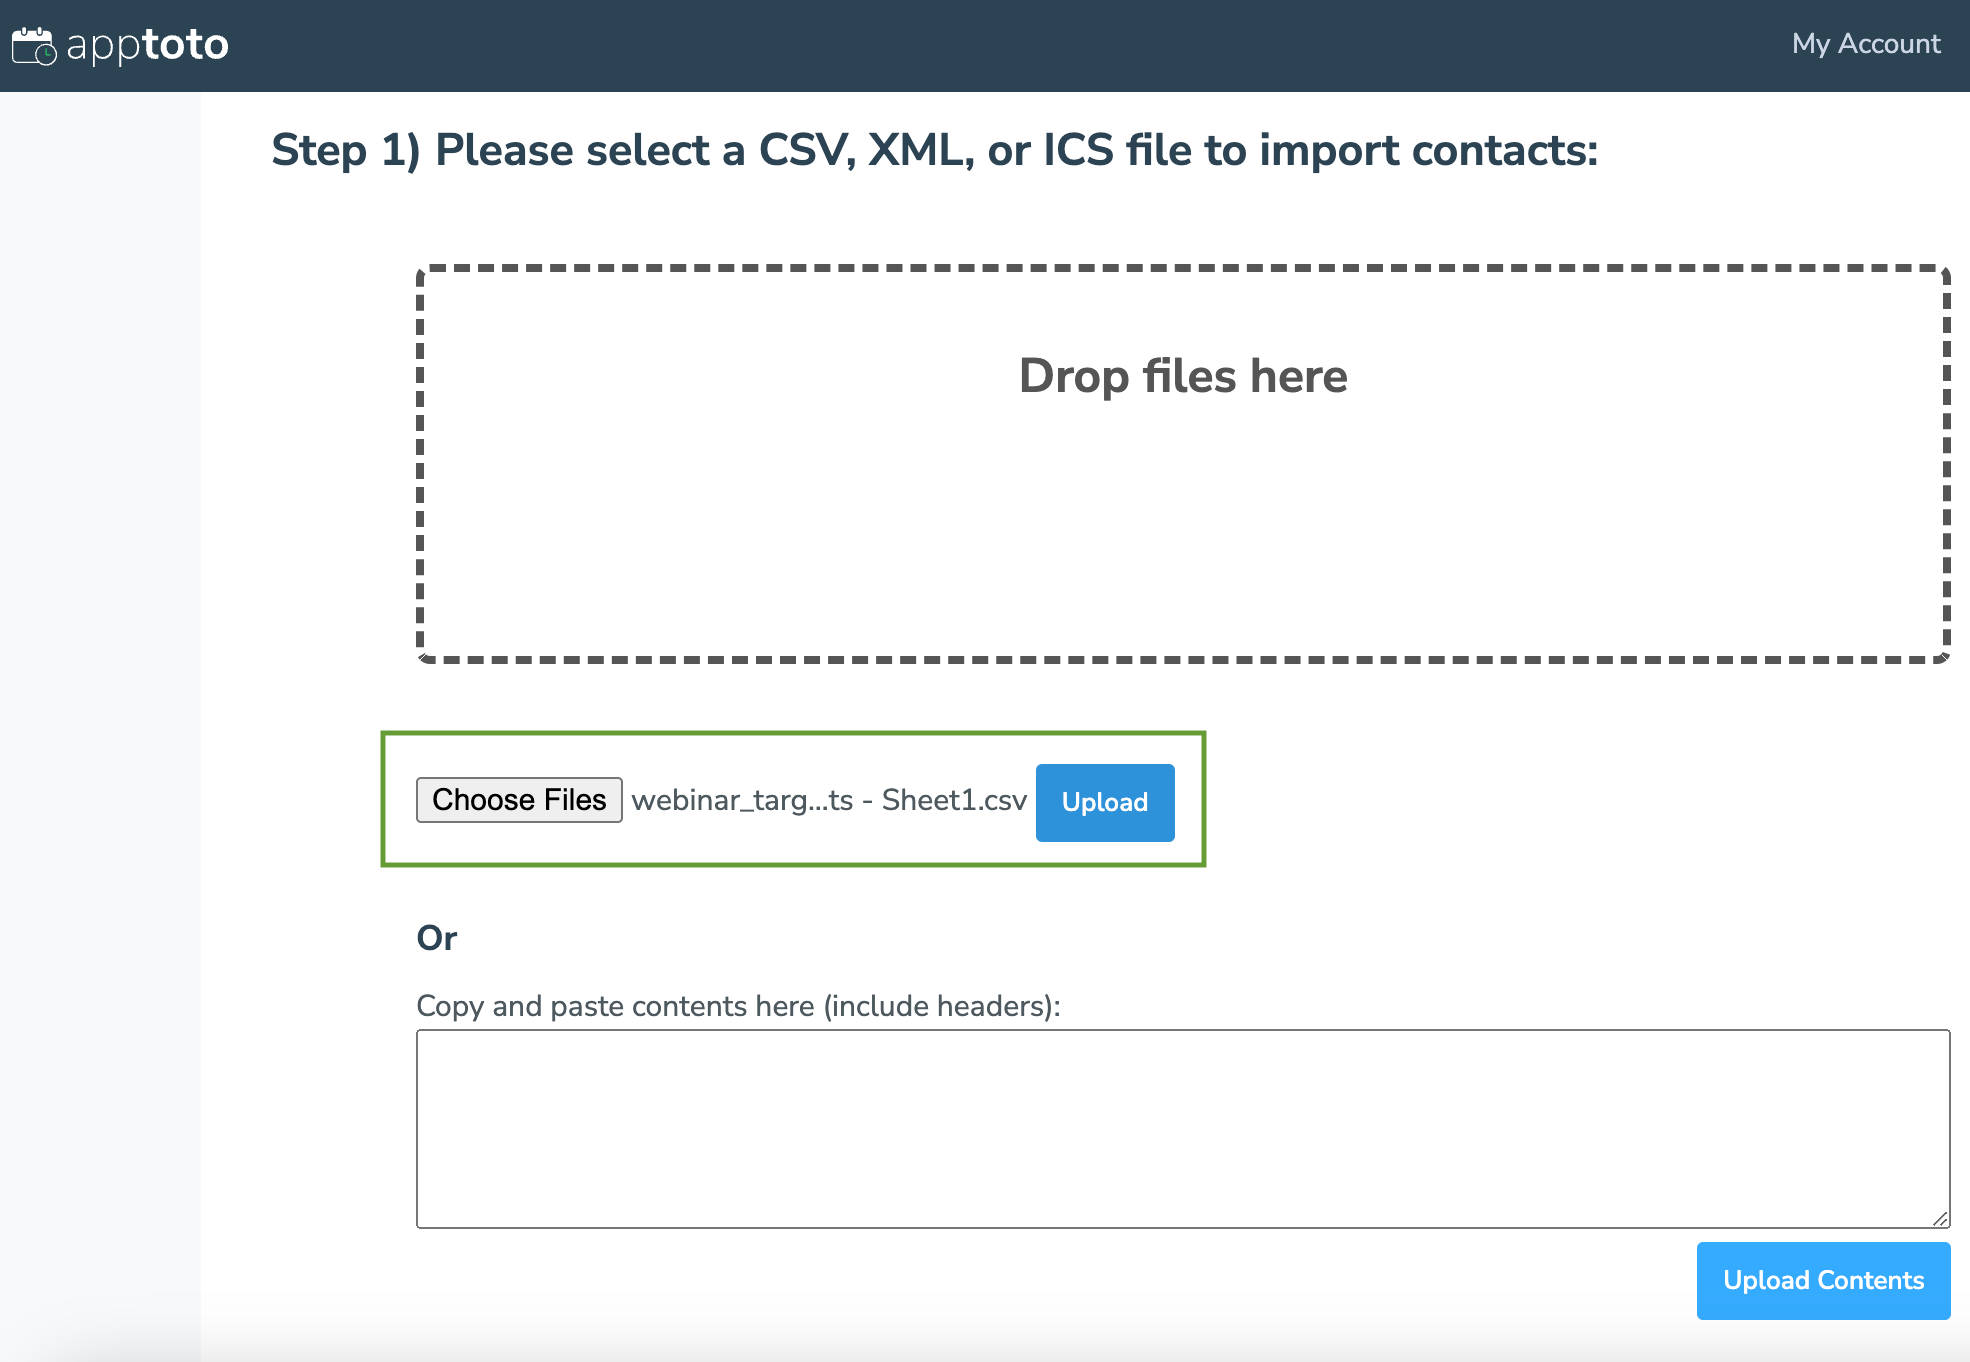
- Drag your CSV file to the “Drop File here” field or click “Choose file” and select your CSV file. Click “Upload.”
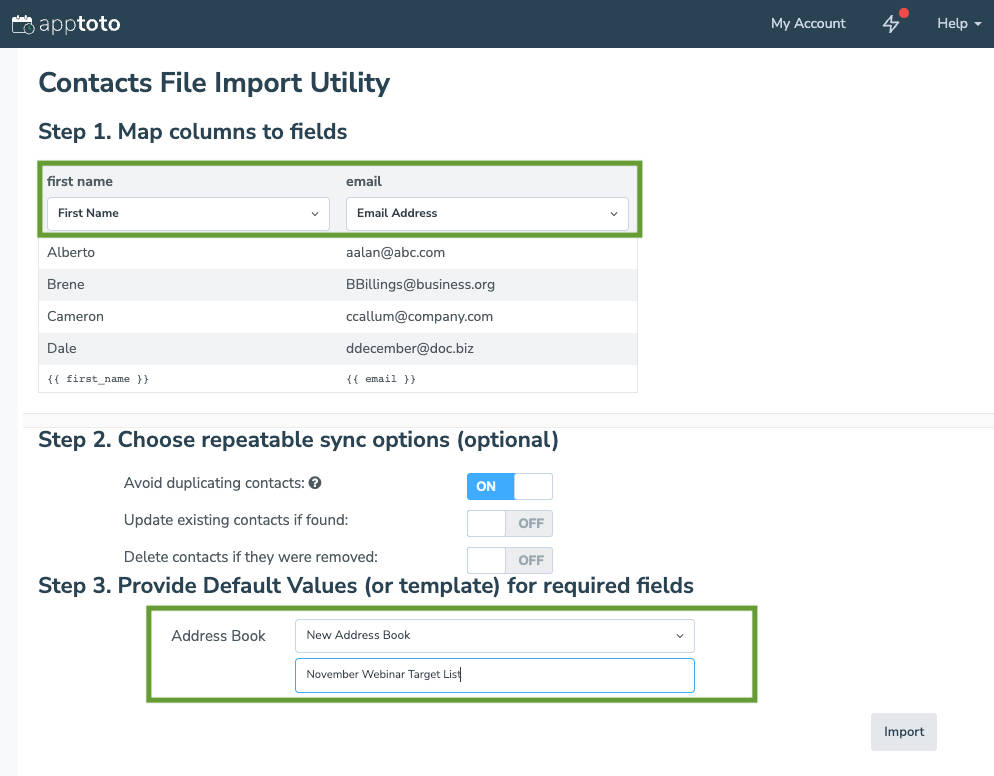
- On the “Contacts File Import Utility,” map the fields you exported into your CSV in step 2a. Choose the column header that most appropriately represents the data in the column.
- Set the sync options in step 2 and select whether to add your registrants to an existing Address Book or create a new one by clicking “New Address Book” from the dropdown.
- PRO TIP: We suggest creating a new webinar-specific Address Book to reduce confusion.
- PRO TIP: We suggest creating a new webinar-specific Address Book to reduce confusion.
- Click “Import.”
Setting Up Your Signup Page for Your Webinar
- Navigate to the “Booking Pages” tab.
- Click “Add Booking Page,” then select “+Add Signup Page.”

- Using the “Signup Page” settings tabs, add your Webinar title, description, and URL.
- Under the “Events Available on Signup Page” section, click “+ Add New Event.”
- Match the title, date, and time to the virtual meeting you set up in Step 1. Then, add the Virtual Meeting link to the location field or event body.
- Do not add participants to the meeting at this time

- Do not add participants to the meeting at this time
- Click “Save,” then continue adjusting the settings on the General tab to your preferences (being sure to pay attention to “Max Participants.”

- Next, review the other Signup Page settings, including:
- Appearance: adjusts the look of your Signup page
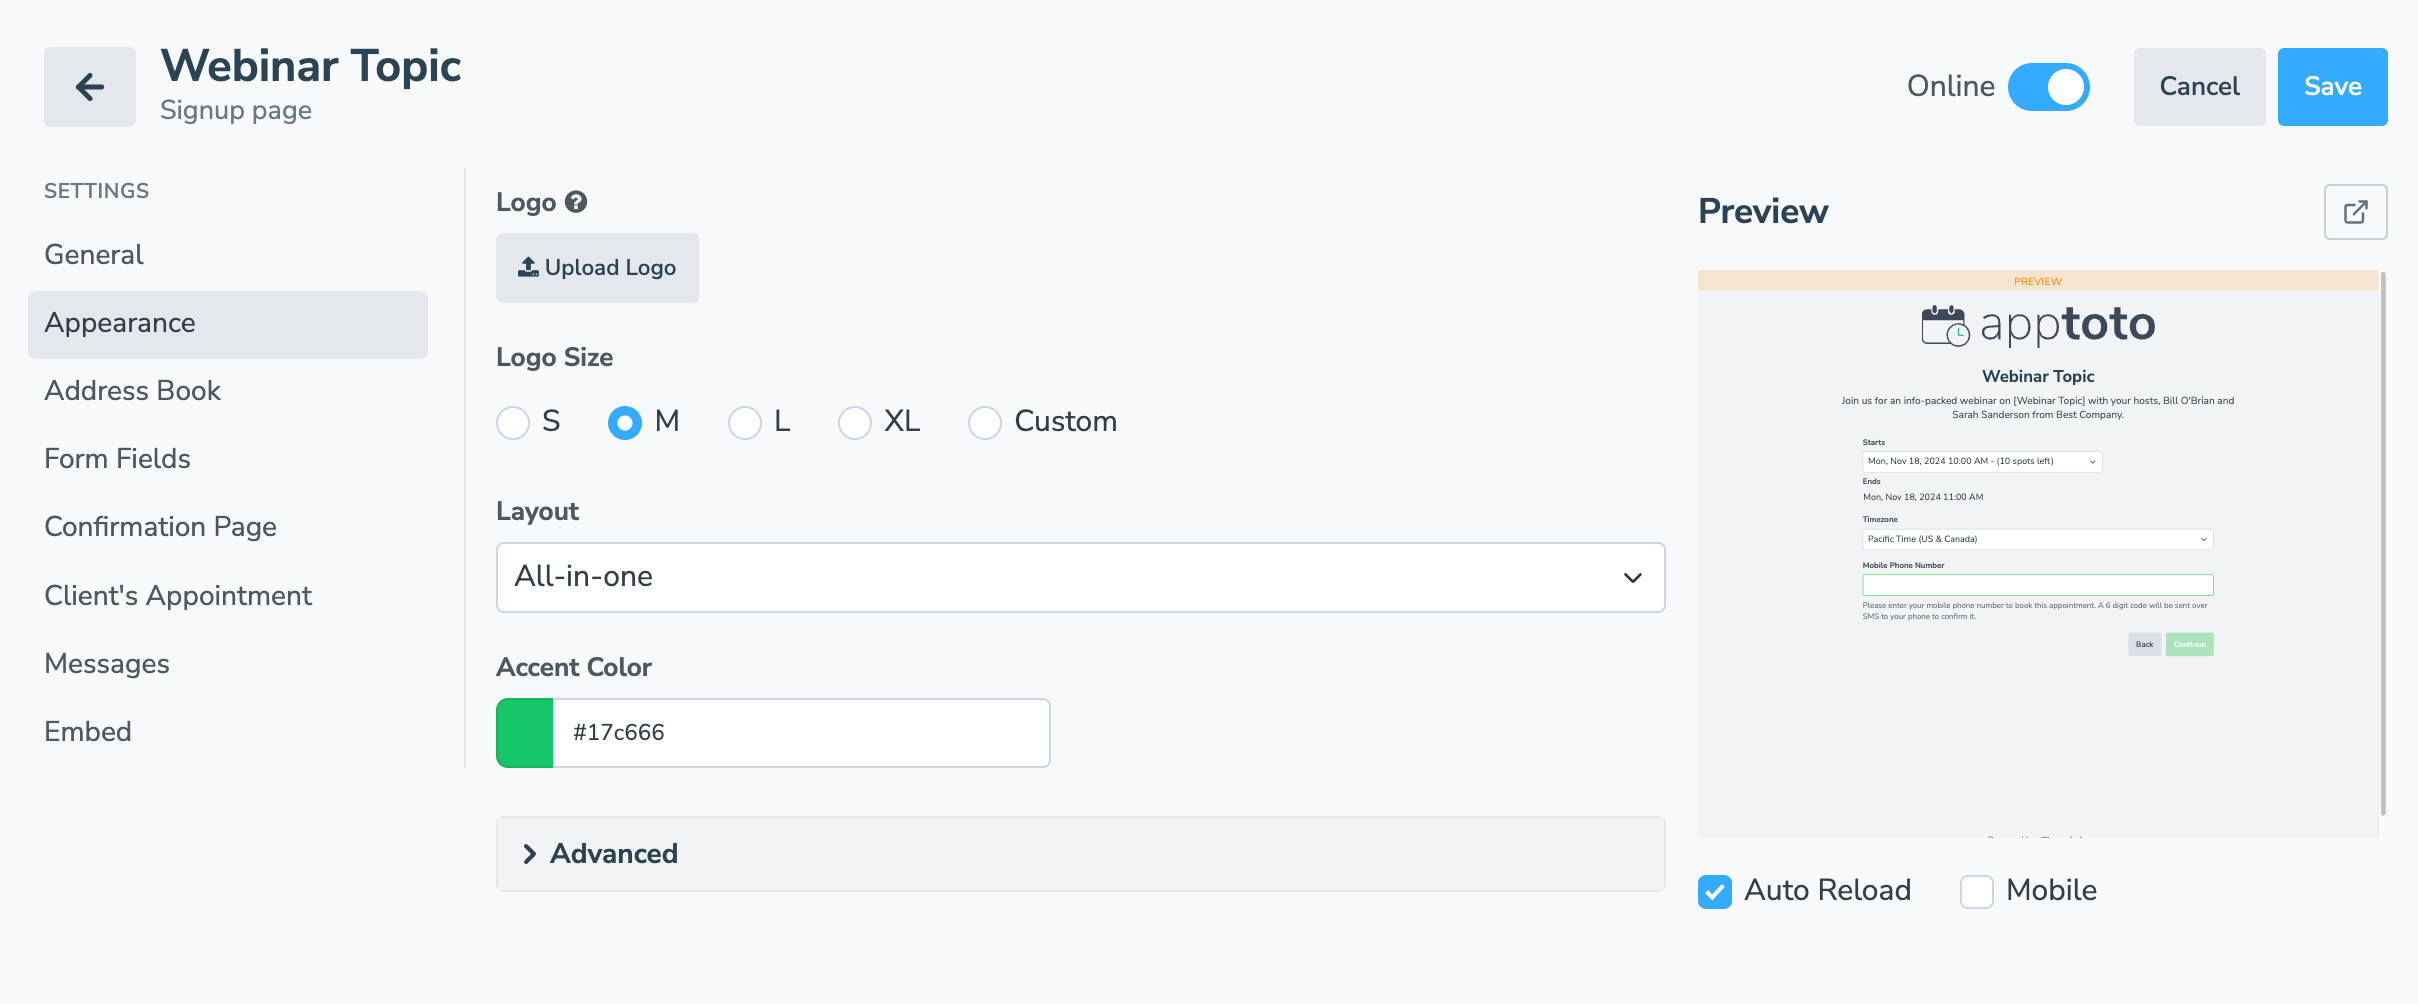
- Address Book: ensure contacts are added to the “Webinar” address book and choose if you want to require registrants to authenticate their contact information
- Form Fields: control what data you collect from your registrants during signup

- Confirmation Page: control the page and/or verbiage your registrants see after signing up
- Client’s Appointment: control what information is included on your client’s calendar event if they click “Add to Calendar” after receiving their booking confirmation
- PRO TIP: We suggest updating the “Event Body” or “Event Location” to include your webinar link

- PRO TIP: We suggest updating the “Event Body” or “Event Location” to include your webinar link
- Messages: adjust the content of the email or text messages sent to you and your registrants after they sign up through your Webinar Signup page
- PRO TIP: If you check “Send email to customer upon booking” or “Send text to customer upon booking,” we suggest including a webinar link in these messages as well.
- Embed: promote your webinar by embedding your Signup page via iframe or CTA button.

- Appearance: adjusts the look of your Signup page
- Click “Create” and confirm your page is set to your liking!

Launching Your Promotion Campaign to Generate Webinar Signups
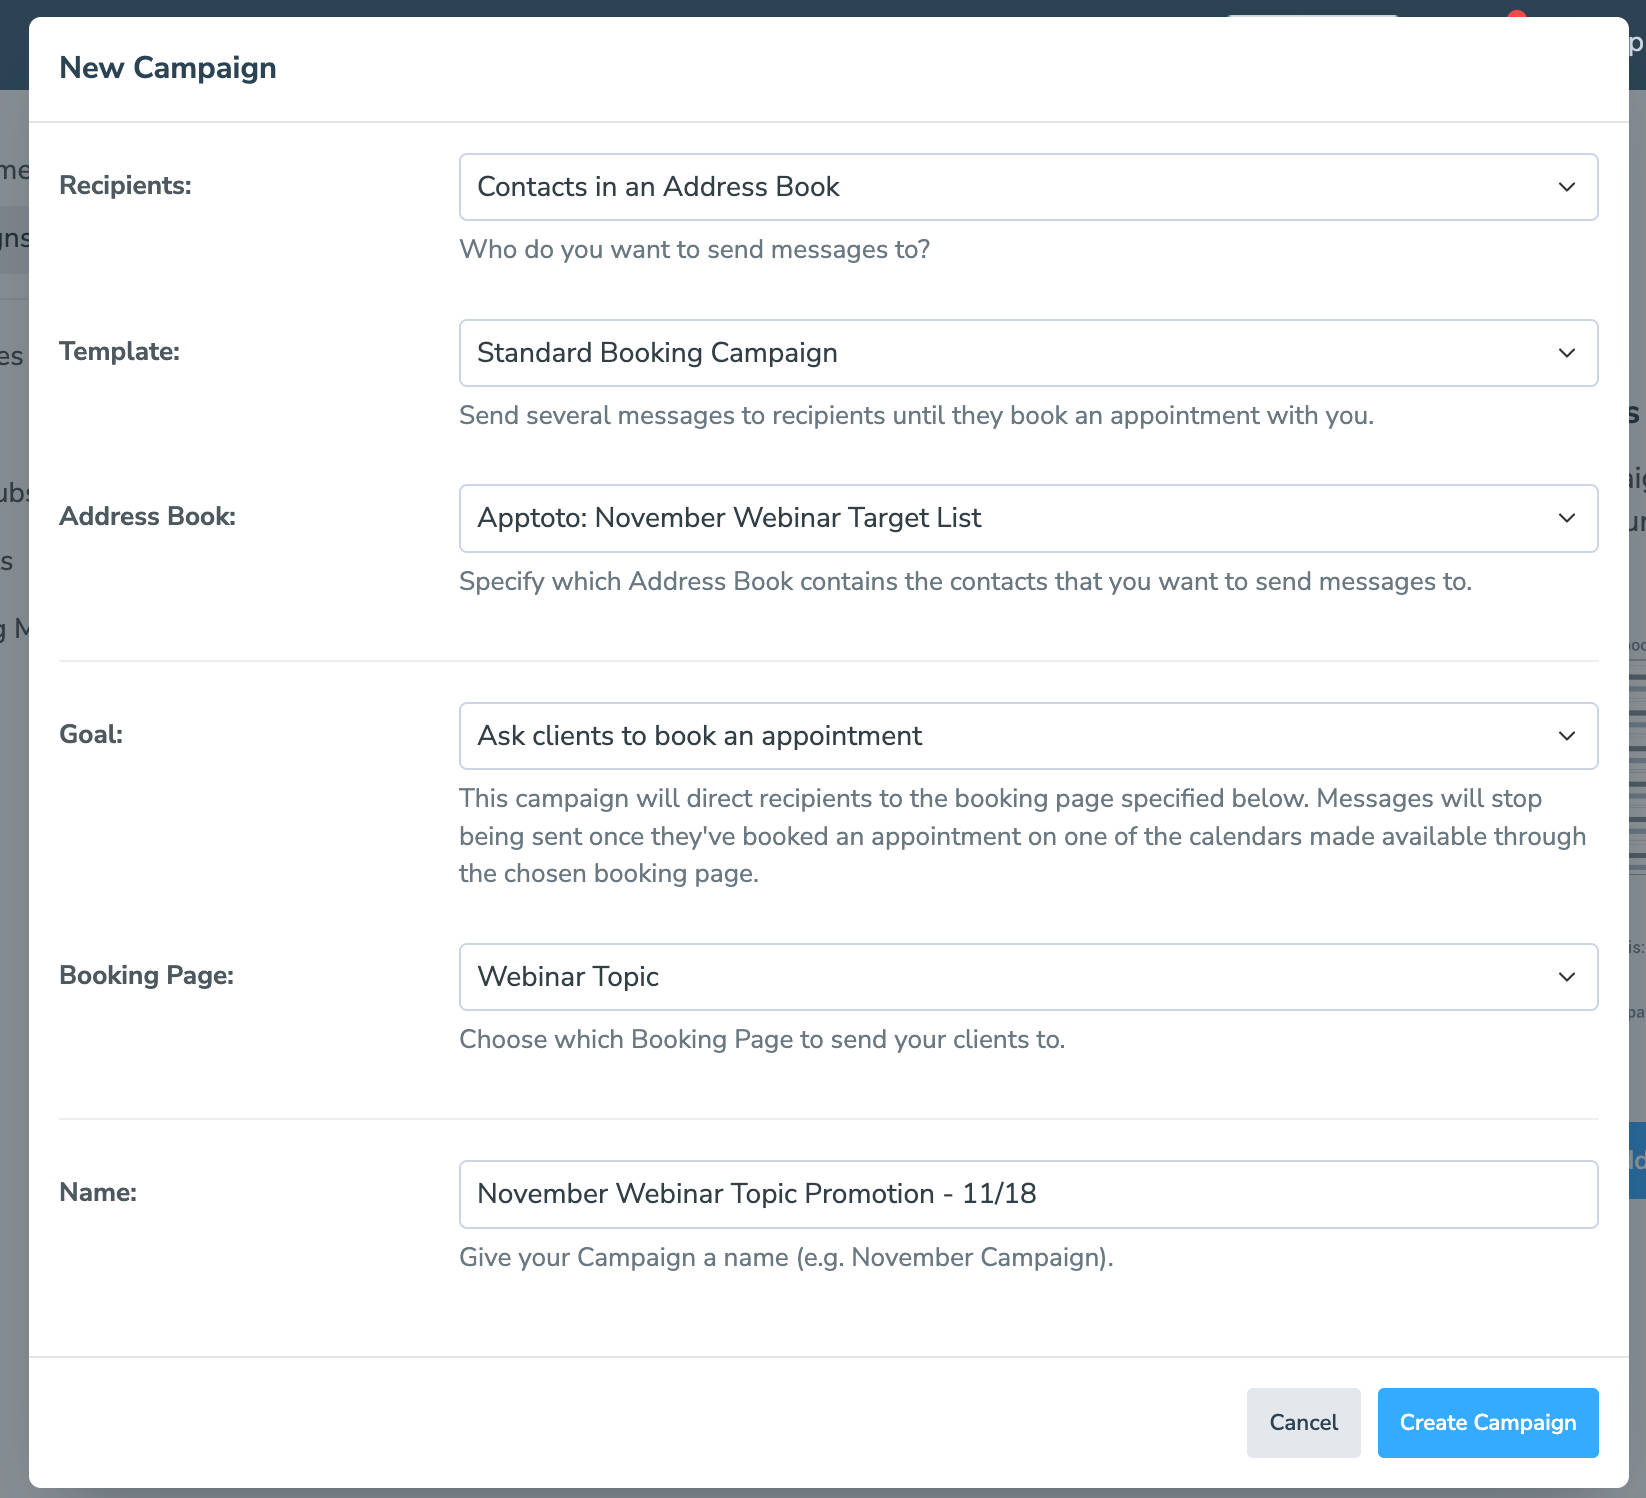
- Navigate to the “Messaging” tab, then click “Campaigns.”
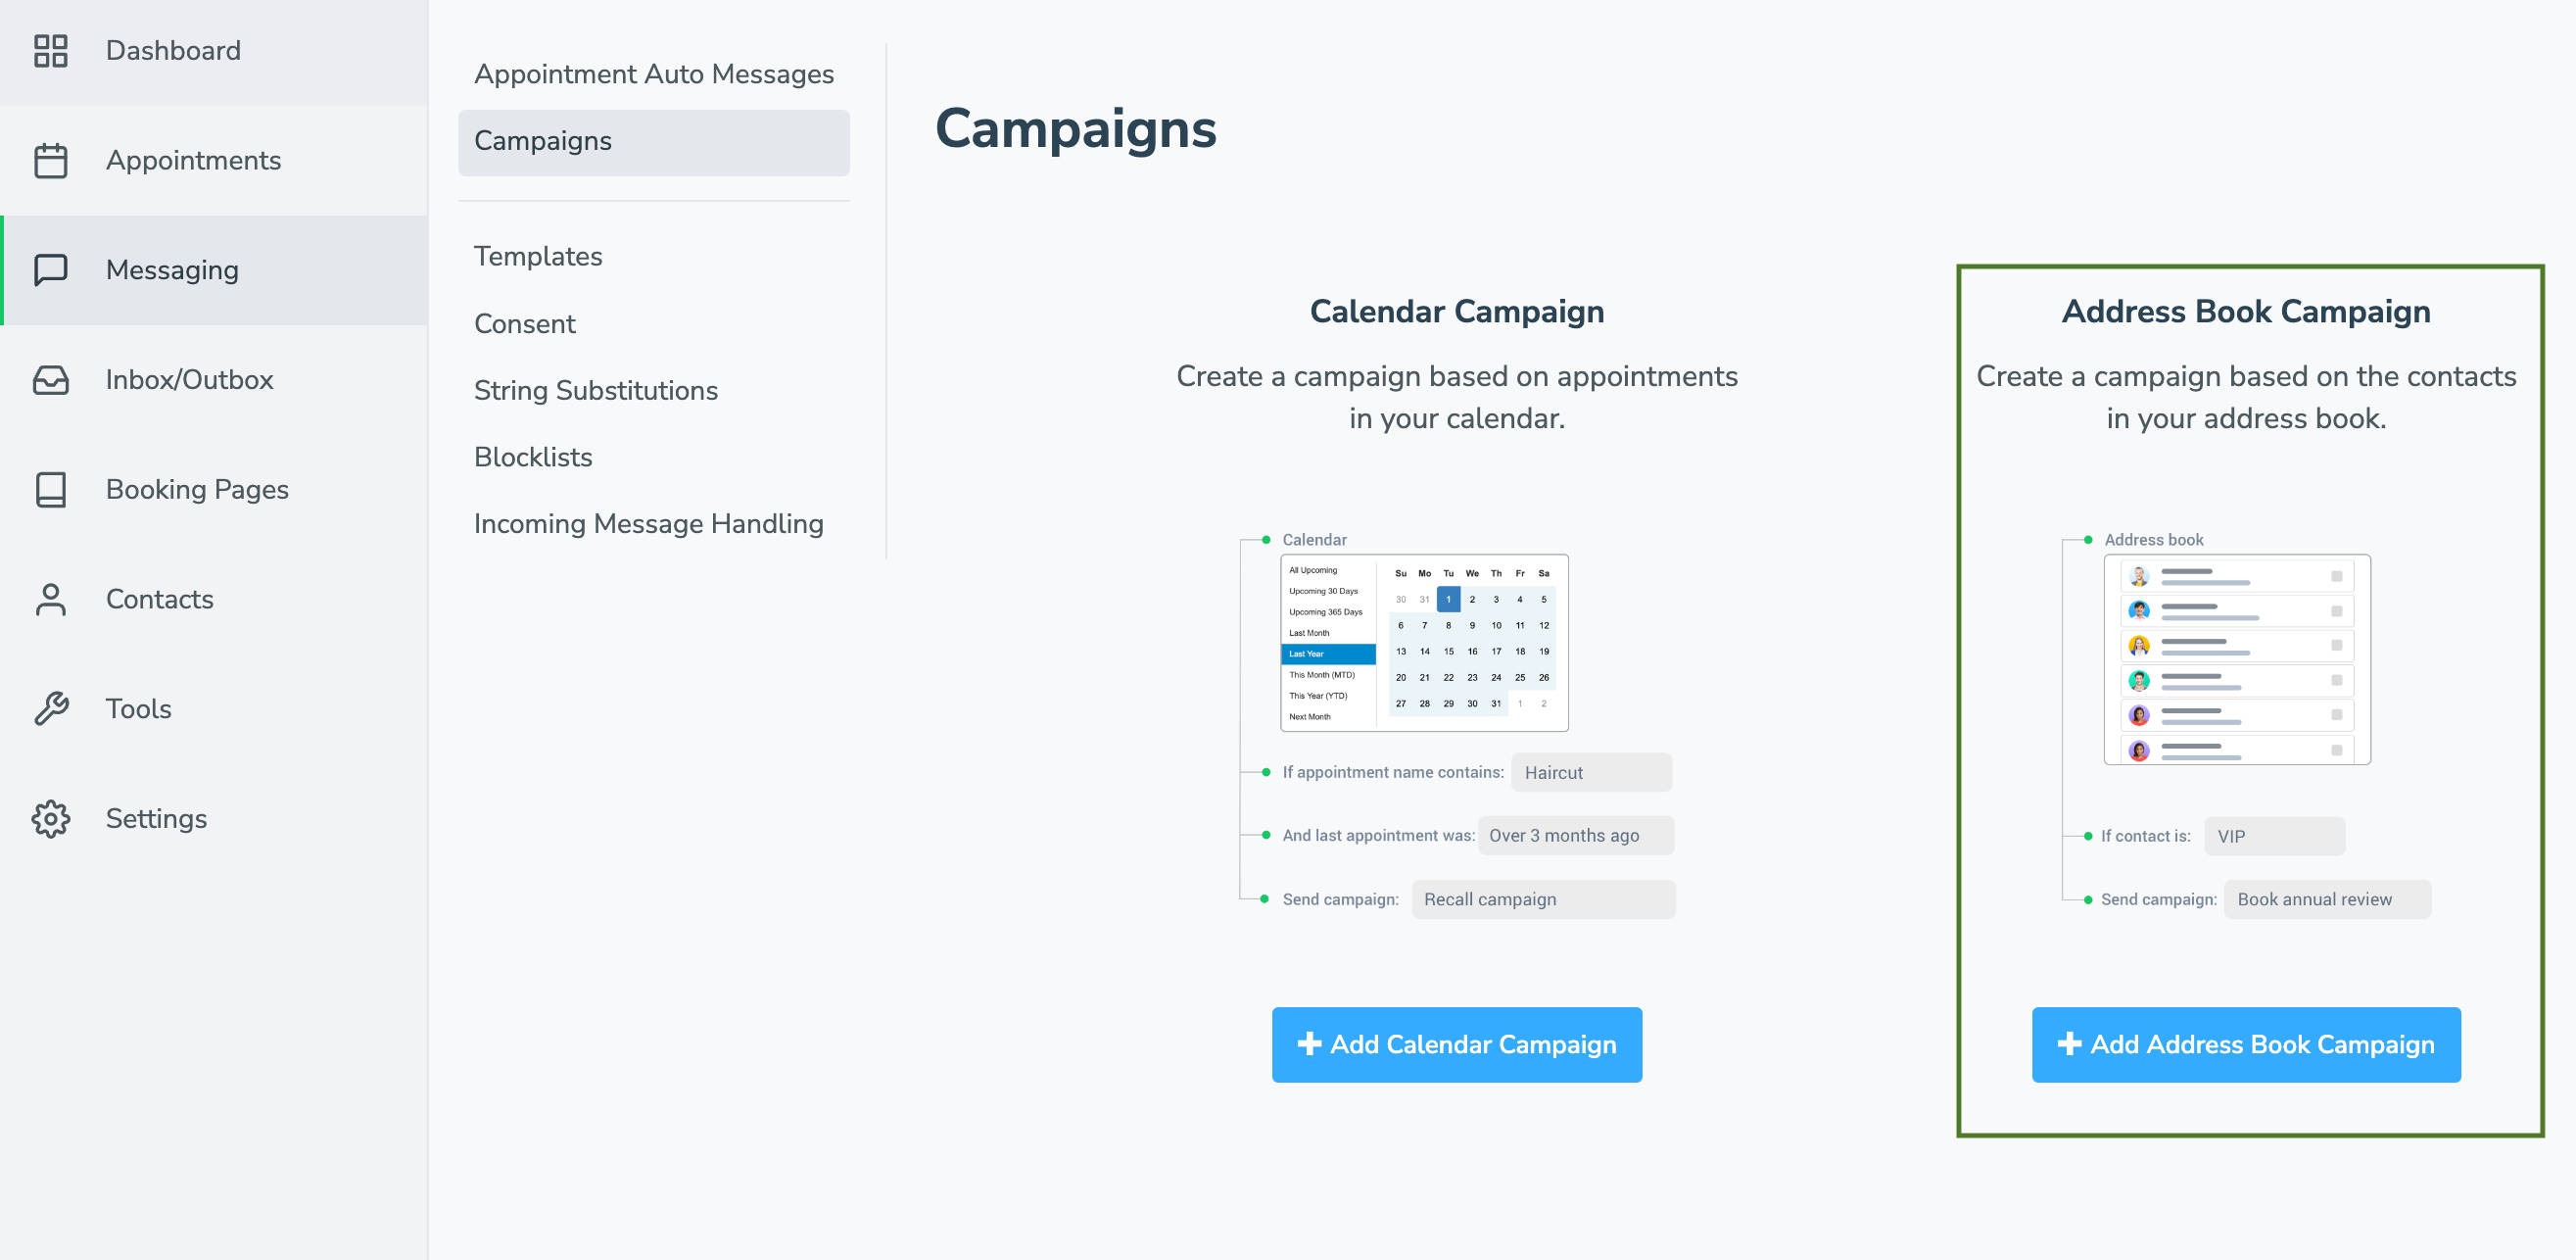
- Select “+ Add Address Book Campaign.”
- Select the “Standard Booking Campaign” template
- Under “Address Book,” select the “Address Book” that houses all your target webinar contacts.
- Leave the Goal as “Ask Clients to Book an Appointment.”
- Set the “Booking Page” to the Webinar signup page you created in steps 9 to 16.
- Click “Create Campaign” and give it a name.
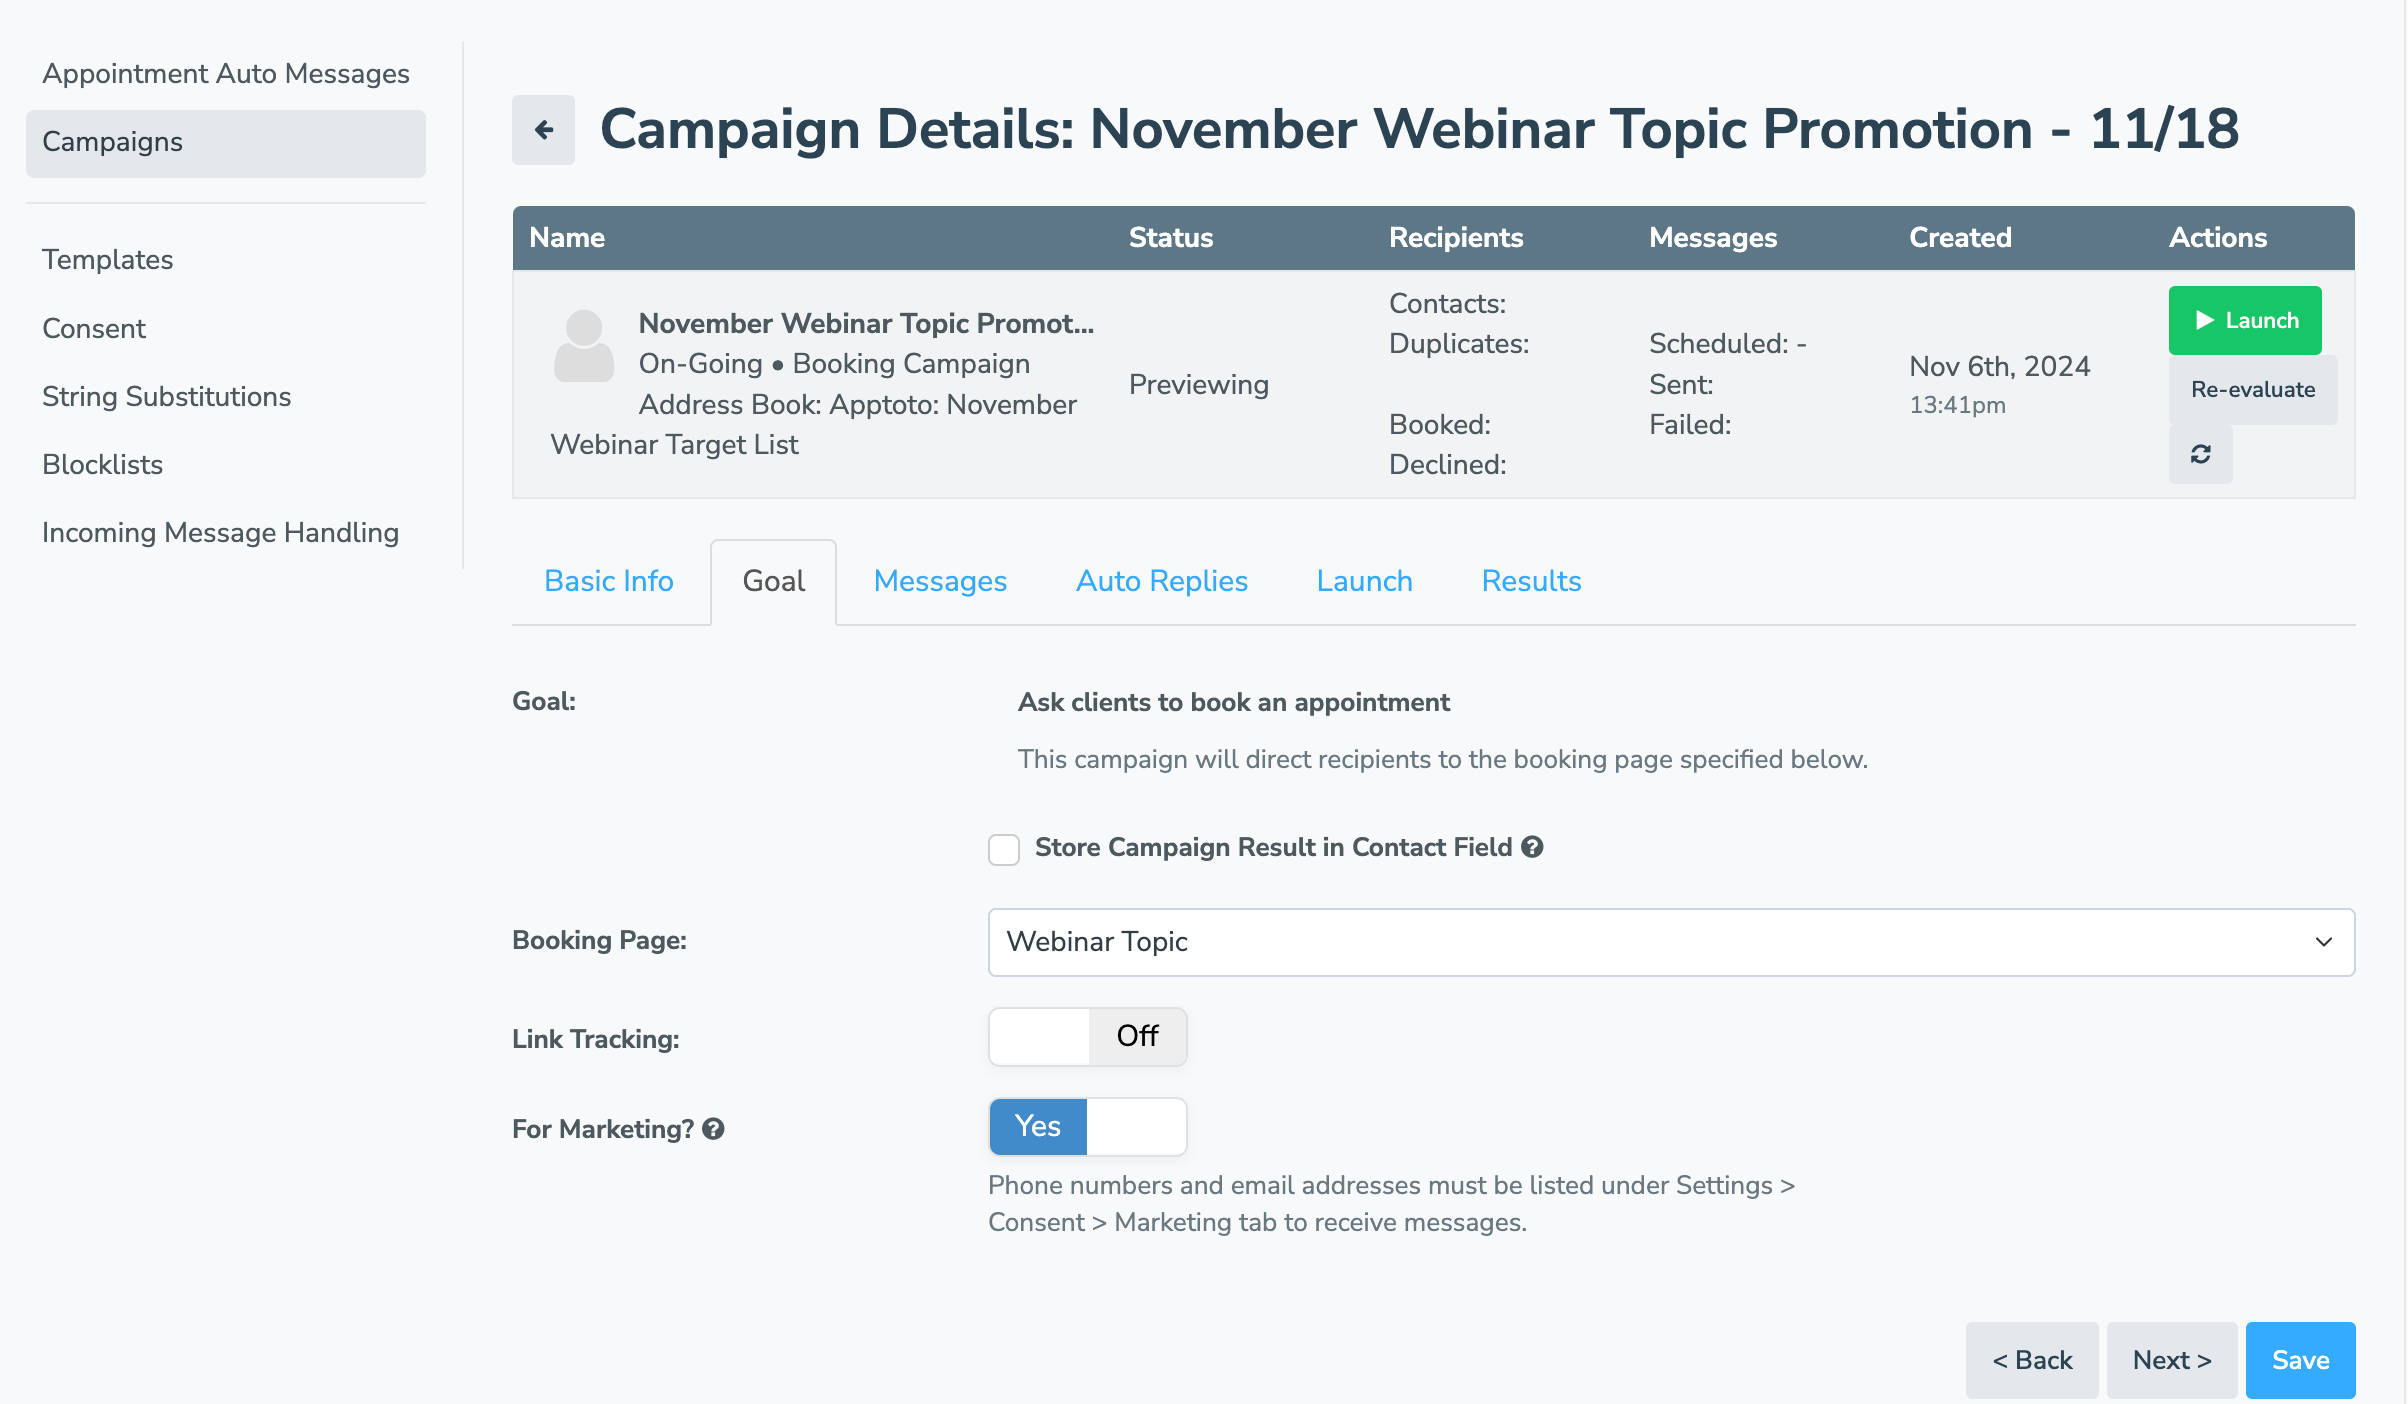
- You’ll be taken to the “Campaign Details screen.” Review the Basic Info and Goal tabs to make sure everything looks good.
- On the messages tab, choose the cadence, timing, and content of the SMS and email messages you want to send to target registrants, enticing them to sign up.
- Add or remove messages as needed.
- Make sure to include {{ campaign.booking_link }} in your email and SMS messages. Apptoto will auto-populate the field with the webinar Signup page link (see step 22)

- Use the “Auto Replies” tab to craft automated responses to your registrants if they respond to your email or SMS messages.
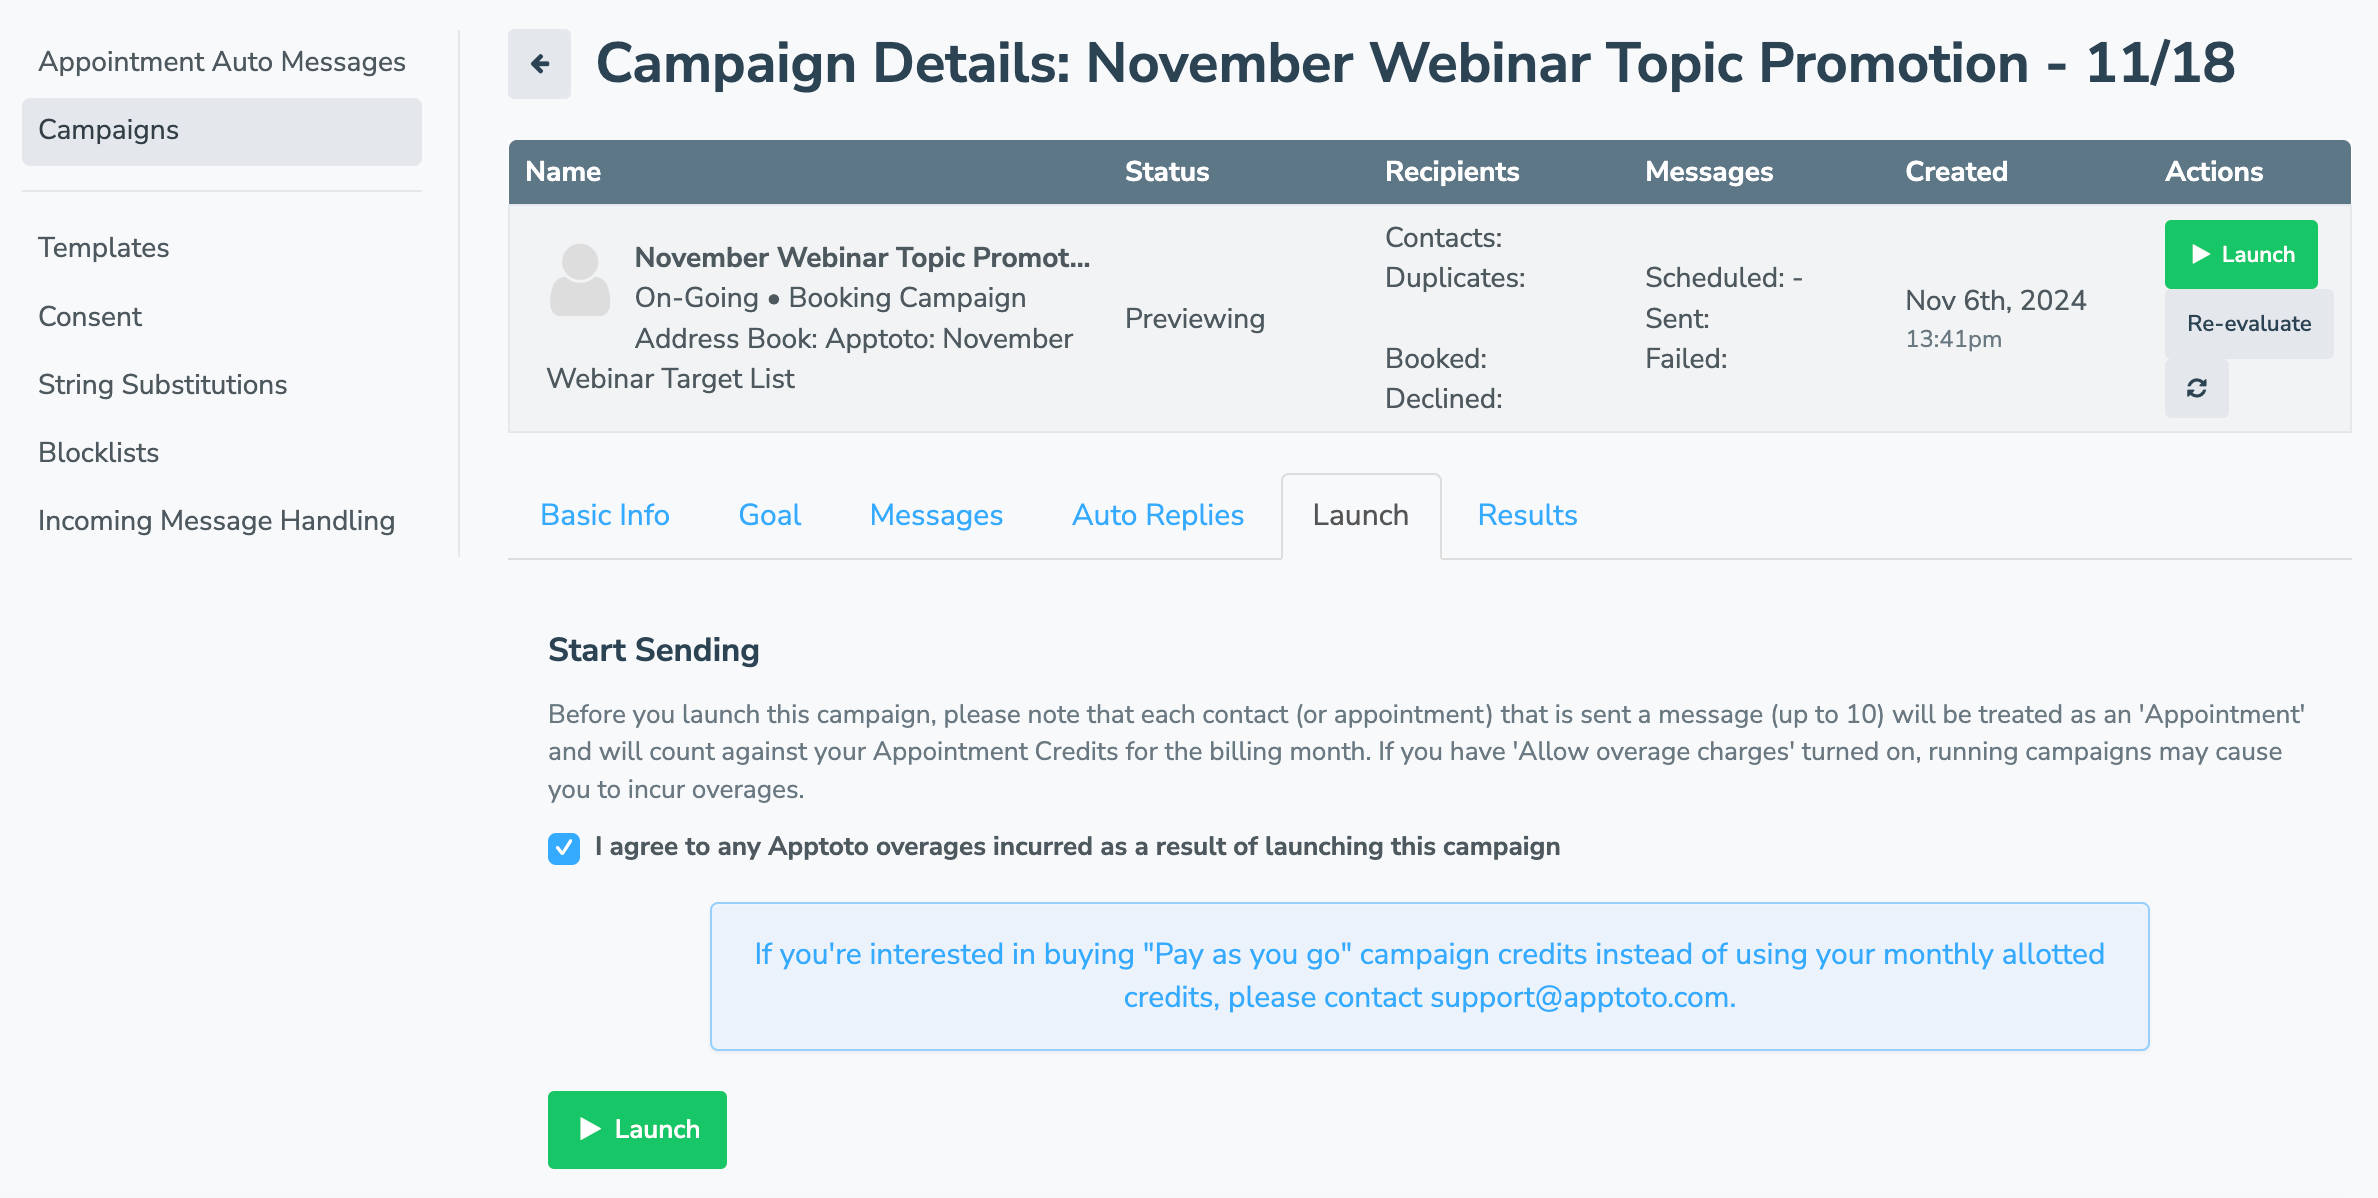
- Review all your settings to ensure they look correct.
- Click launch, and Apptoto will automatically contact your target registrants with a link to your Webinar signup page!
- PRO TIP: Once a contact from your target webinar registrants lists signs up for your webinar, Apptoto will stop sending campaign messages asking them to register automatically.
- PRO TIP: Once a contact from your target webinar registrants lists signs up for your webinar, Apptoto will stop sending campaign messages asking them to register automatically.
Setting Up Pre-Webinar Meeting Reminders for Registrants
Anyone signing up for your webinar via your signup page will automatically be added as a registrant for the event. By signing up, they’ll automatically receive the reminders below unless they opt-out.
- Navigate to the “Messages” tab and select “Appointment Auto Messages.”
- Scroll to the bottom of the “Appointment Auto Messages” tab and click “Add New Rule.”
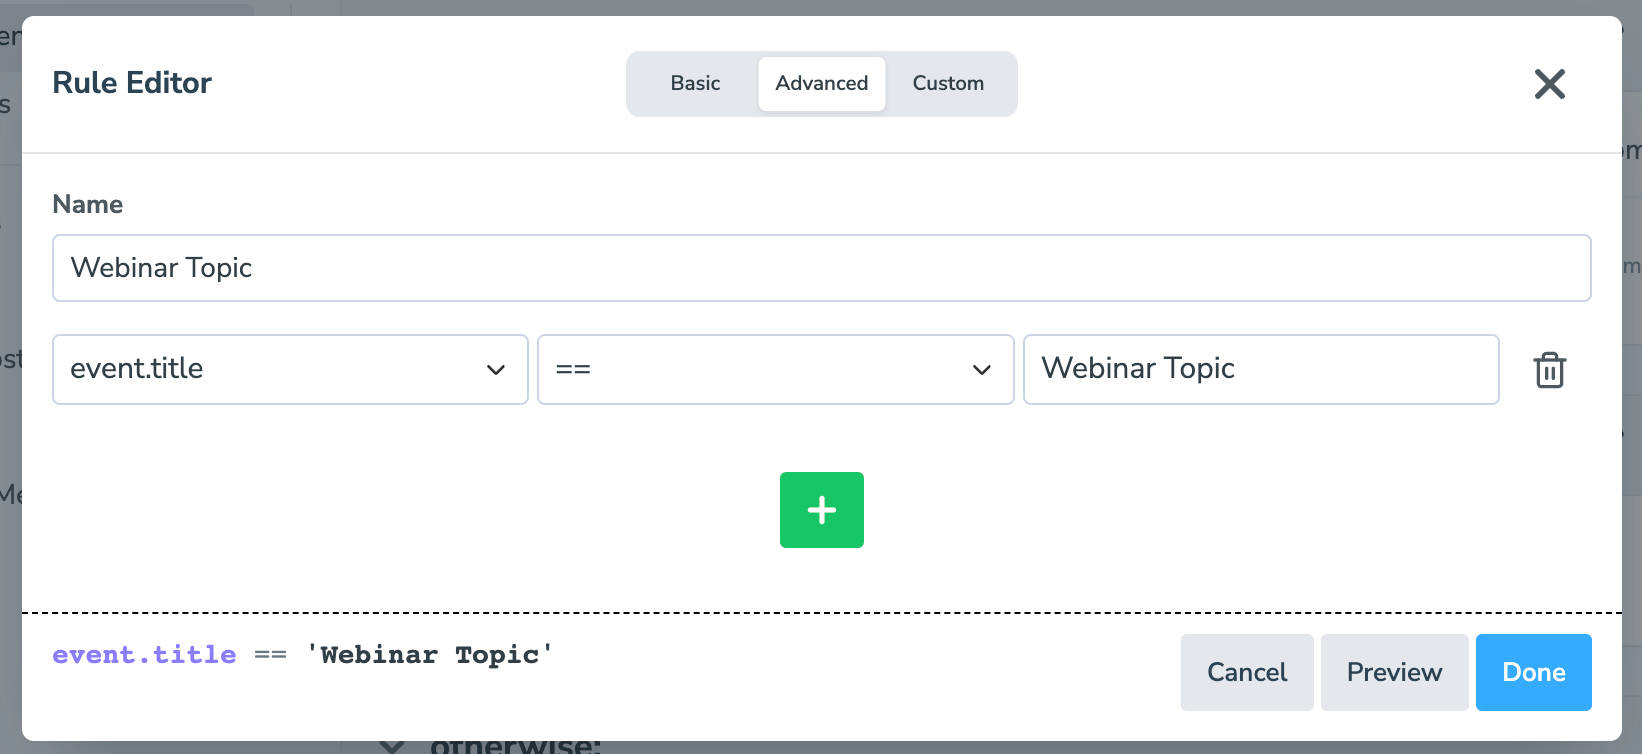
- Name your rule (we suggest the Webinar name), then set “event.title” == and add your exact event title name. Click “Done.”
- Click “+Add Message” to create reminder emails, text messages, or voice calls to remind your registrants about the upcoming webinar. Check out the “Webinar Reminder Templates” section below for reminder examples.
- PRO TIP: Send reminders seven days before the Webinar, one day before, and one hour before.
- PRO TIP: Include the virtual meeting link in your reminder emails (at a minimum)

Host Your Webinar
- Host your webinar using your virtual meeting provider. Make sure to record it so you can send it to registrants and attendees after the webinar.
Thank Attendees & Registrants
- After the webinar, remember to thank your registrants and attendees. Send an email with a link to the recording.
- To send your thank you email with Apptoto, create a new address book for your registrants and attendees (this will exclude anyone who didn’t sign up from your original promotion campaign).
- Repeat steps 17 through 27. Use a “Single Message” template in step 19. In step 21, change the goal from “Ask Clients to Book an Appointment’ to “No goal (send information messages) instead.”
- Launch!
“Webinar Promotion” Best Practices
- Don’t just promote your webinar signup page via a campaign! Advertise via newsletters, social media posts, etc. Don’t worry, though! Anyone who uses your signup page link will automatically receive webinar reminders.
- Limit the number of form fields you collect from registrants (step 15C) to only the most vital information. Too many fields = lower registration rate.
- When you send your thank you email, segment your registrants into two lists: attendees and registrants (who did not attend). This will allow you to personalize your messaging and call-to-action for each.
- To extend the usefulness of your webinar, repurpose it into blog posts, social media posts, and videos.
- And, of course, keep engaging your registrants and attendees after the event!
Webinar Reminder Templates
Text Messages:
7 Days Out:
- “Hey {First Name}! Just a reminder that our webinar, {Webinar Title}, is coming up in one week. Can’t wait to see you there!”
- “Quick heads-up: Your spot for {Webinar Title} on {Date} at {Time + Timezone} is confirmed! We’re covering {Topic/Benefit}—don’t miss it!”
- “Countdown alert! 📅 You’re registered for our {Webinar Title} webinar in 7 days. Get ready to learn all about {Topic}.
1 Day Out:
- “Tomorrow’s the day! {Webinar Title} is happening at {Time}. Here’s the link to the webinar session {Webinar URL}—see you there!”
- “Excited for tomorrow? 🙌 Just a reminder that {Webinar Title} is at {Time}. Have questions ready, and we’ll cover them live! {Webinar URL}”
- “24 hours to go! Join us for {Webinar Title} at {Time} tomorrow. Can’t wait to dive into {Topic/Benefit} with you! {Webinar URL}”
1 Hour Out:
- “We’re live in one hour! 🎉 Join us for {Webinar Title} at {Webinar URL}. Grab your favorite beverage, and we will see you soon!”
- “1-hour countdown! Ready for {Webinar Title}? Join us at {Webinar URL} to get started. Let’s make it an insightful session!”
- “It’s almost time! ⏰ We’re starting {Webinar Title} in just under an hour. Click {Webinar URL} when you’re ready to join!
Email:
Subject: {Remaining time before webinar} to Go: {Webinar Title}
Body:
Hi {Name},
{Webinar Title} starts in just {remaining time before webinar}. This will be a packed session full of awesome insights on {topic} such as:
- Topic/Key Takeaway 1
- Topic/Key Takeaway 2
- Topic/Key Takeaway 3
All you need to do is click {Call to Action} below to join us on the webinar at {Date} + {Time + Timezone}.
Need help joining the live webinar? Check out our troubleshooting guide here {link to FAQ}. Unable to make it? We’ll send out a recording of the webinar after the event!
See you soon!
{Your Name}
{Your Company}
Hosting a Successful Webinar that Drives Business
Hosting a webinar that captivates your audience and drives engagement isn’t just about presenting great content; it’s about creating a flawless experience from start to finish.
You can increase attendance, maximize impact, and keep participants engaged even after the event ends by automating key steps–from registration to reminders to follow-up. Plus, with the right tools, each webinar can become a valuable asset that continues to educate, connect, and convert long after it’s over. Remember, successful webinars don’t just happen—they’re strategically crafted with your audience’s experience in mind.
Ready to take your webinars to the next level? With Apptoto, you can attract more attendees and drive better results with our step-by-step automation recipe. Try it out and see how simple it can be to host impactful webinars that build lasting connections!
P.S. If you haven’t already done so, check out our “Adding Appointments to Client’s Calendars” recipe and let us know what automation you’d like us to cover next!
