Estimated reading time: 12 minutes
Finding the perfect appointment should be easy for your clients—but managing it all behind the scenes? That’s a whole different story.
If you’re here, chances are you offer a variety of appointment types on different days or at different times—maybe one appointment is offered Monday through Wednesday. Another appointment type is available daily but only from 9 AM to noon. And just to keep things interesting, some of your team members are on different schedules, too.
So, how do you simplify booking for your clients without overbooking or creating scheduling chaos? With Apptoto, you can link multiple booking pages together, each with a custom schedule, to create a centralized booking experience that’s simple for clients to navigate. You set individual schedules for each appointment type while guiding clients to the right page based on their needs—all without losing flexibility or control.
In this Automation Recipe, you’ll learn how to connect multiple booking pages to streamline appointment scheduling and ensure every client finds the right appointment without extra hassle.
What This Automation Does
- Create individual booking pages for different appointment types
- Link multiple booking pages to a central page
- Control each appointment type’s availability to avoid conflicts
- Automate custom confirmation messages and reminders
Industries That Benefit From Multi-Step Booking Pages with Custom Schedules
Best for:
- Wellness and Beauty Studios: Differentiate booking pages for massages, facials, and hair treatments, each with unique staff and availability.
- Healthcare Providers: Manage specialized services like general checkups, physical therapy, and telehealth consultations.
- Educational Institutions: Set separate schedules for tutoring sessions, group classes, and private coaching.
- Home Service Providers: Divide bookings into plumbing, electrical, and HVAC services with distinct time slots.
- Event Planners: Simplify consultation, venue tour, and day-of-event scheduling.
- Fitness Centers: Manage bookings for group classes, personal training, and equipment rentals with separate pages.
What You’ll Need
- An Apptoto account
- A list of when each appointment type is offered
- Optional: Individual team member calendars if staff don’t all offer the same services
Instructions
Creating Your First Appointment Type Booking Page
- Navigate to the Booking Pages tab.
- Create your first booking page by clicking “Add Booking Page.” Then, select “+Add Availability Page.”
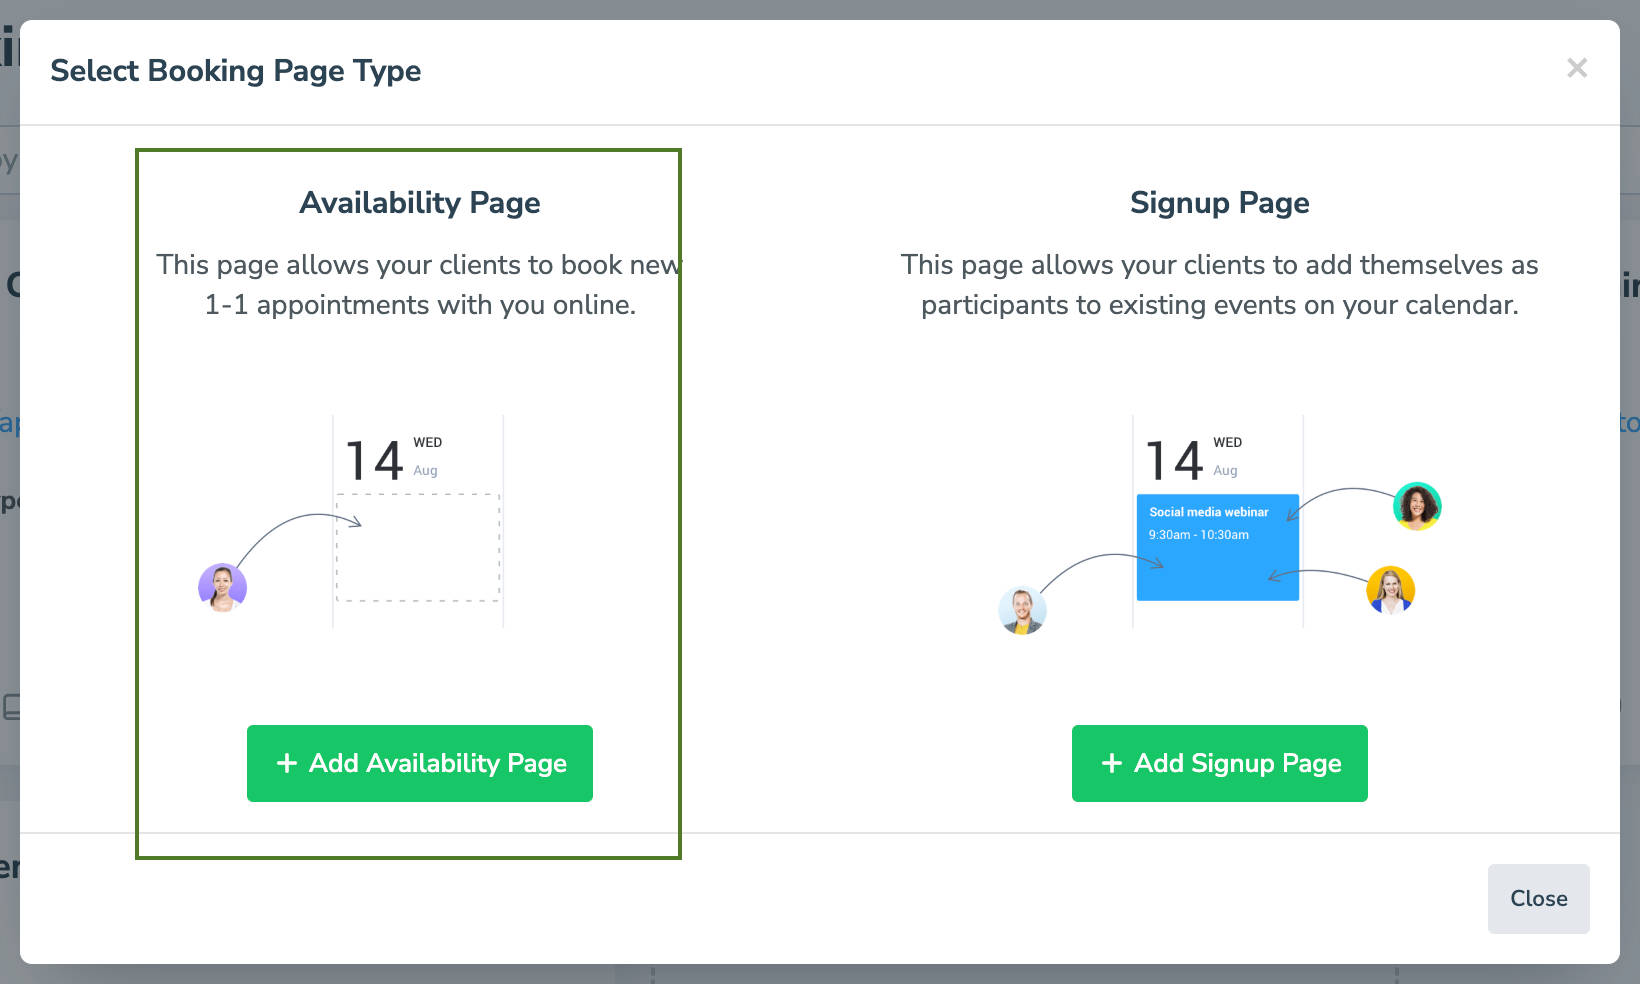
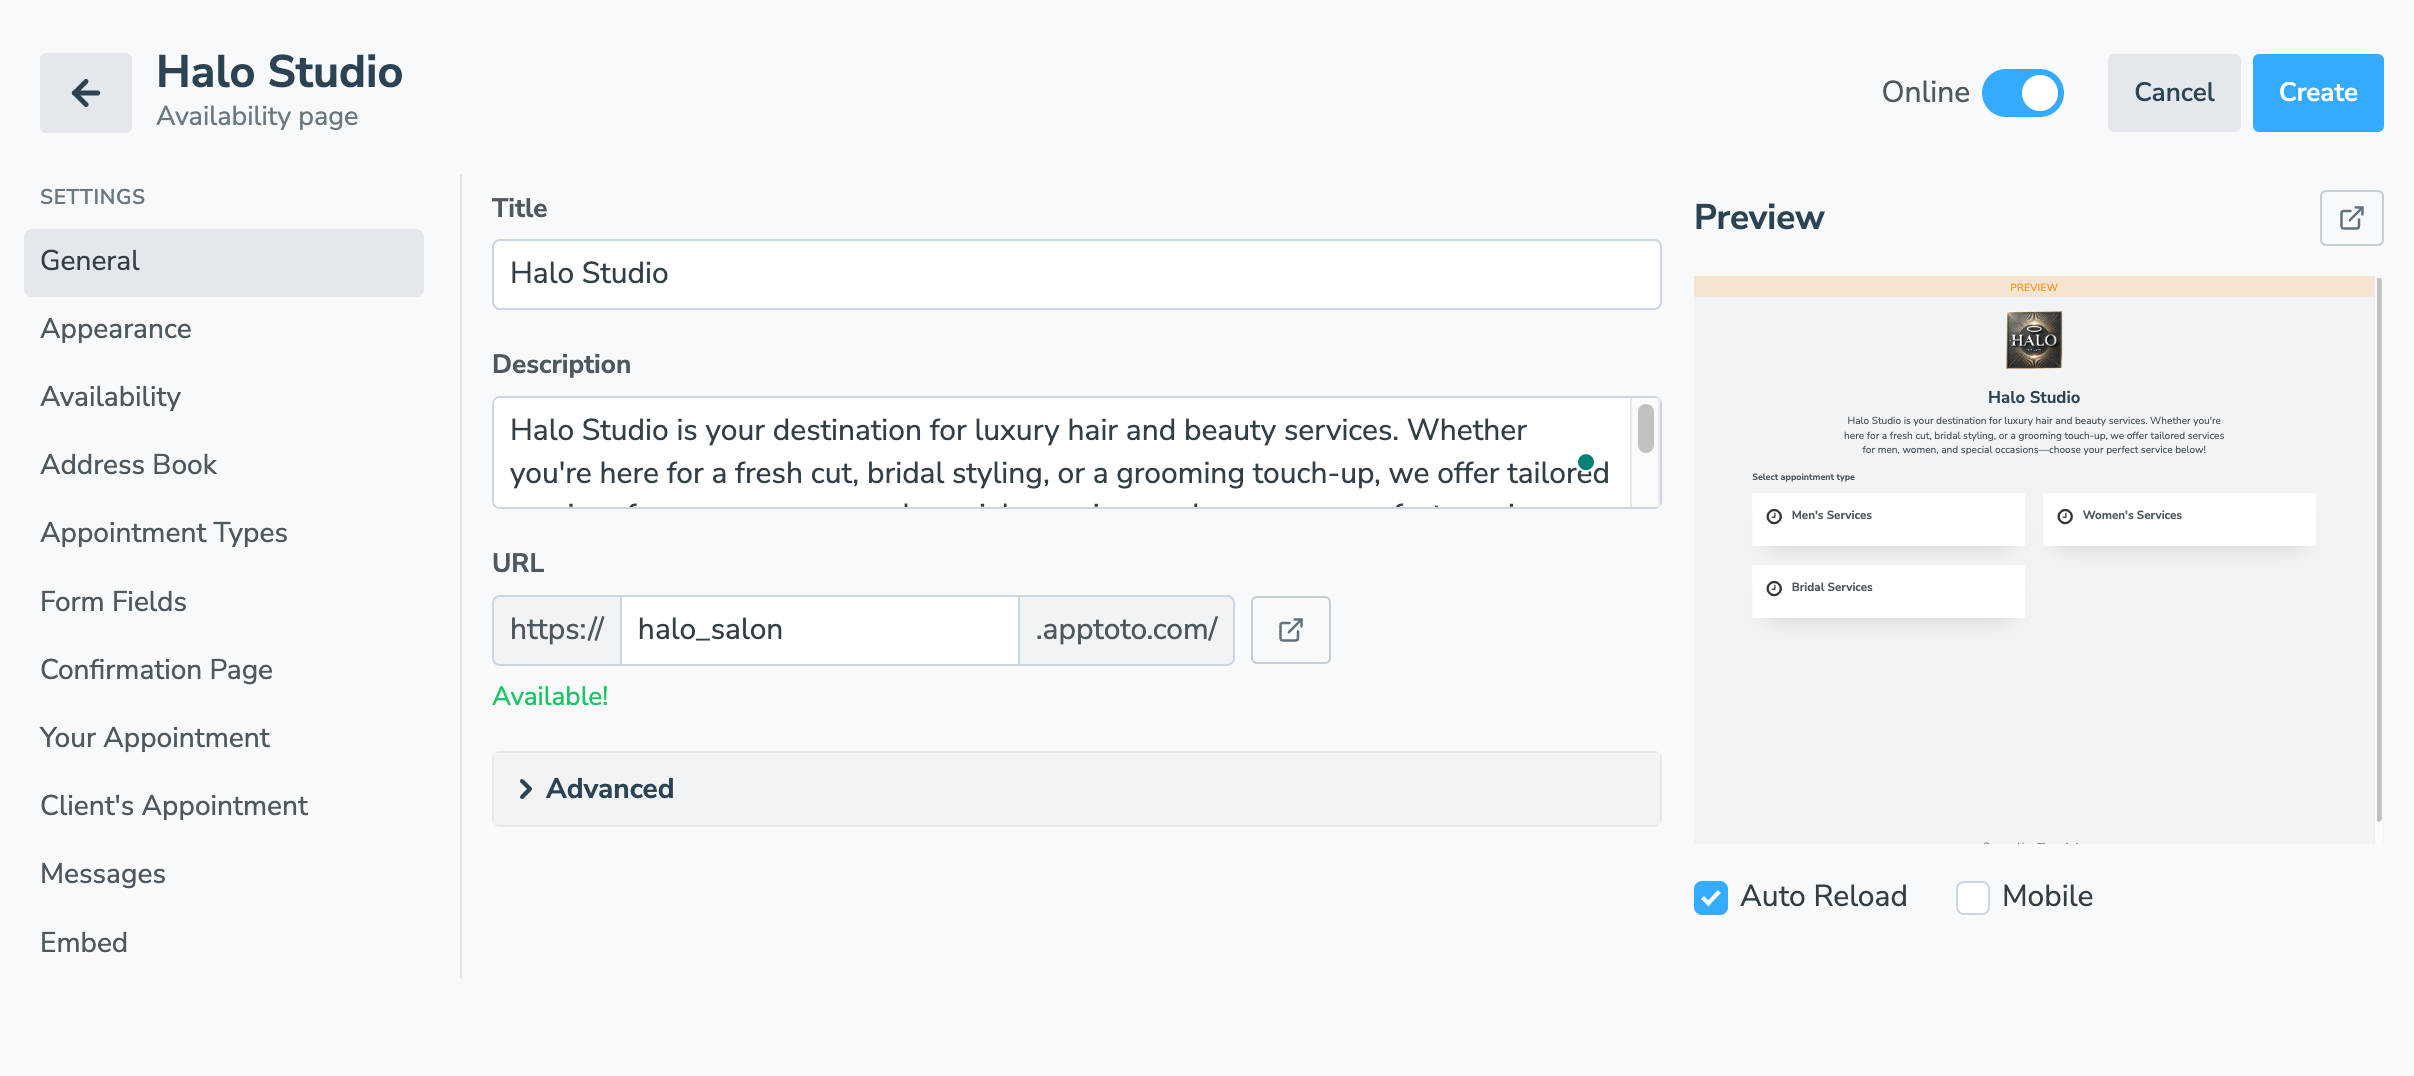
- Add your booking page title, description, and URL for the first appointment type you want to create a custom page for.
- Important: Emphasize the appointment name/type in the title, description, and/or URL to make it clear to the client what appointment type they’re booking.

Setting Custom Schedules for Your First Appointment Type Booking Page
- Navigate to the Availability tab.
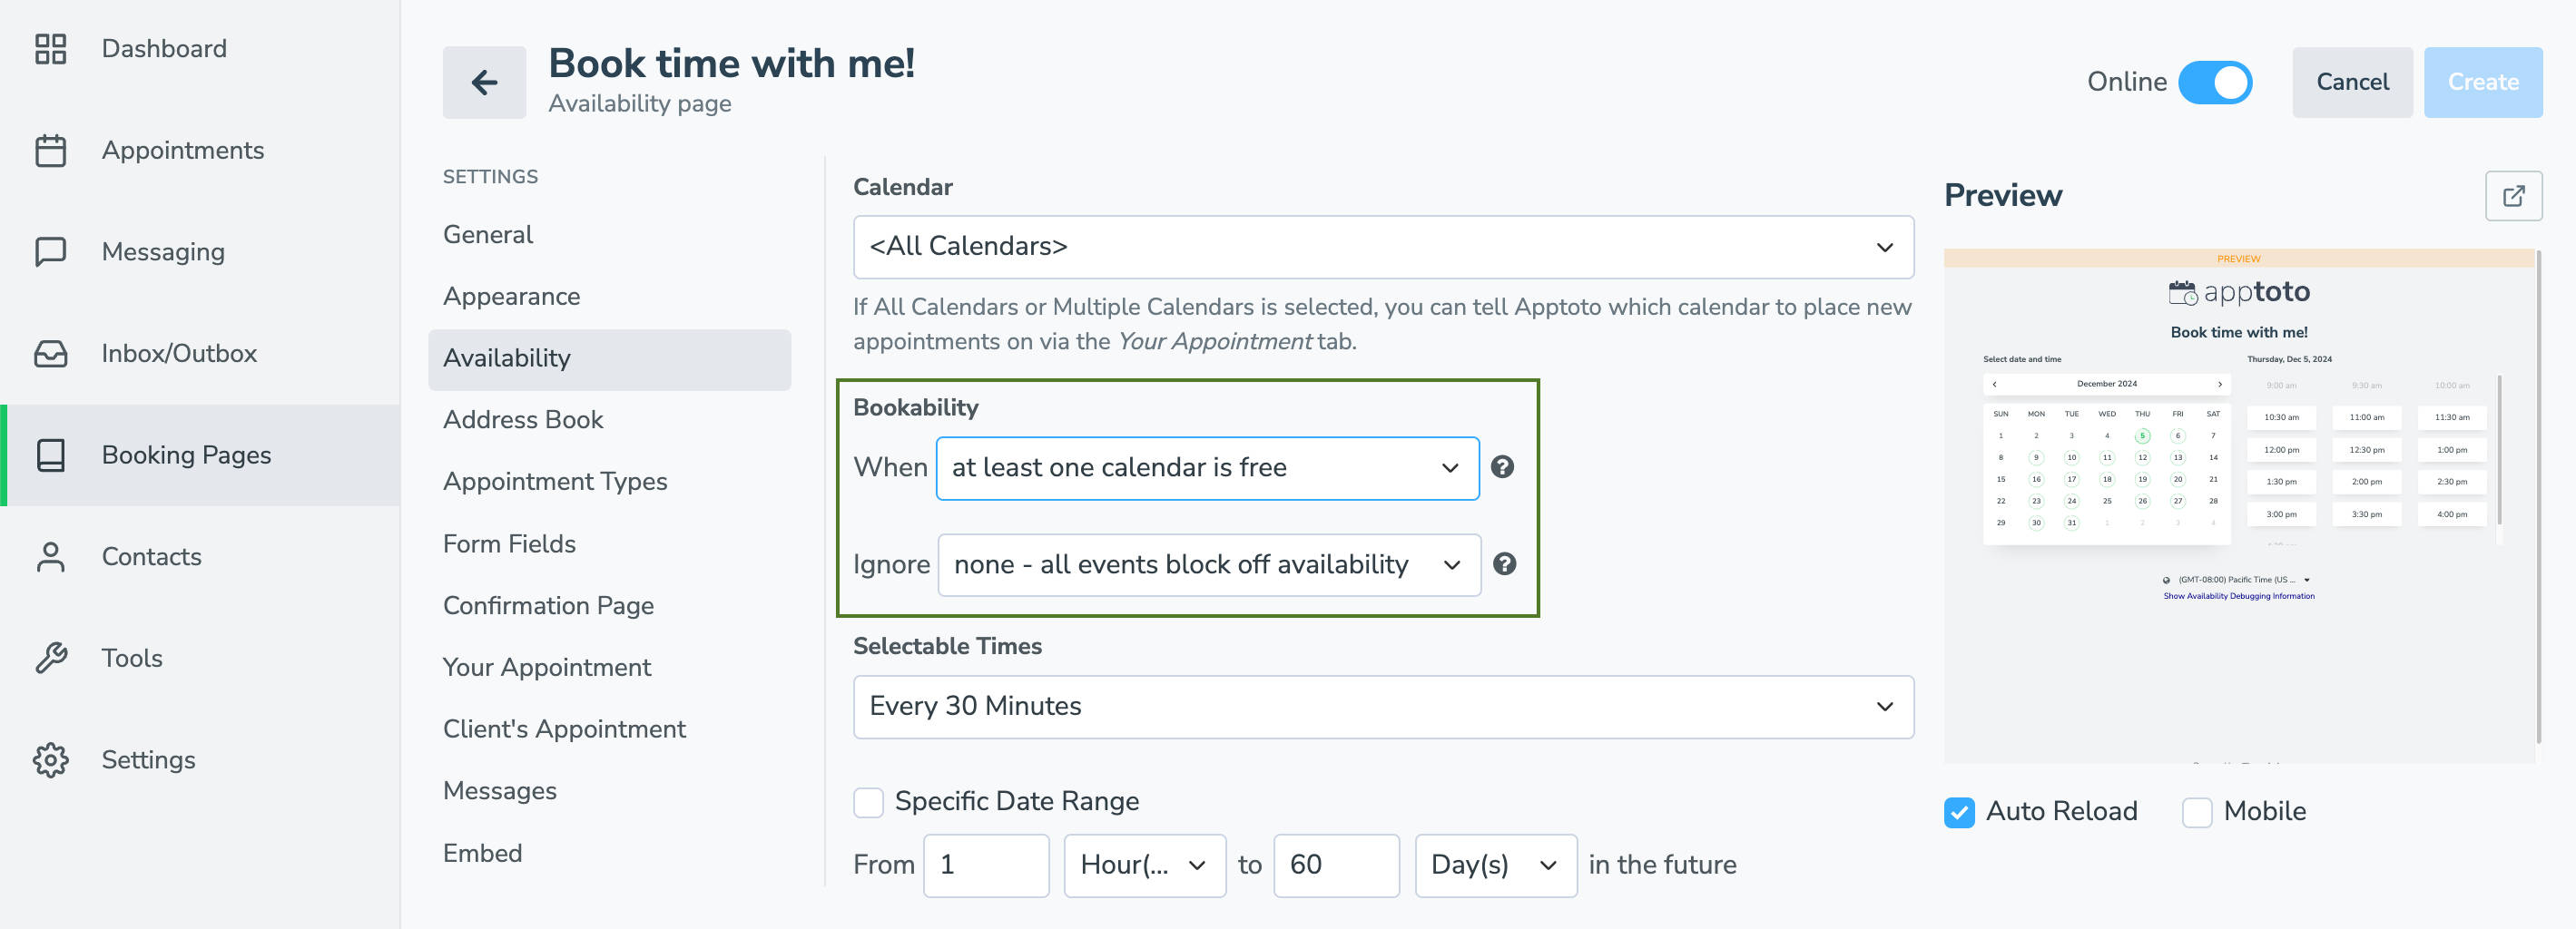
- Use the Calendar dropdown to choose which calendars Apptoto will look at to determine if there are available appointment slots.
- You can sync one calendar, “<All Calendars>”, or “<Multiple Calendars>” (which allows you to select specific calendars you want Apptoto to check for availability)
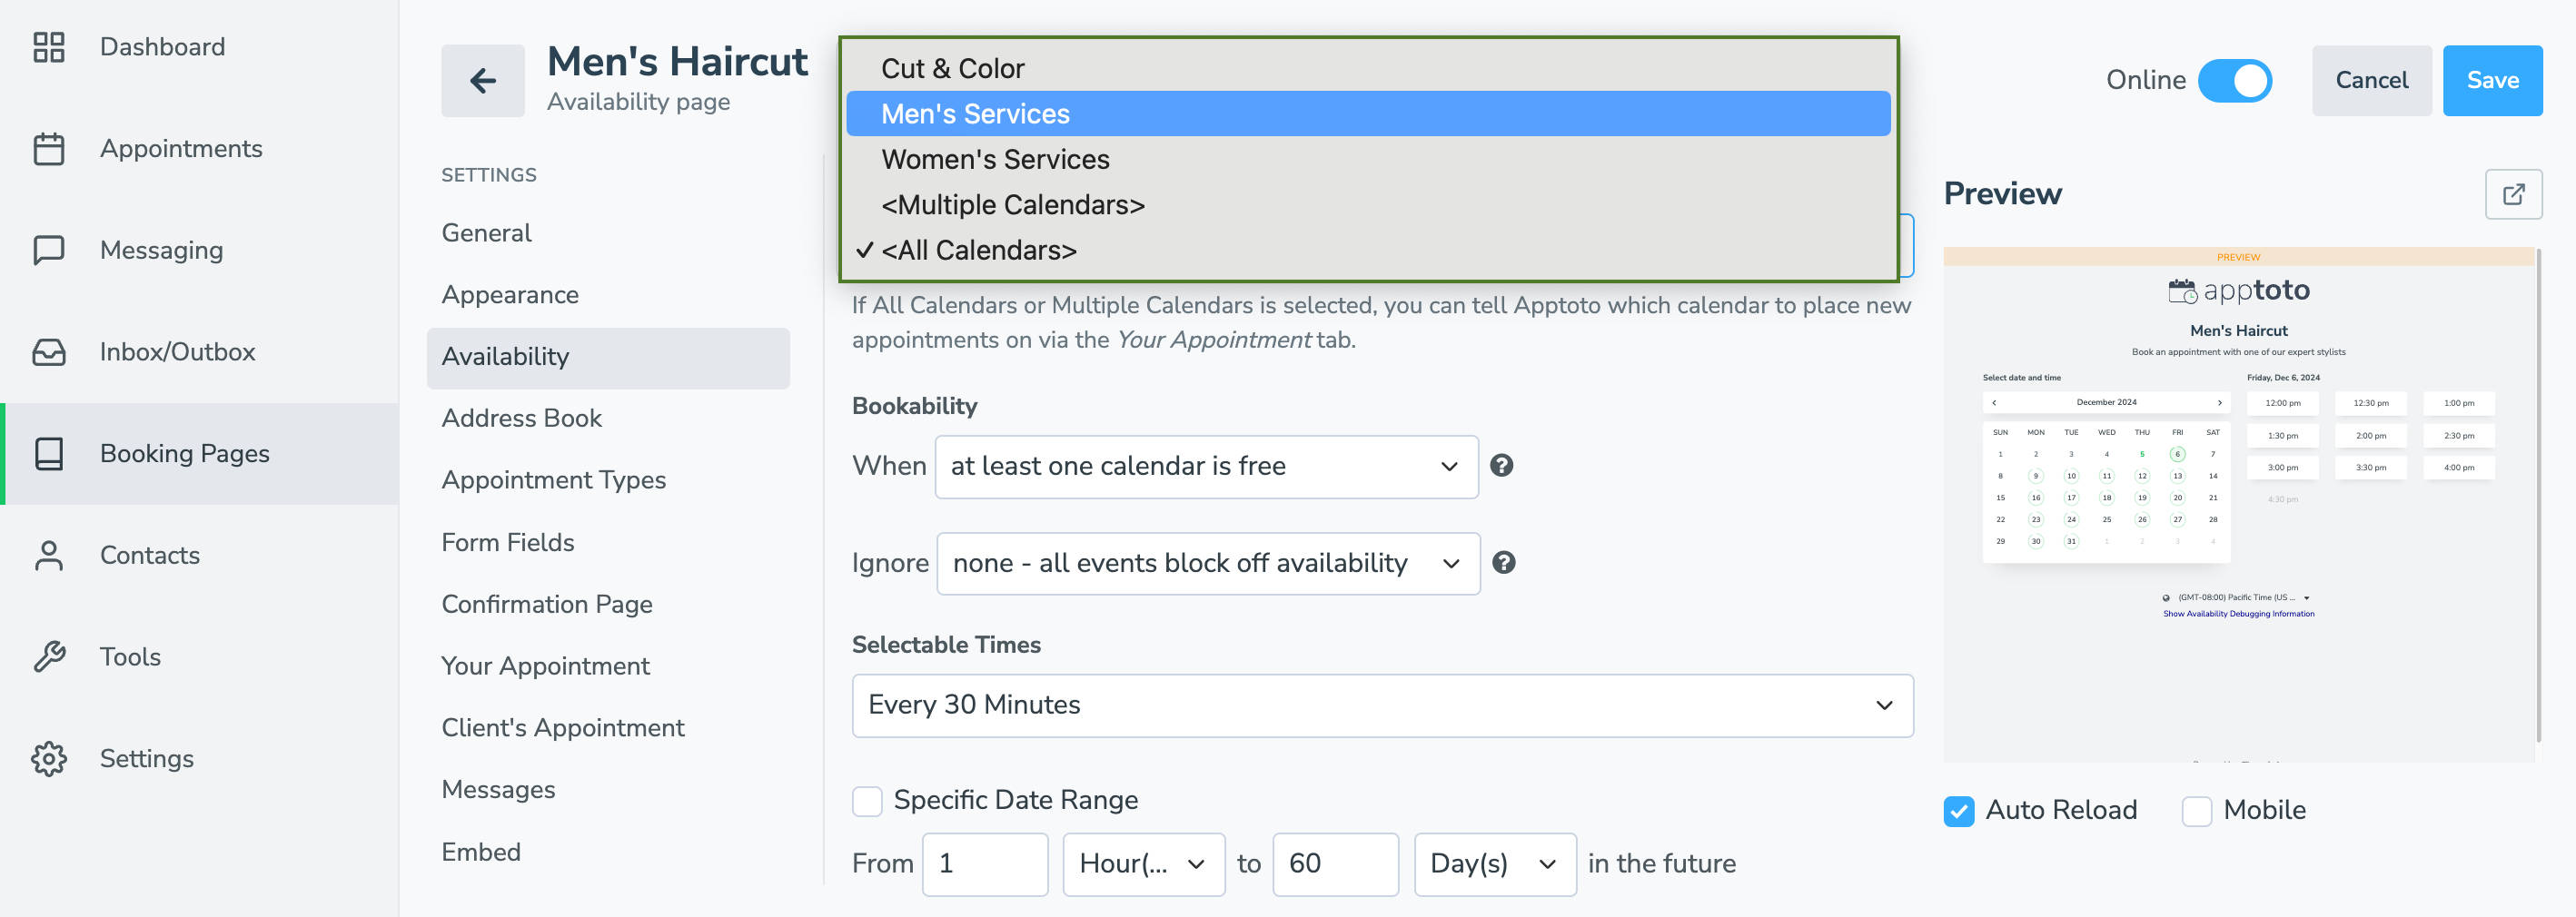
- You can sync one calendar, “<All Calendars>”, or “<Multiple Calendars>” (which allows you to select specific calendars you want Apptoto to check for availability)
- Set Bookability settings.
- Bookability settings determine when available appointment times will be shown on your booking page and can be highly customized.
- You can set your booking pages only to show appointments WHEN some or all synced calendars are free, or appointments have specific titles or conditions.
- Similarly, you can tell Apptoto to IGNORE certain appointments and show availability during that time if they meet certain criteria (i.e., title of “lunch break” or “email catchup”).
- Bookability settings determine when available appointment times will be shown on your booking page and can be highly customized.
- Using the Selectable Times section, set how frequently you want to set appointment start times and the date range you want to book appointments out for.
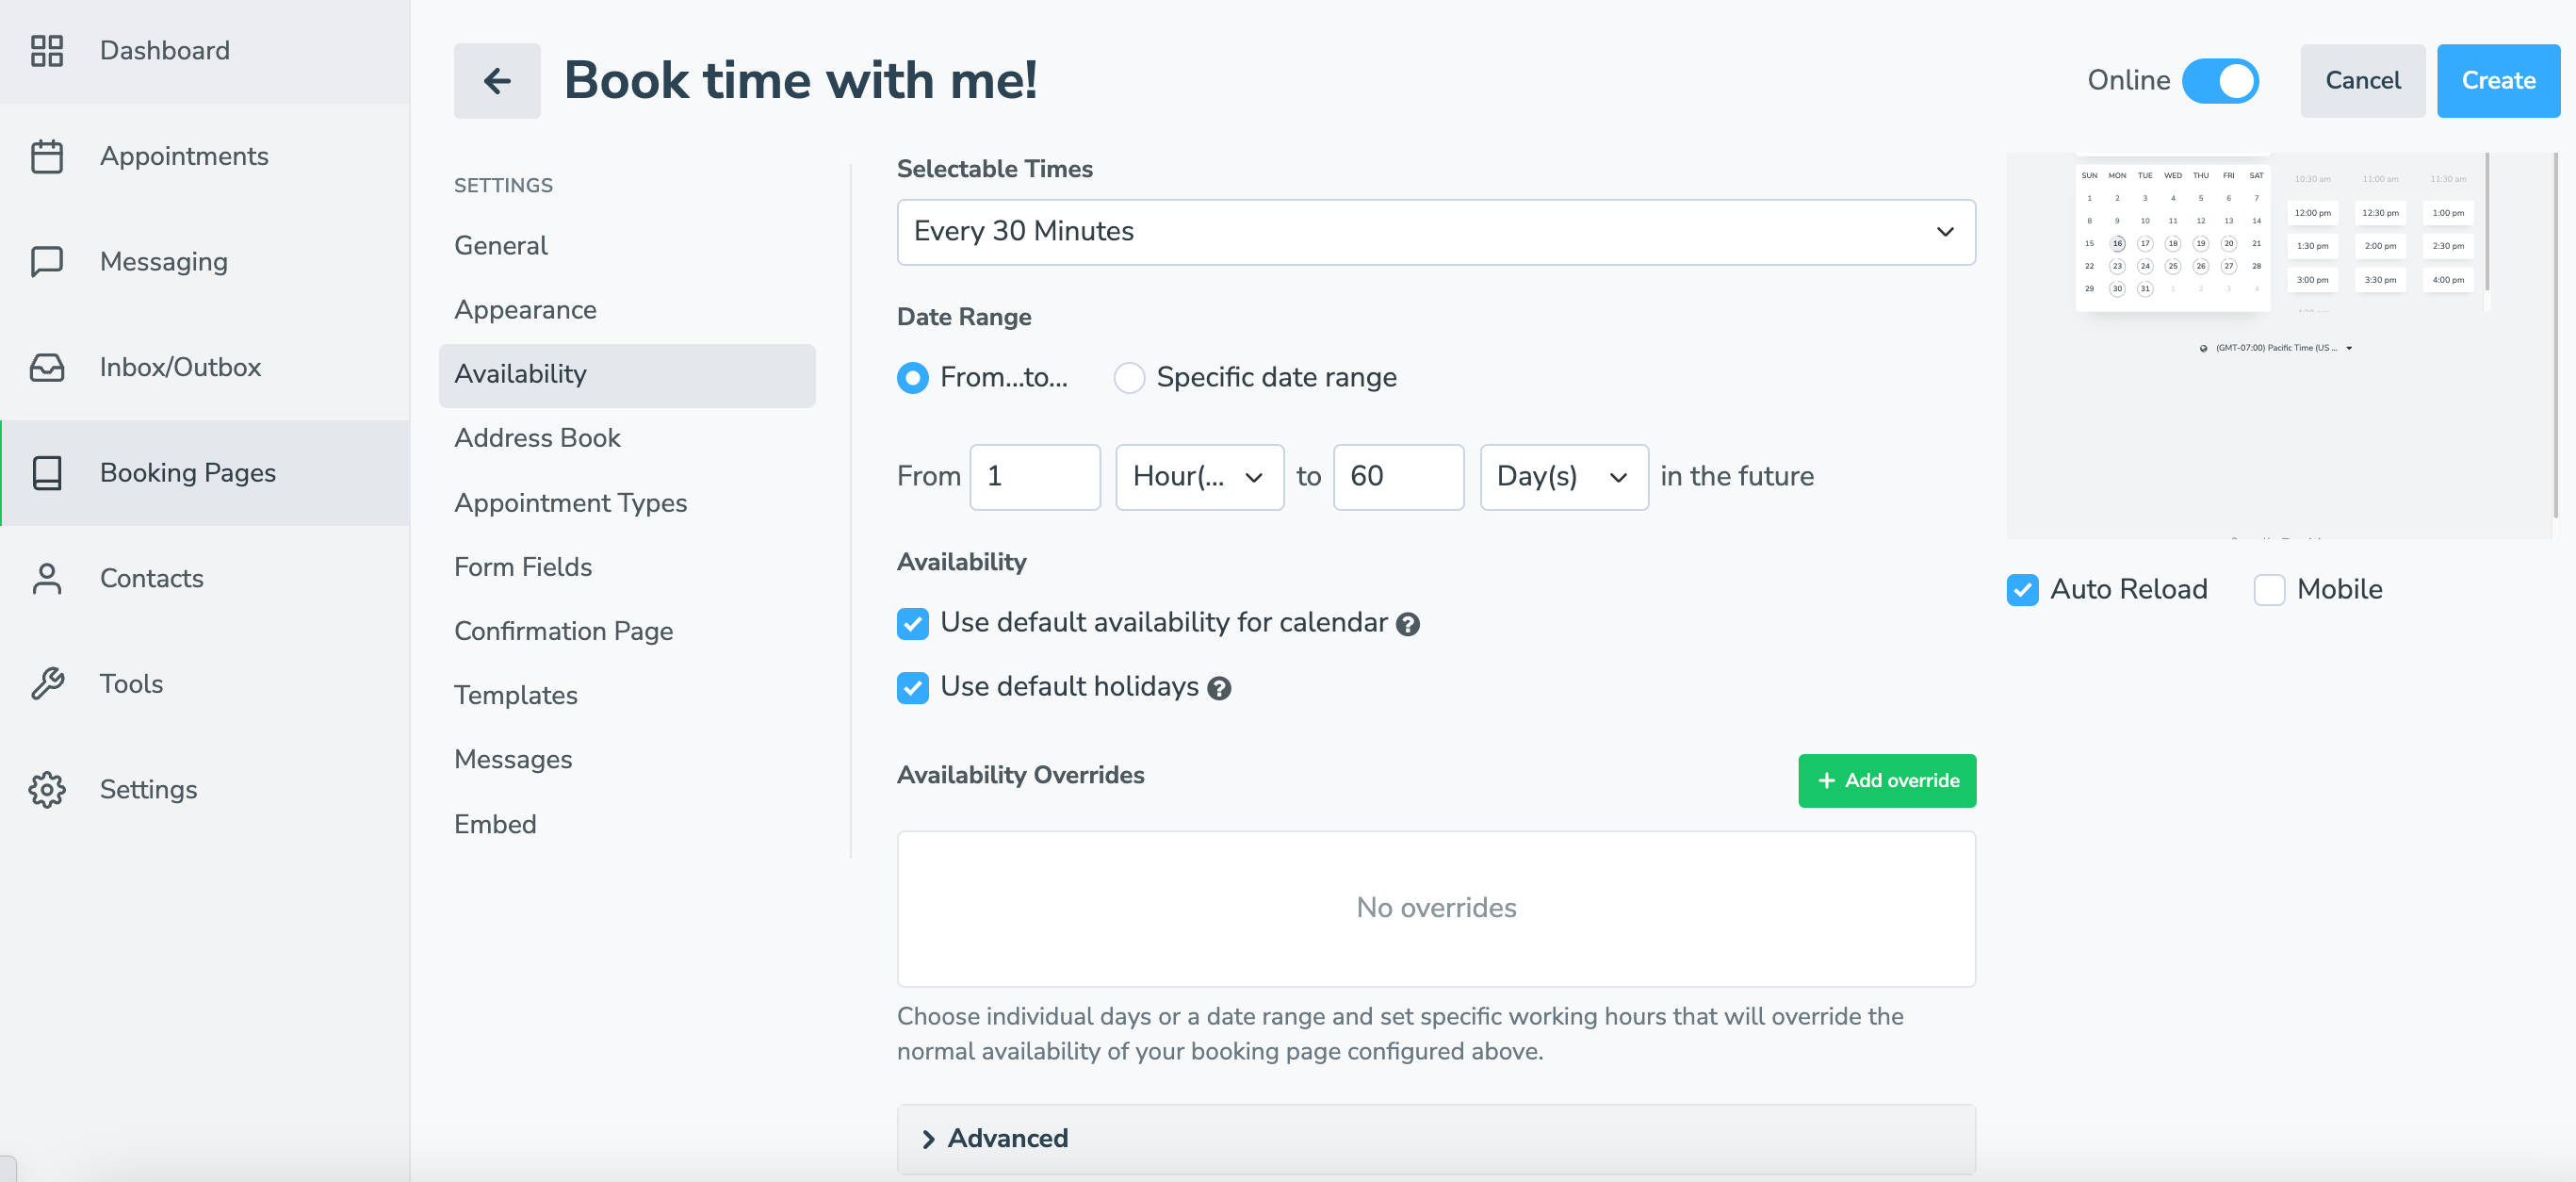
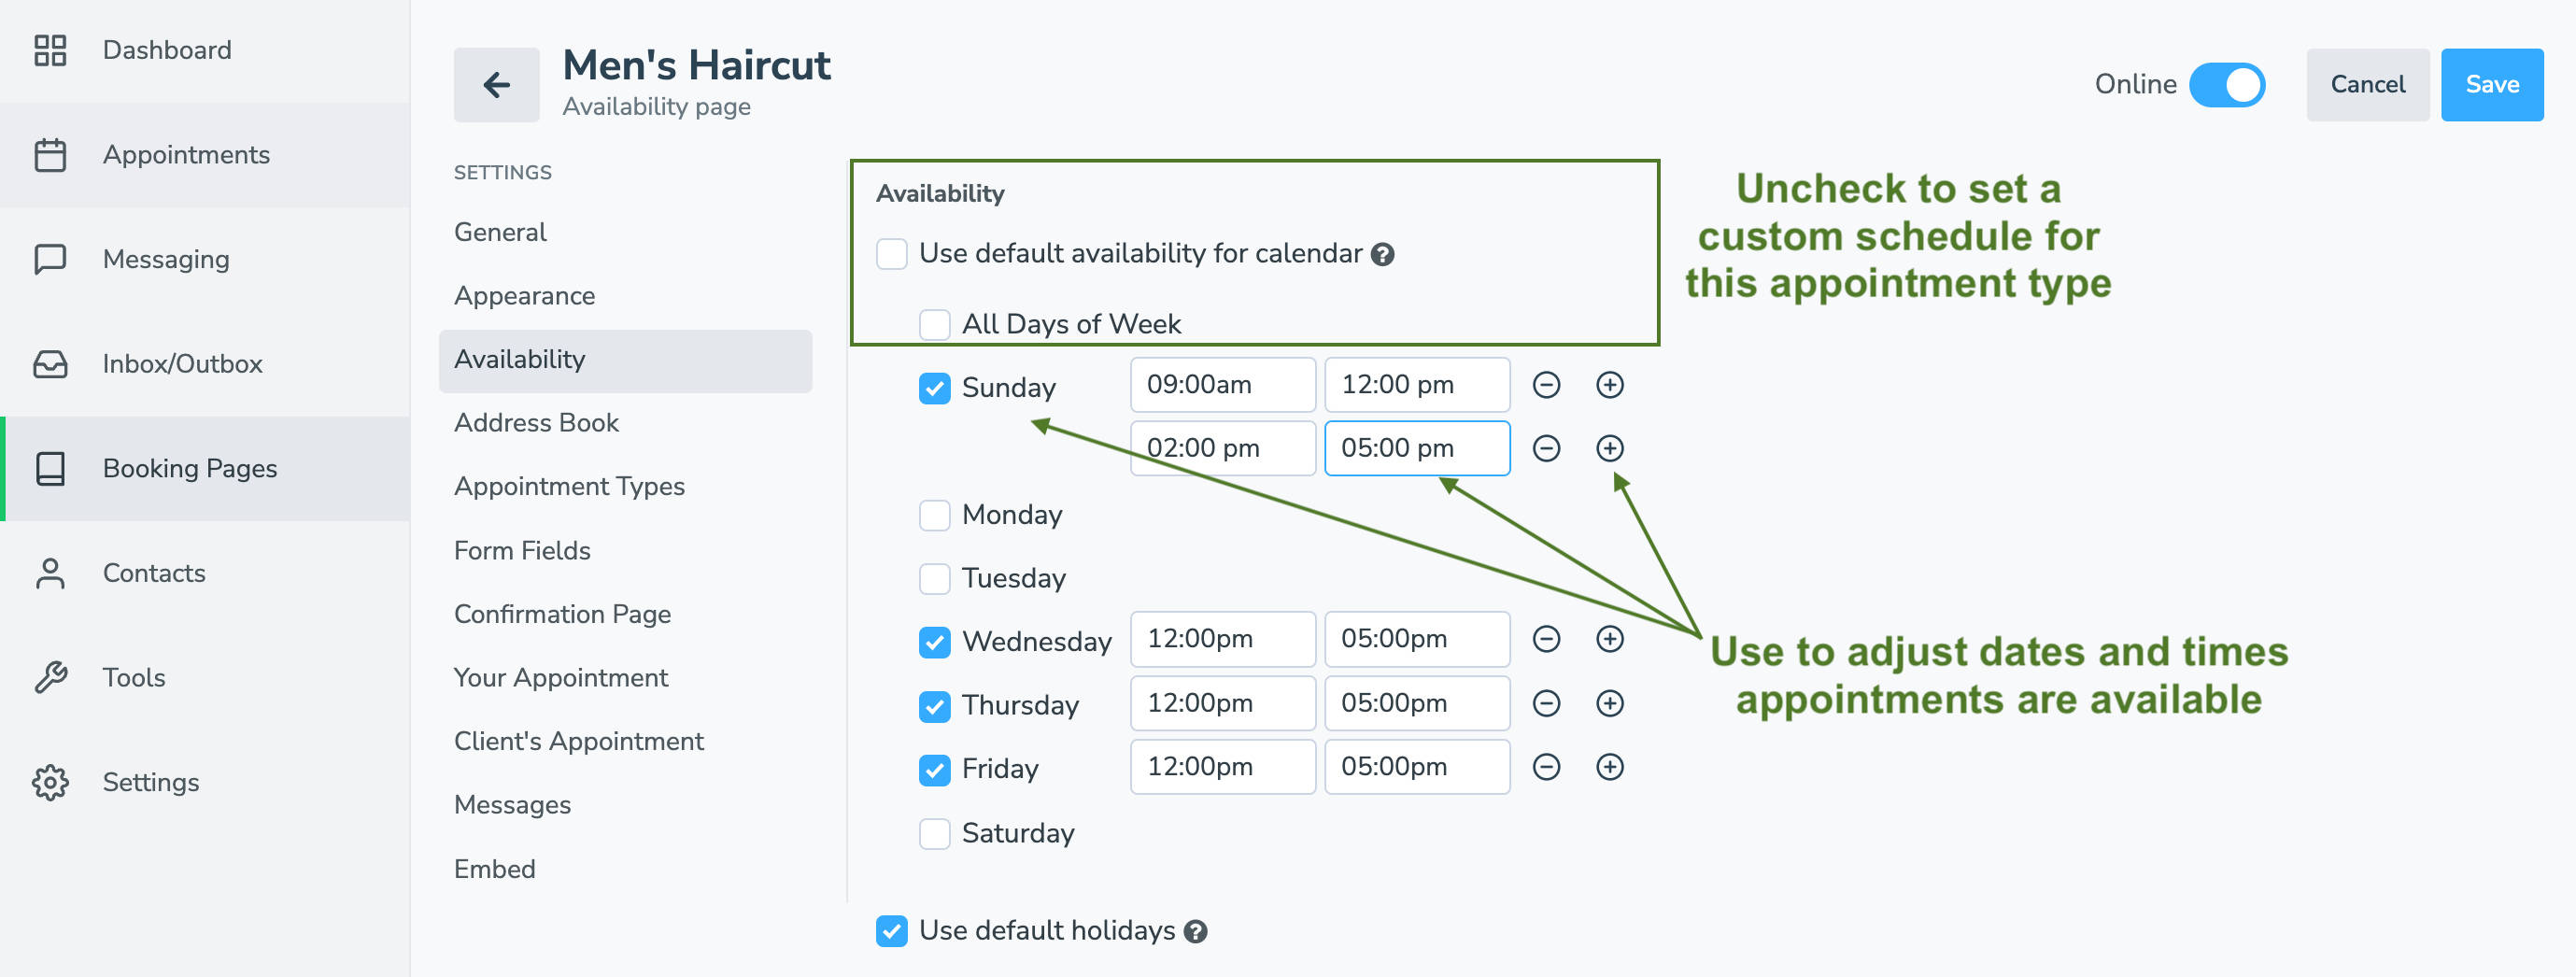
- IMPORTANT: You use Availability Settings to control when each appointment type is offered.
- Uncheck “Use default availability for calendar.”
- Uncheck “All Days of Week.”
- Select the times and dates you will offer this appointment type. You can set multiple time ranges per day using the + button.
- Set the Holiday, Availability Overrides, and Advanced settings according to your needs.
Setting Appointment Type Details & Other Settings
- Navigate to the Appointment Types tab.
- Leave Appointment Type as “Single Option.”
- Set the appointment length.
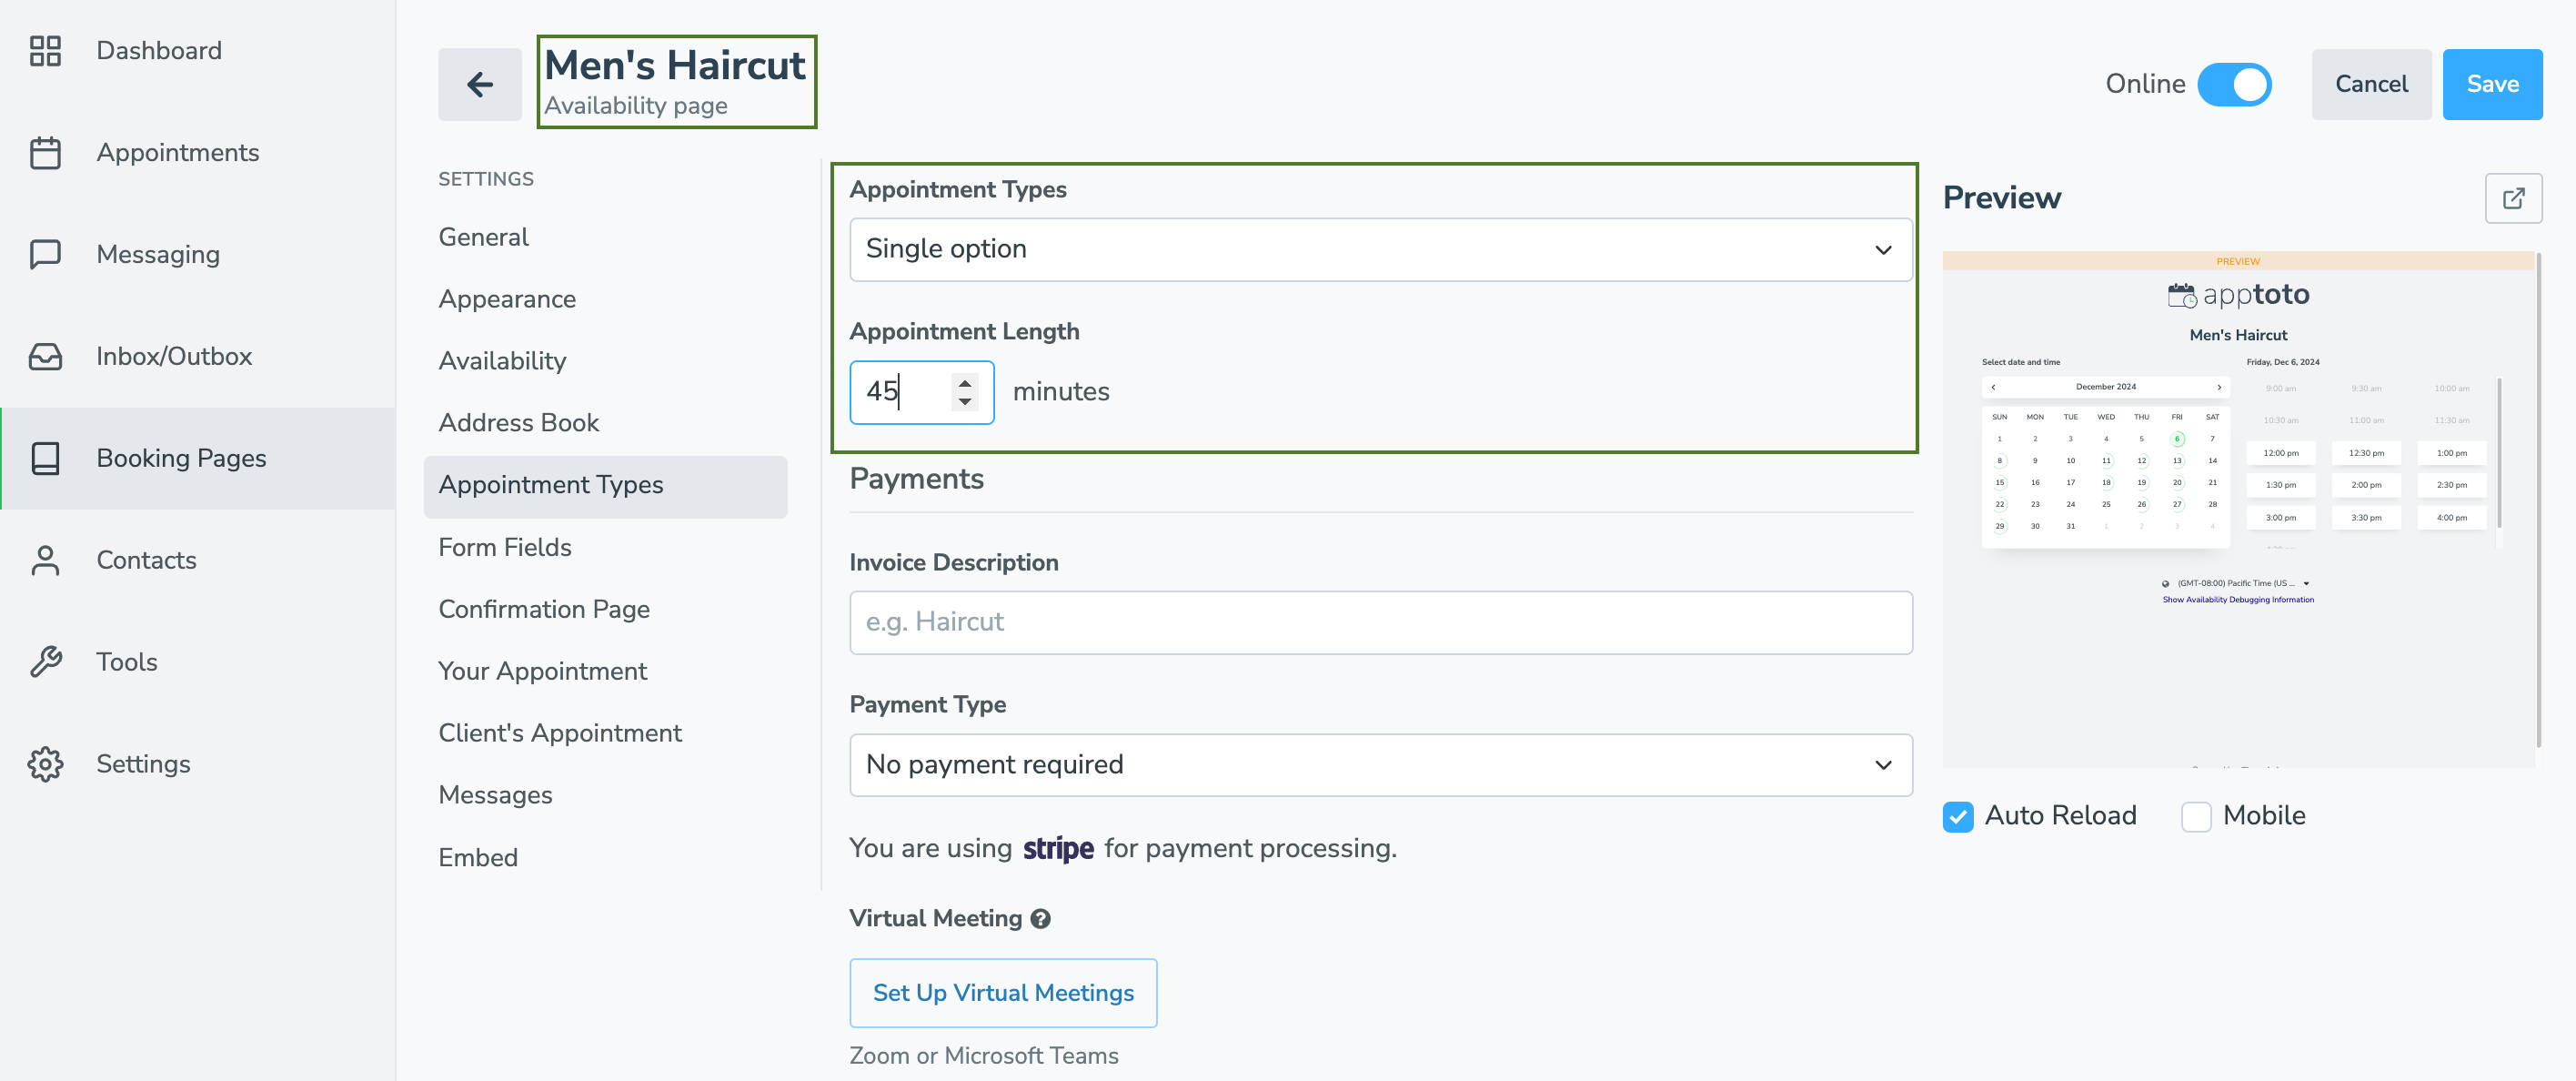
- Add payment and virtual meeting details (if needed).
- Under “Advanced” settings, you can also add padding time (e.g., 10 minutes) between appointments if desired.
- Continue adjusting settings on the remaining Settings tabs to your liking, including:
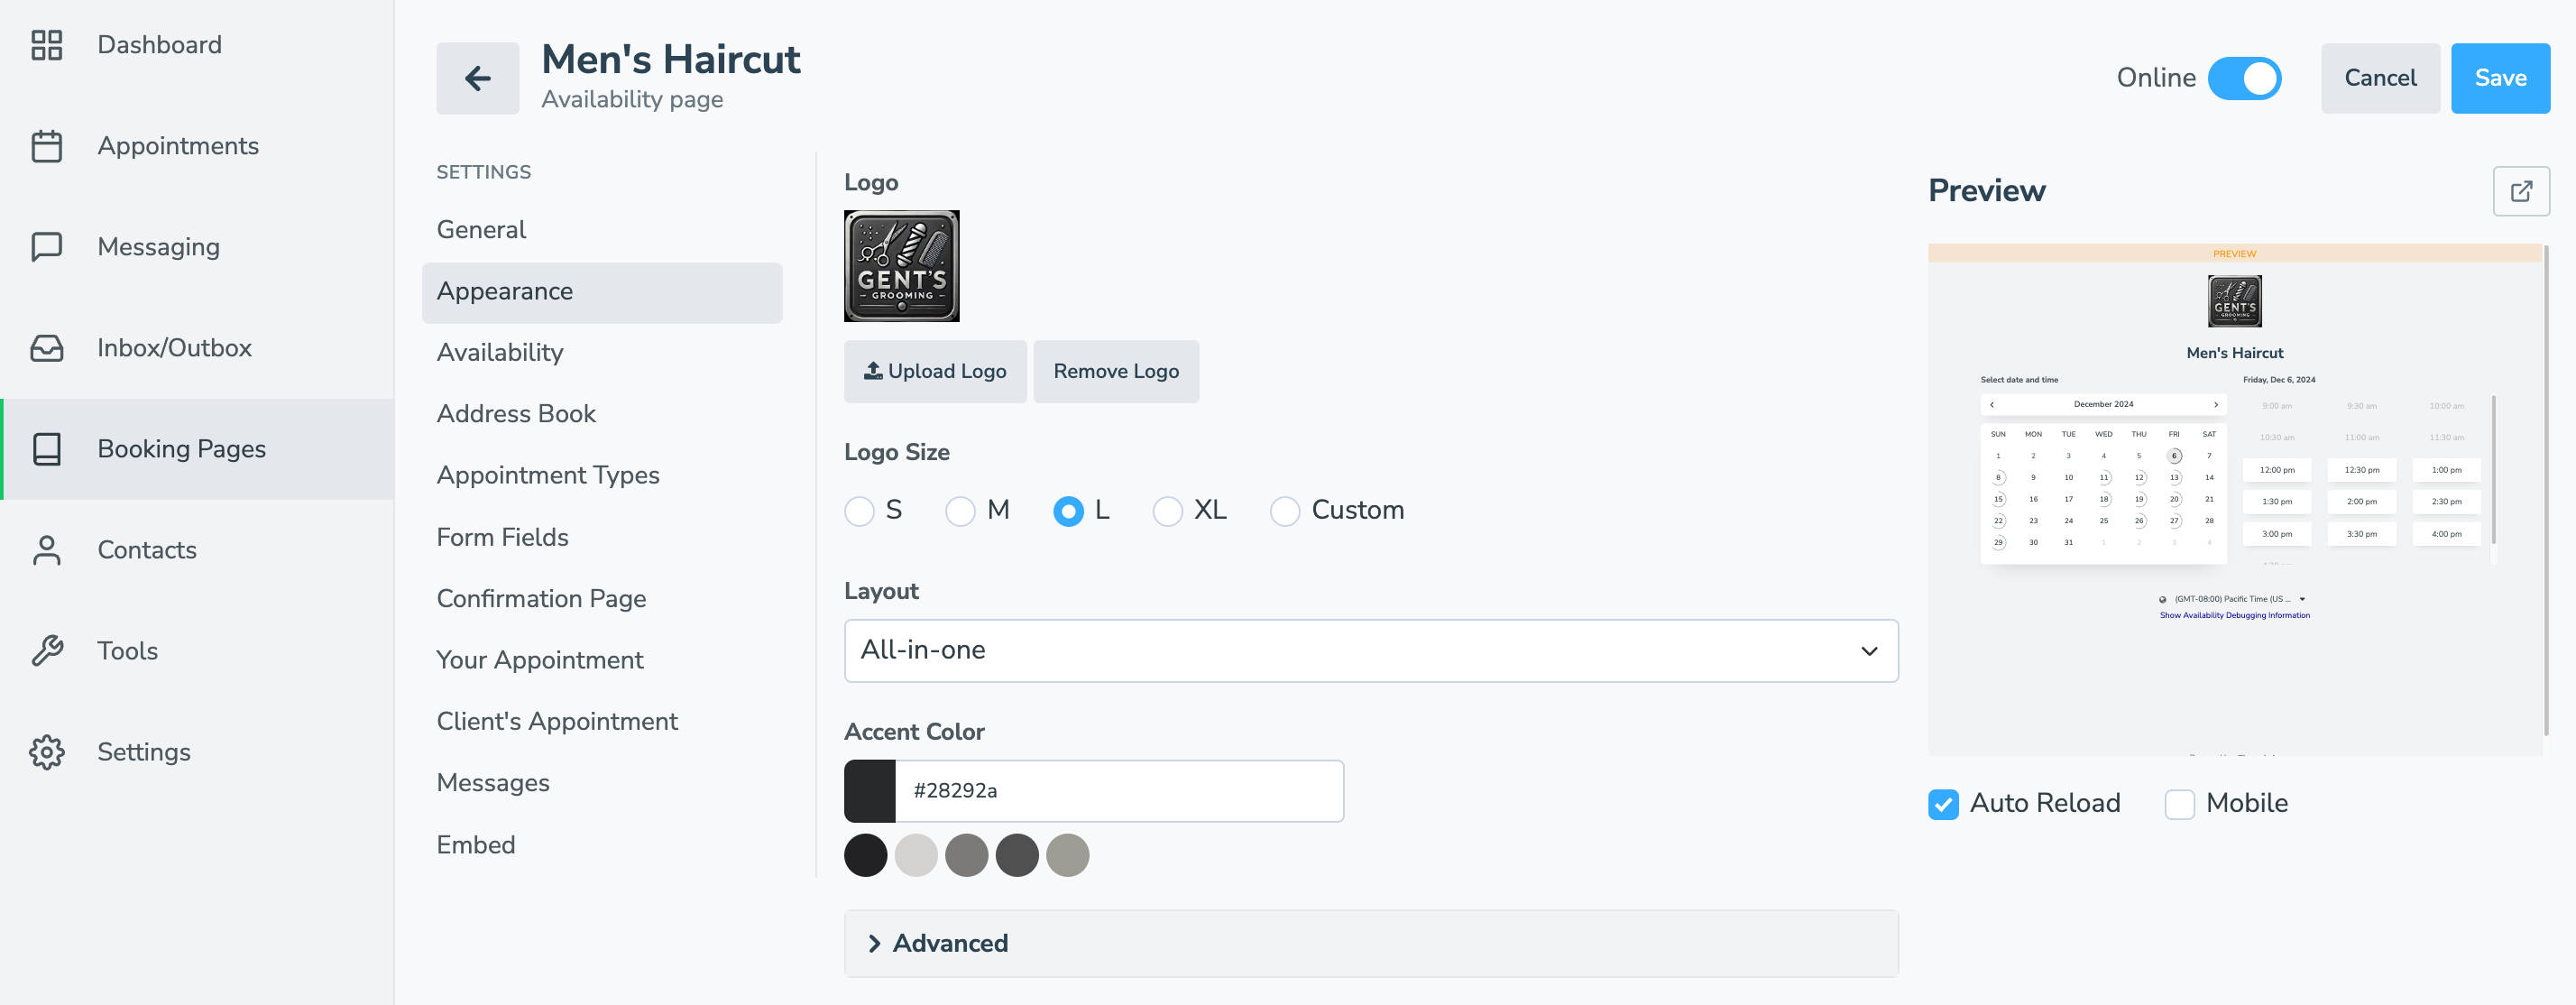
- Appearance: to adjust the look of your booking page
- Address Book: to set which address book new contacts are added to and set an authentication method (i.e., mobile phone, email, captcha).
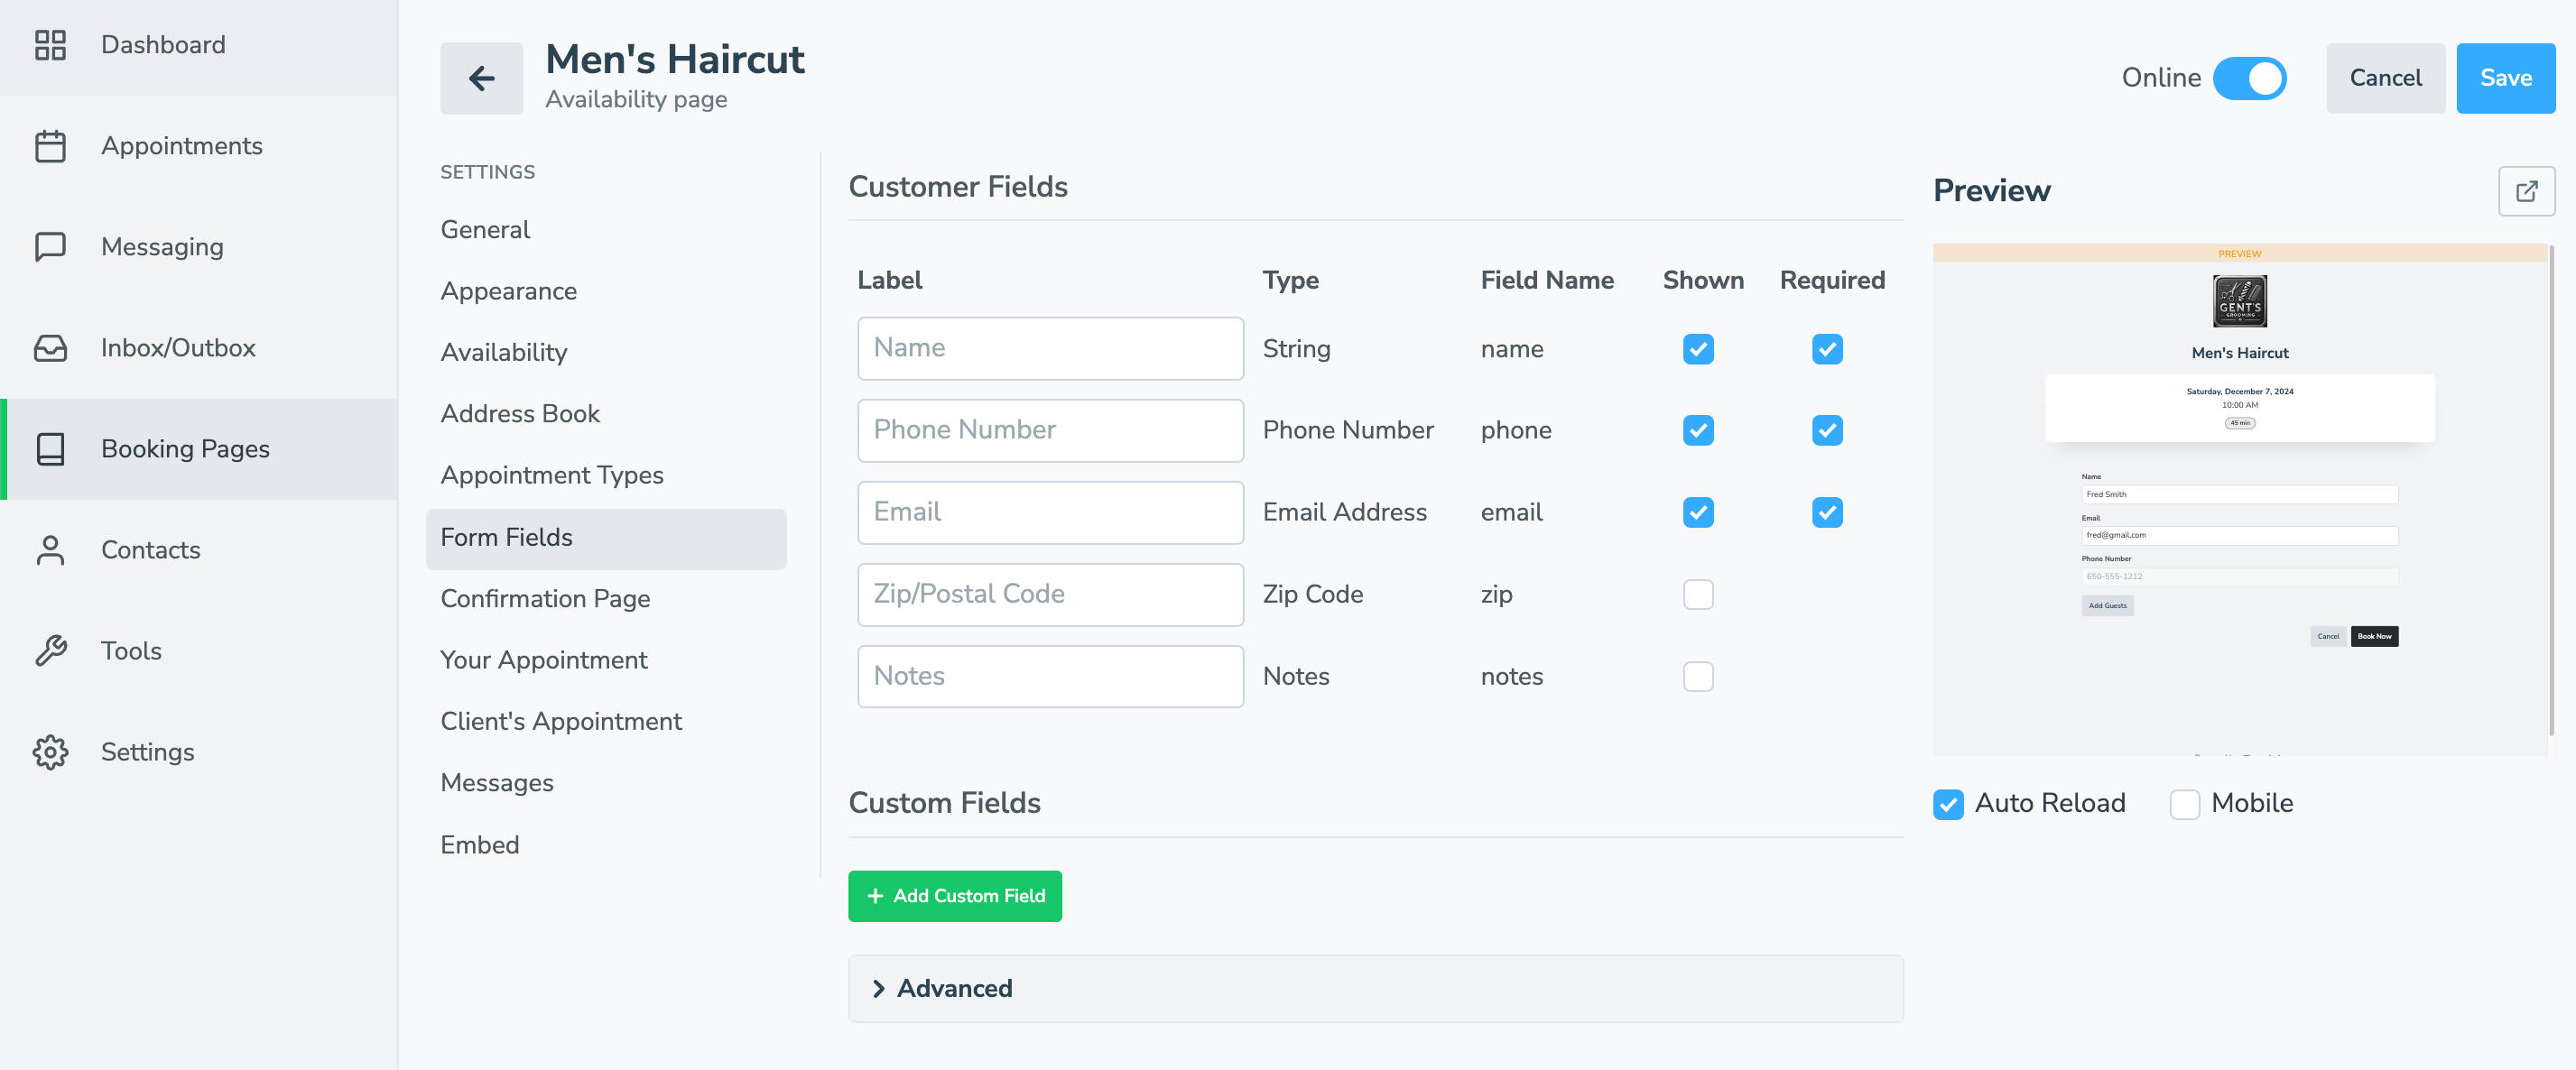
- Form Fields: to control what data you collect from someone when they book an appointment.
- Confirmation Page: to control the page or verbiage someone sees after booking an appointment
- Your Appointment: to control how the booked event will appear on your calendar and what details will be included.
- Client’s Appointment: to control what information is included on your client’s calendar event if they click “Add to Calendar” after receiving their booking confirmation
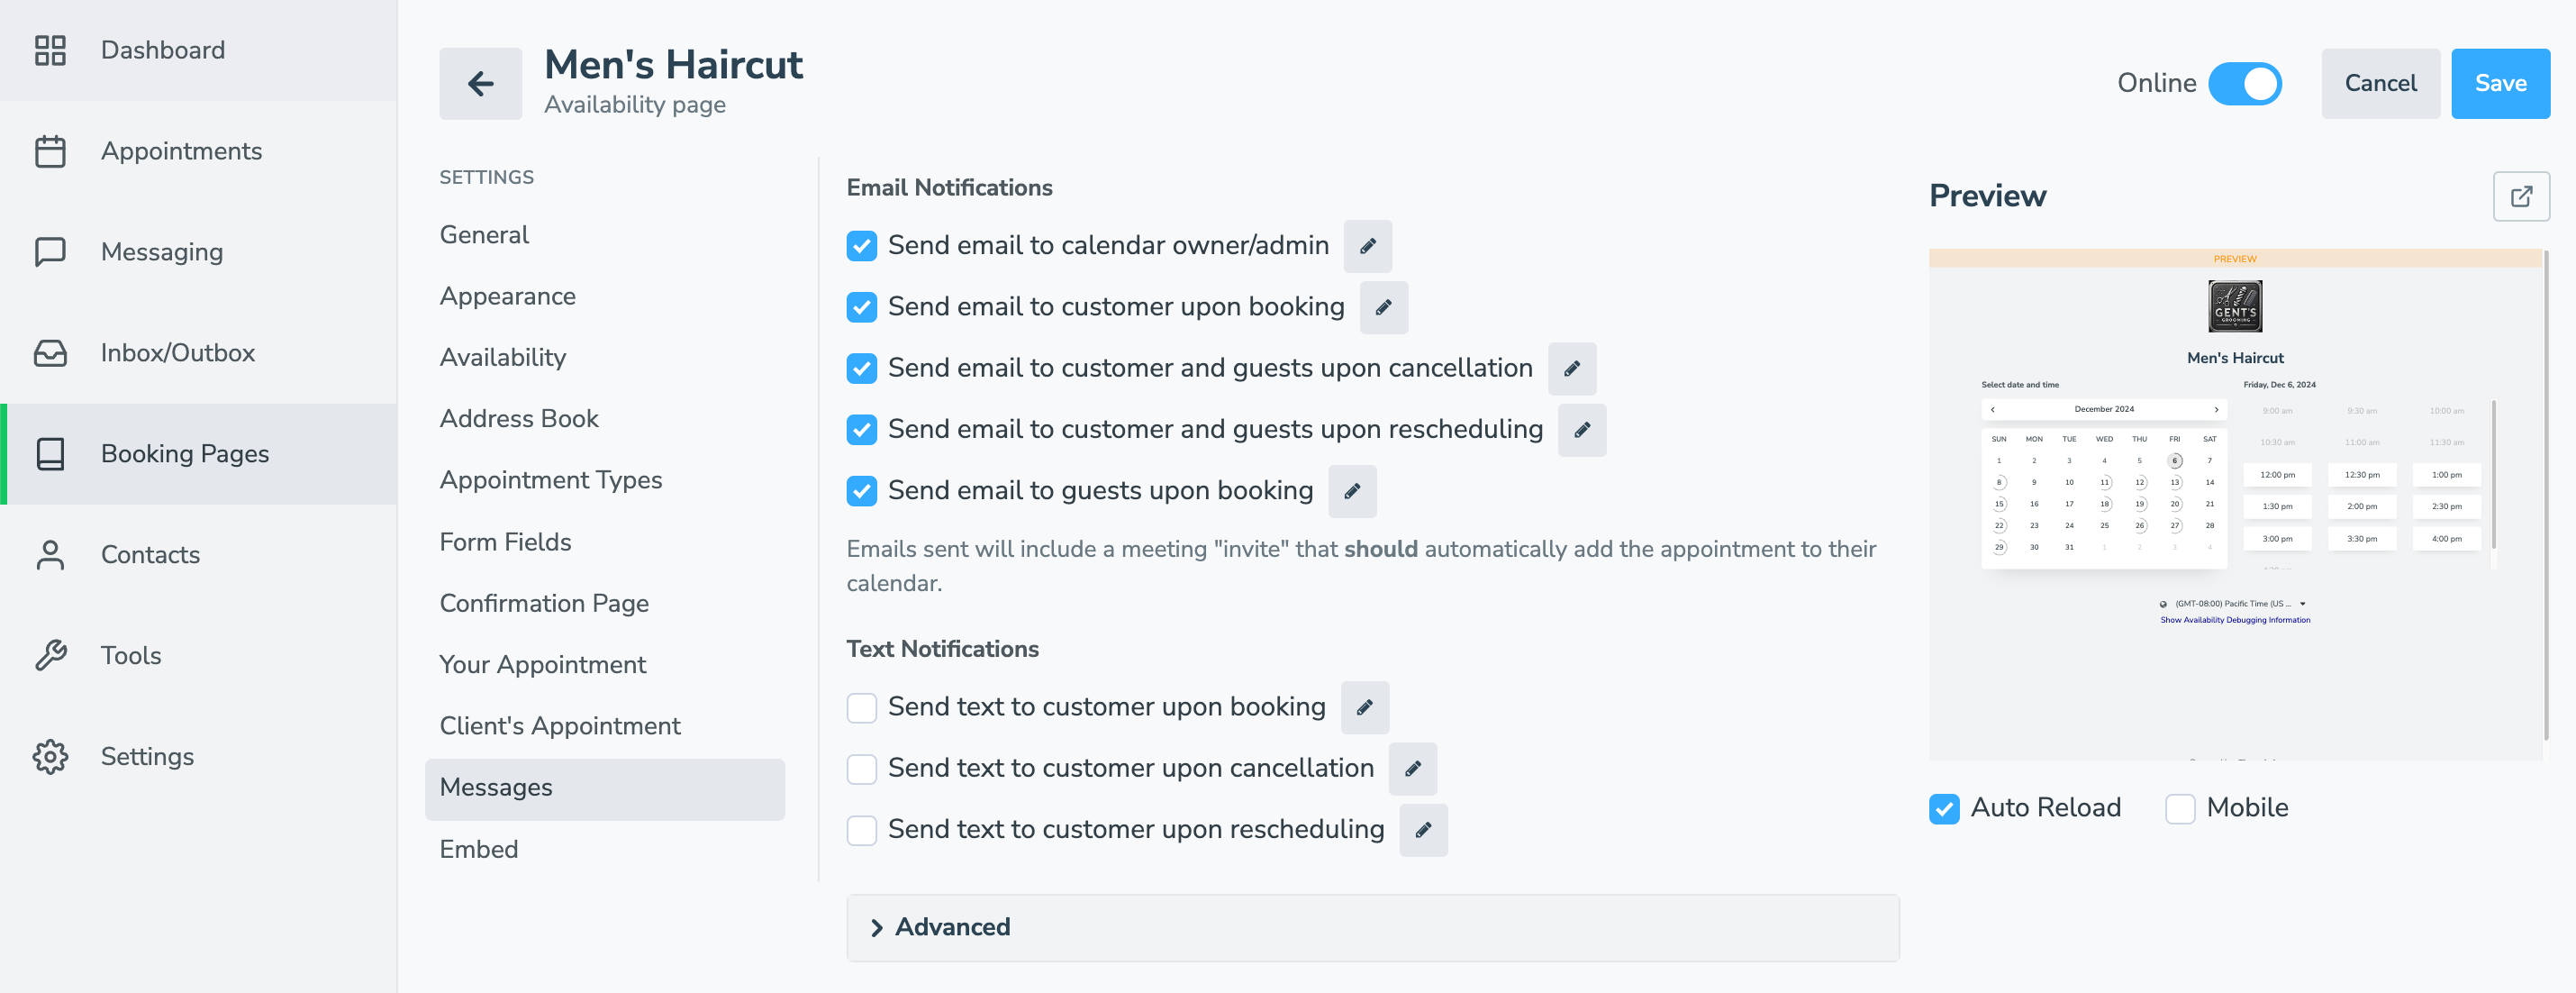
- Messages: to control the content of the email or text messages sent to you and your clients after they book an appointment, cancel, or reschedule.
- Embed: generate an iframe or “Book Now” button to add to your website (if you want to promote the discount to everyone).
- Appearance: to adjust the look of your booking page
- Click “Create” to create your page.
Creating Additional Appointment Type Booking Pages
- Repeat steps 2 through 11 to create additional booking pages for your unique appointment types.
- Pay special attention to step 8 to customize each appointment type’s availability.

Linking All Your Booking Pages to the Main Booking Page
- From the Booking Page tab, click the name of your Main/Primary booking page to open it, or follow steps 2-11 (skipping 10-12) to create a new one.
- For step 8, leave “Use default availability for calendar” checked.
- For step 8, leave “Use default availability for calendar” checked.
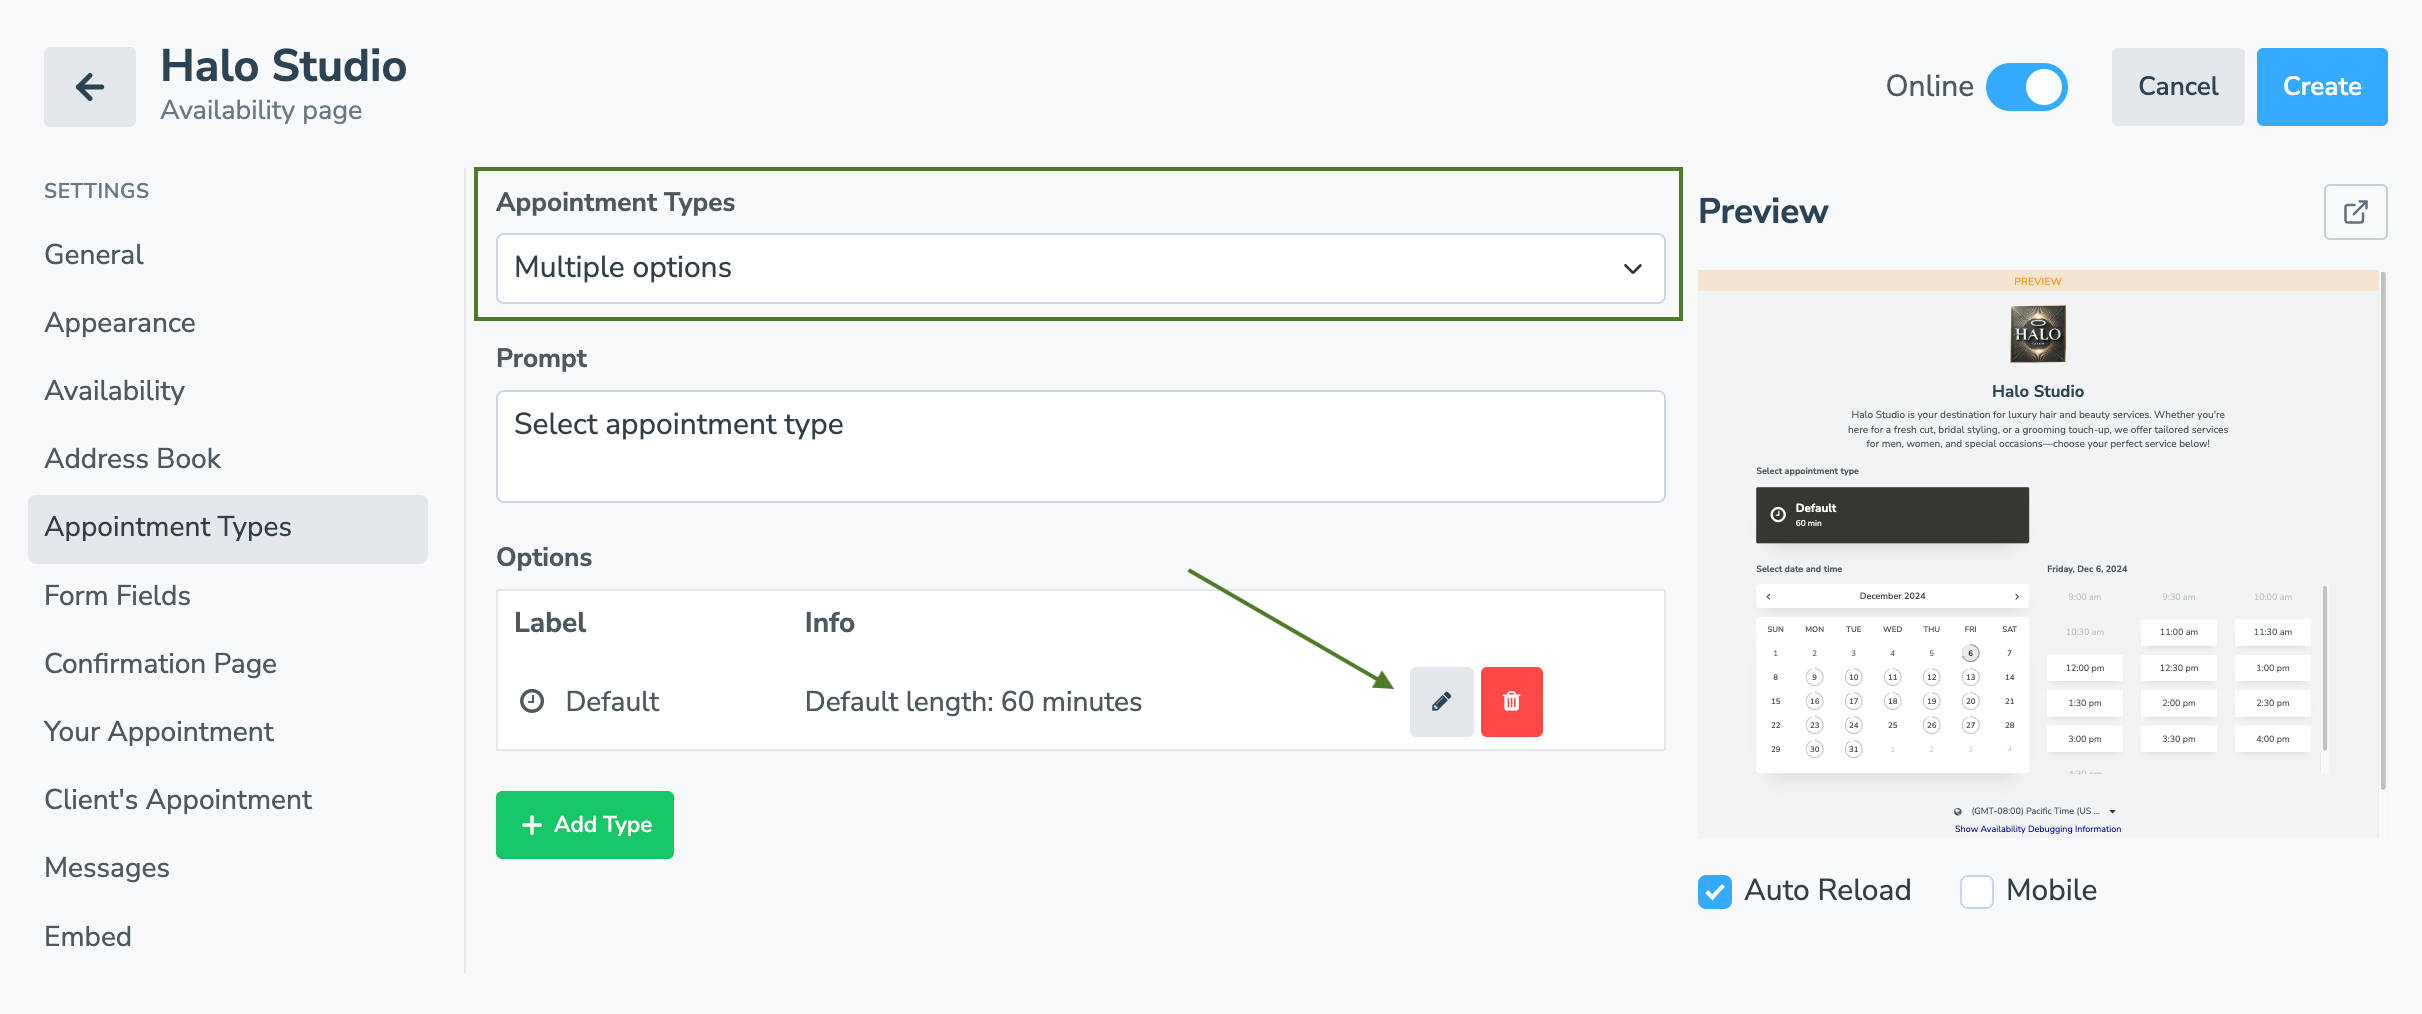
- Navigate to the Appointment Types tab.
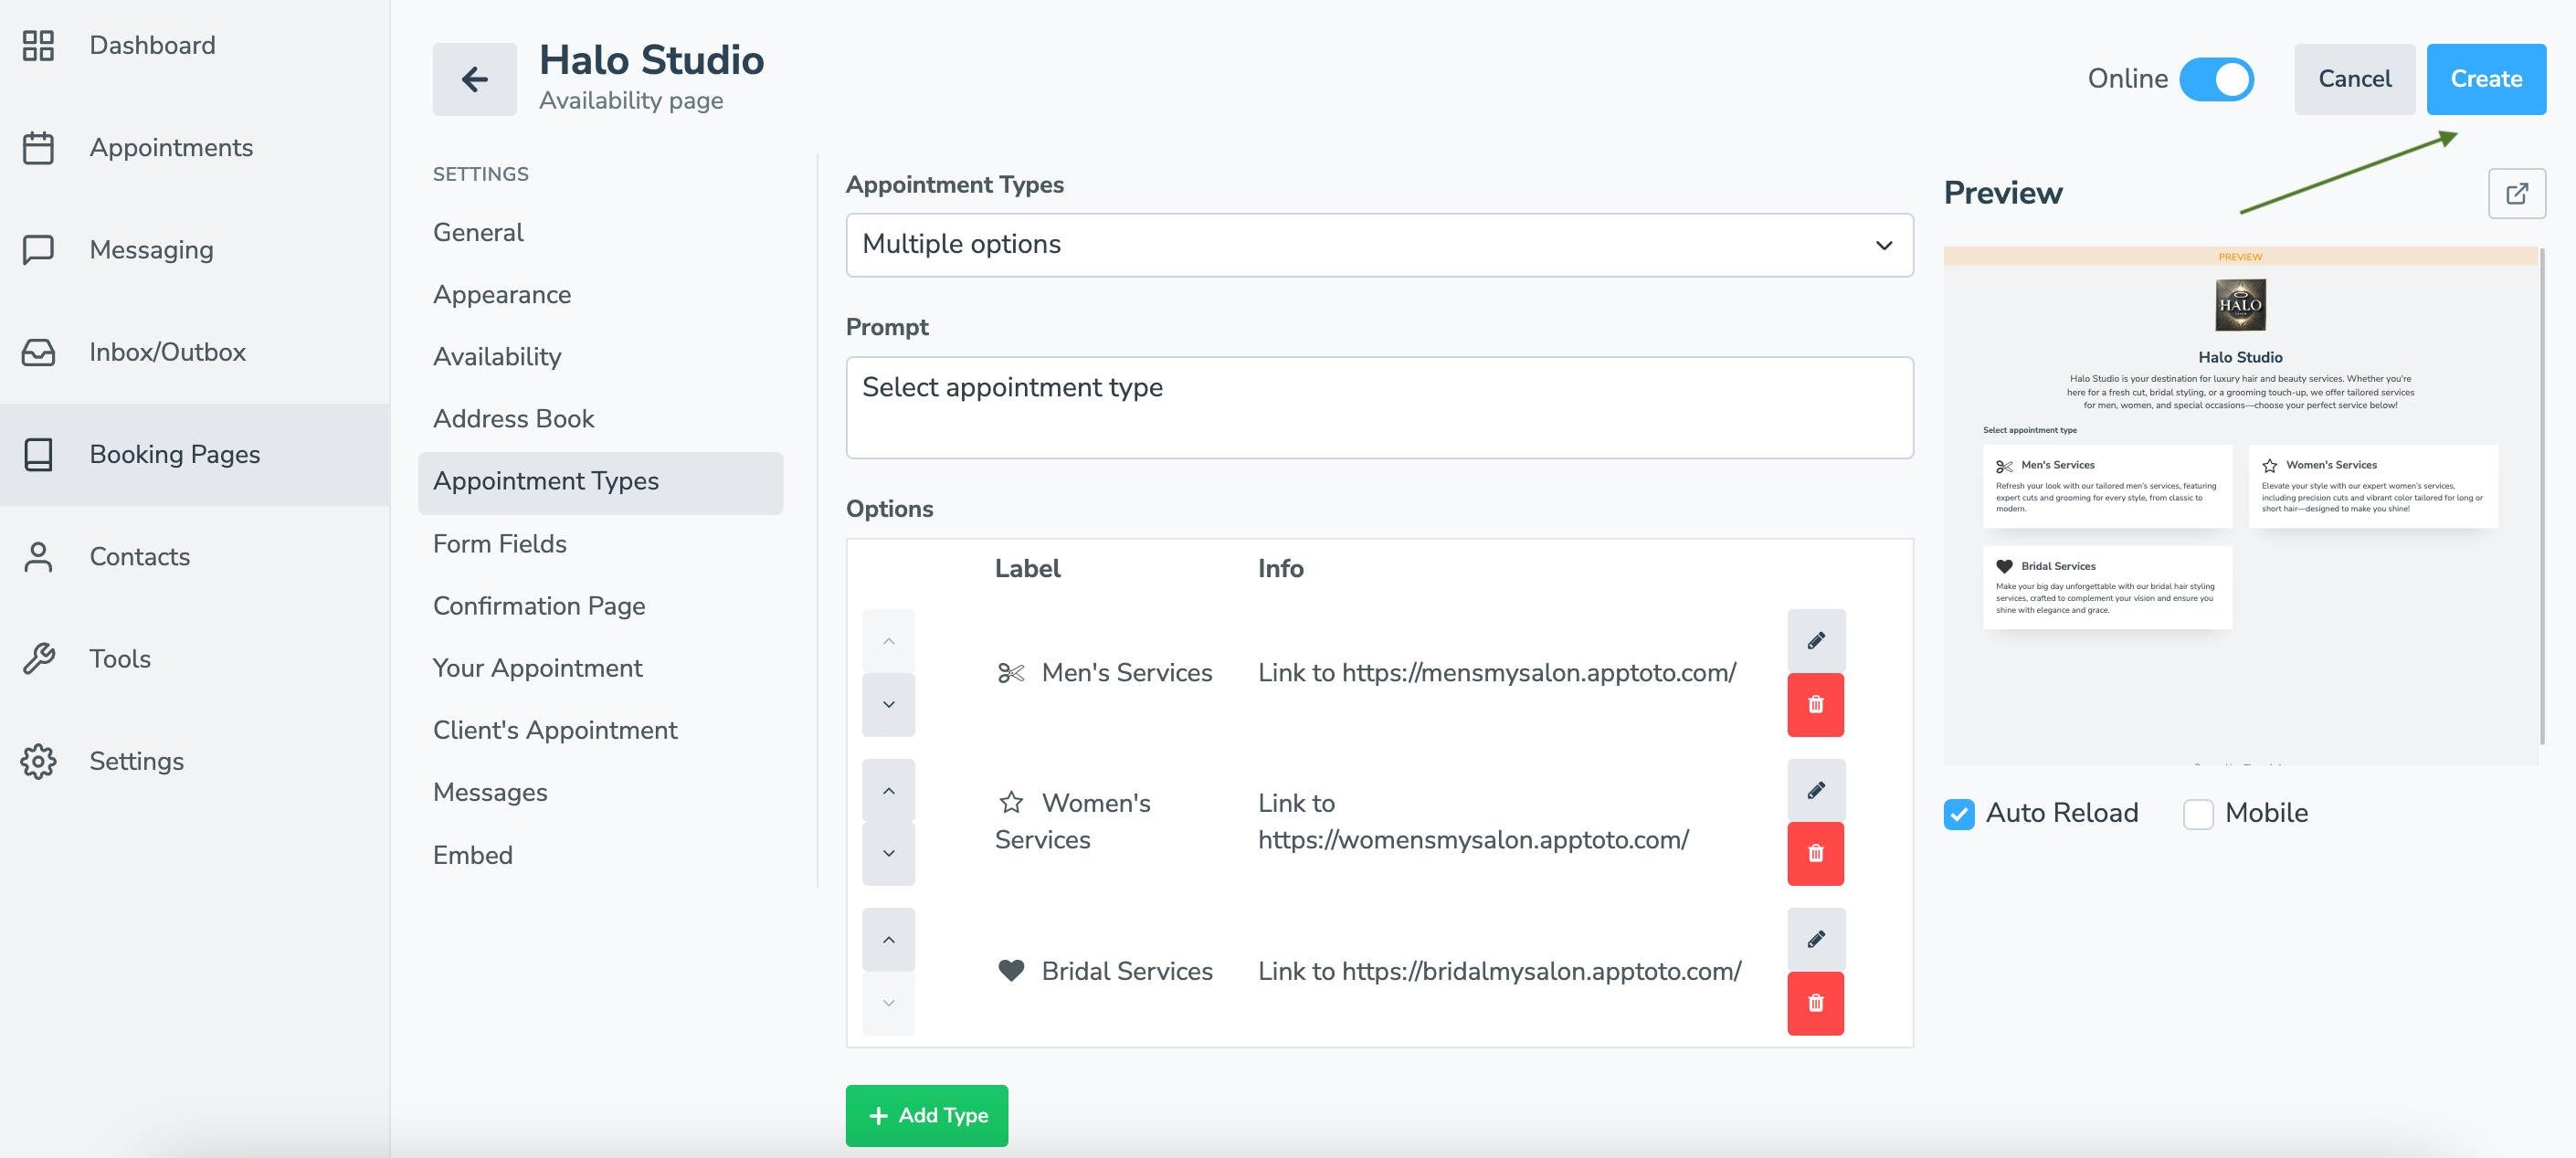
- Set Appointment Type to “Multiple Options,” and enter a prompt for your page if desired.
- Under Options, a “Default” appointment type will appear. Click the pencil to edit it.
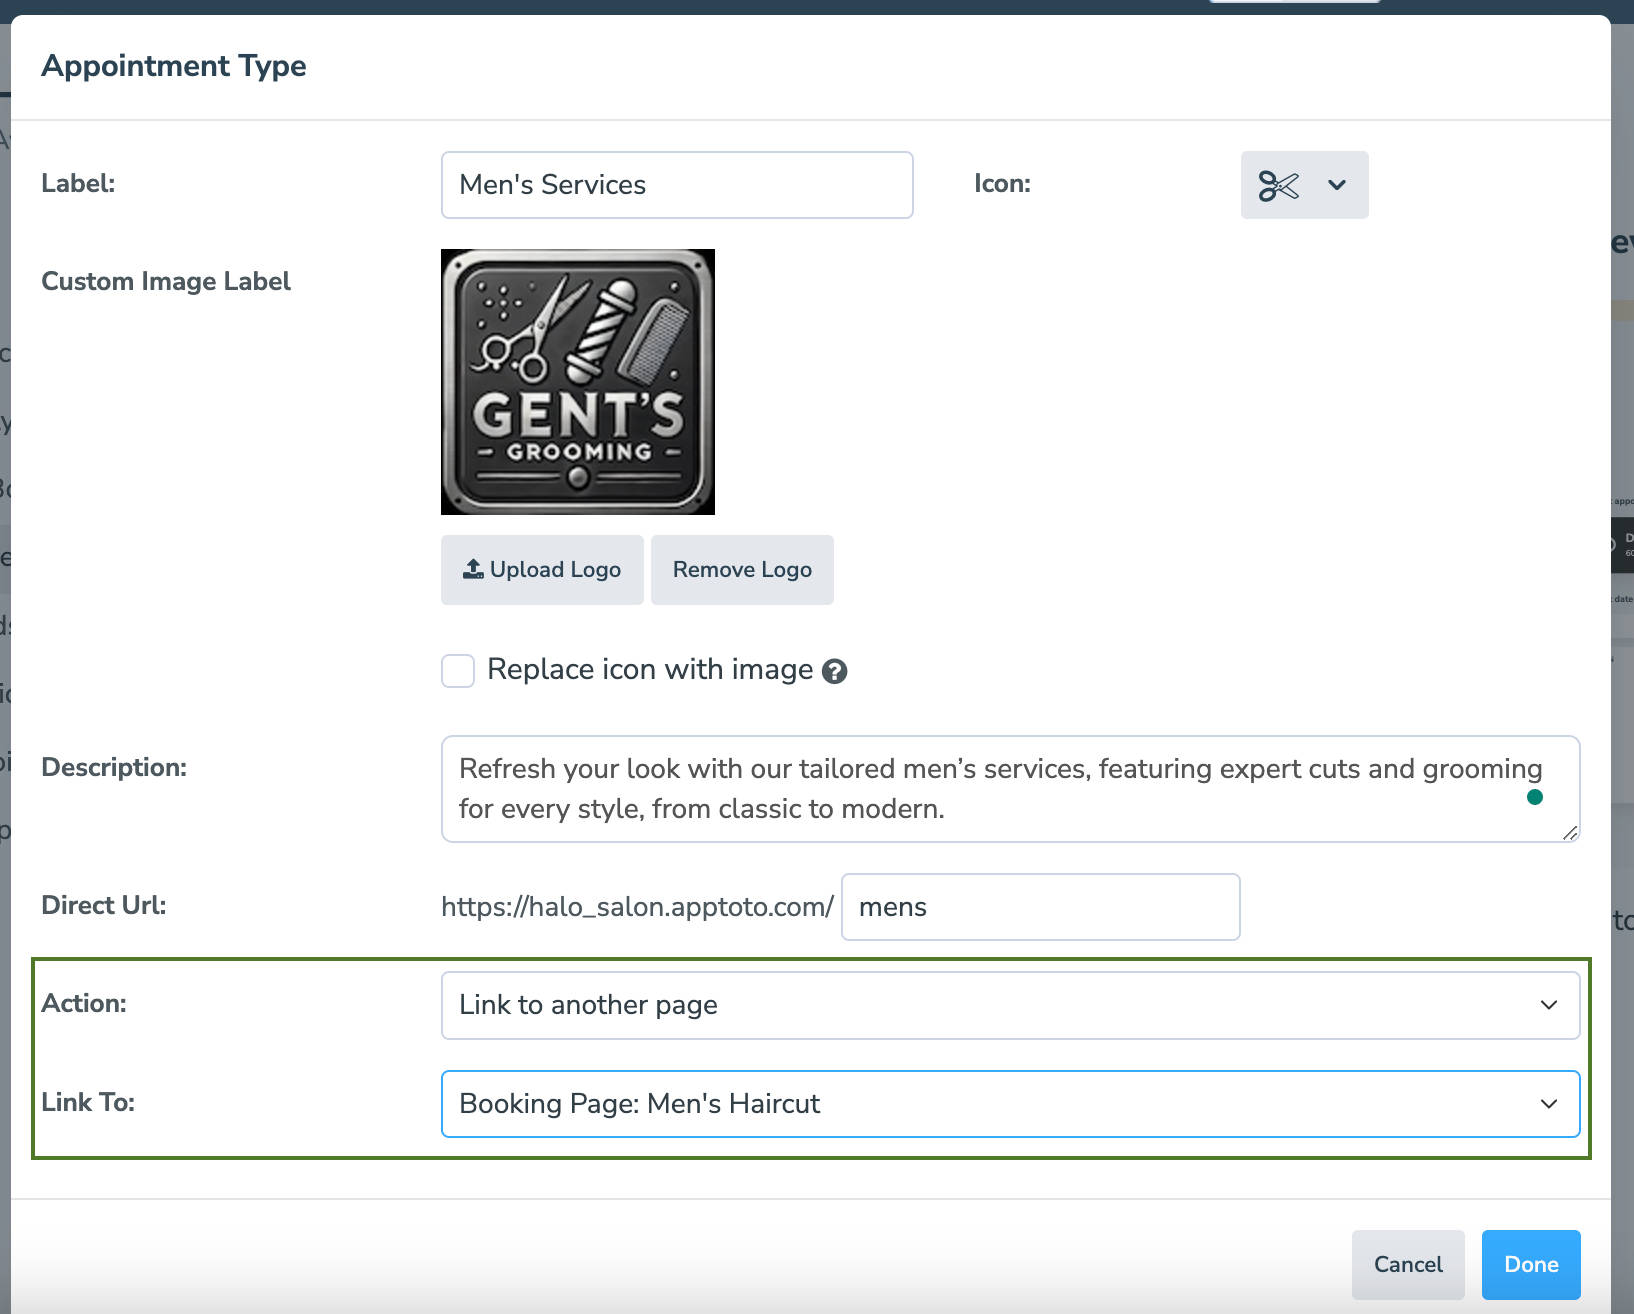
- Set the Label (appointment type name), icon, and description.
- Change the “Action” field to “Link to Another Page.”
- Using the “Link To:” dropdown, select the appropriate booking page for your first appointment type.
- Click “Done” to return to the Appointment Types tab.
- Click the “+Add Type” button to repeat the process for all the appointment-type pages you created and want to link.
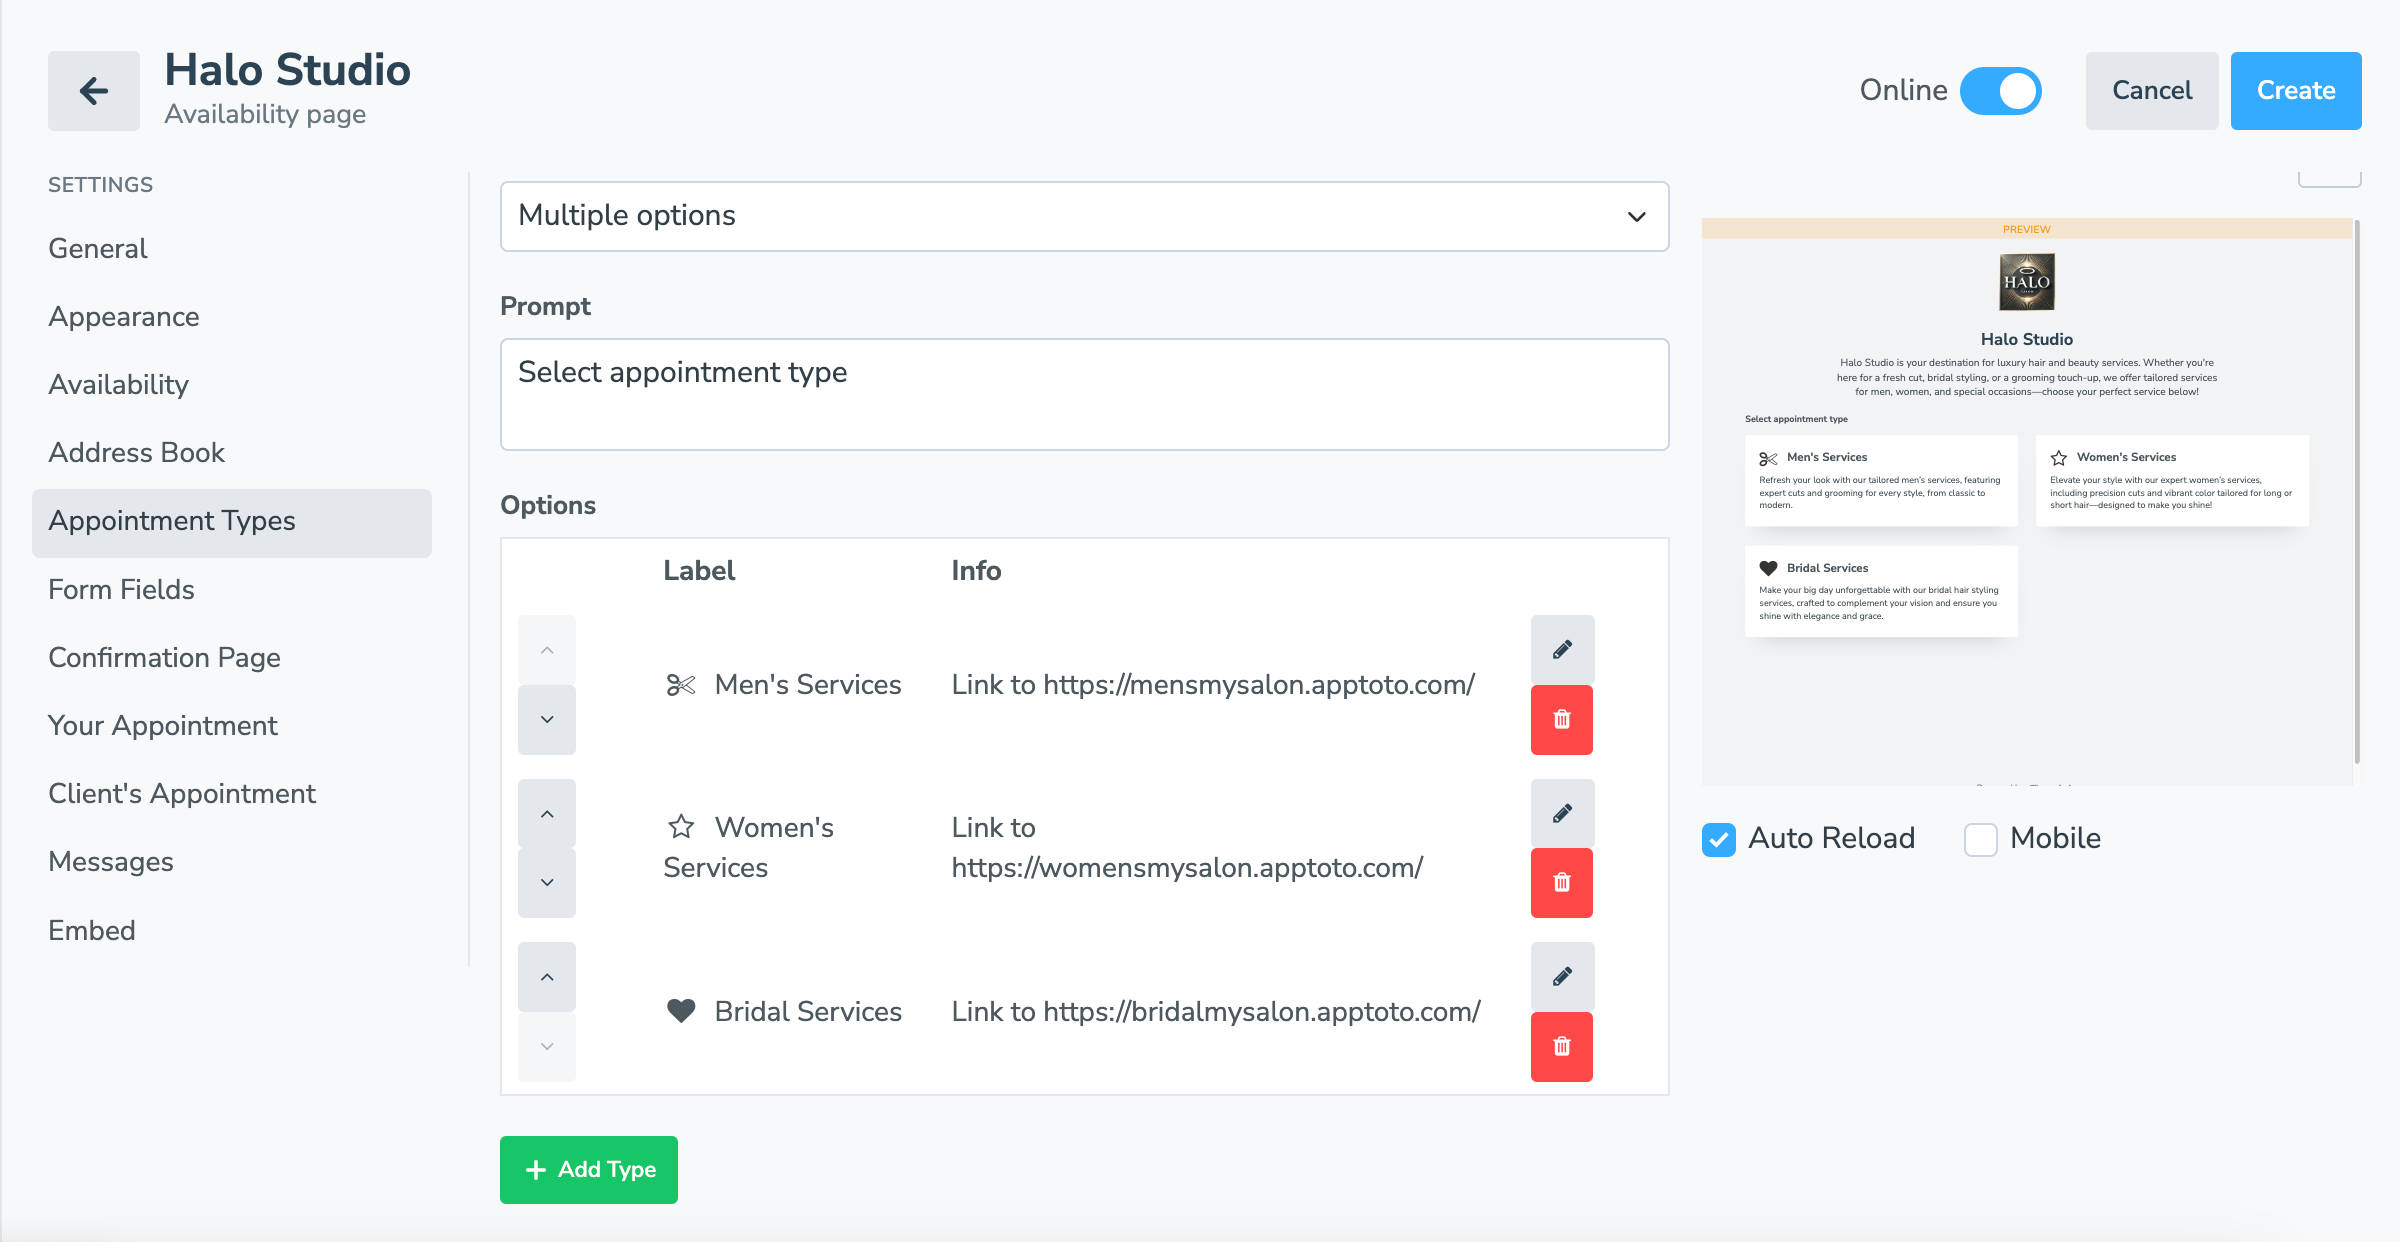
- Use the preview button to ensure your primary and secondary pages work as expected.
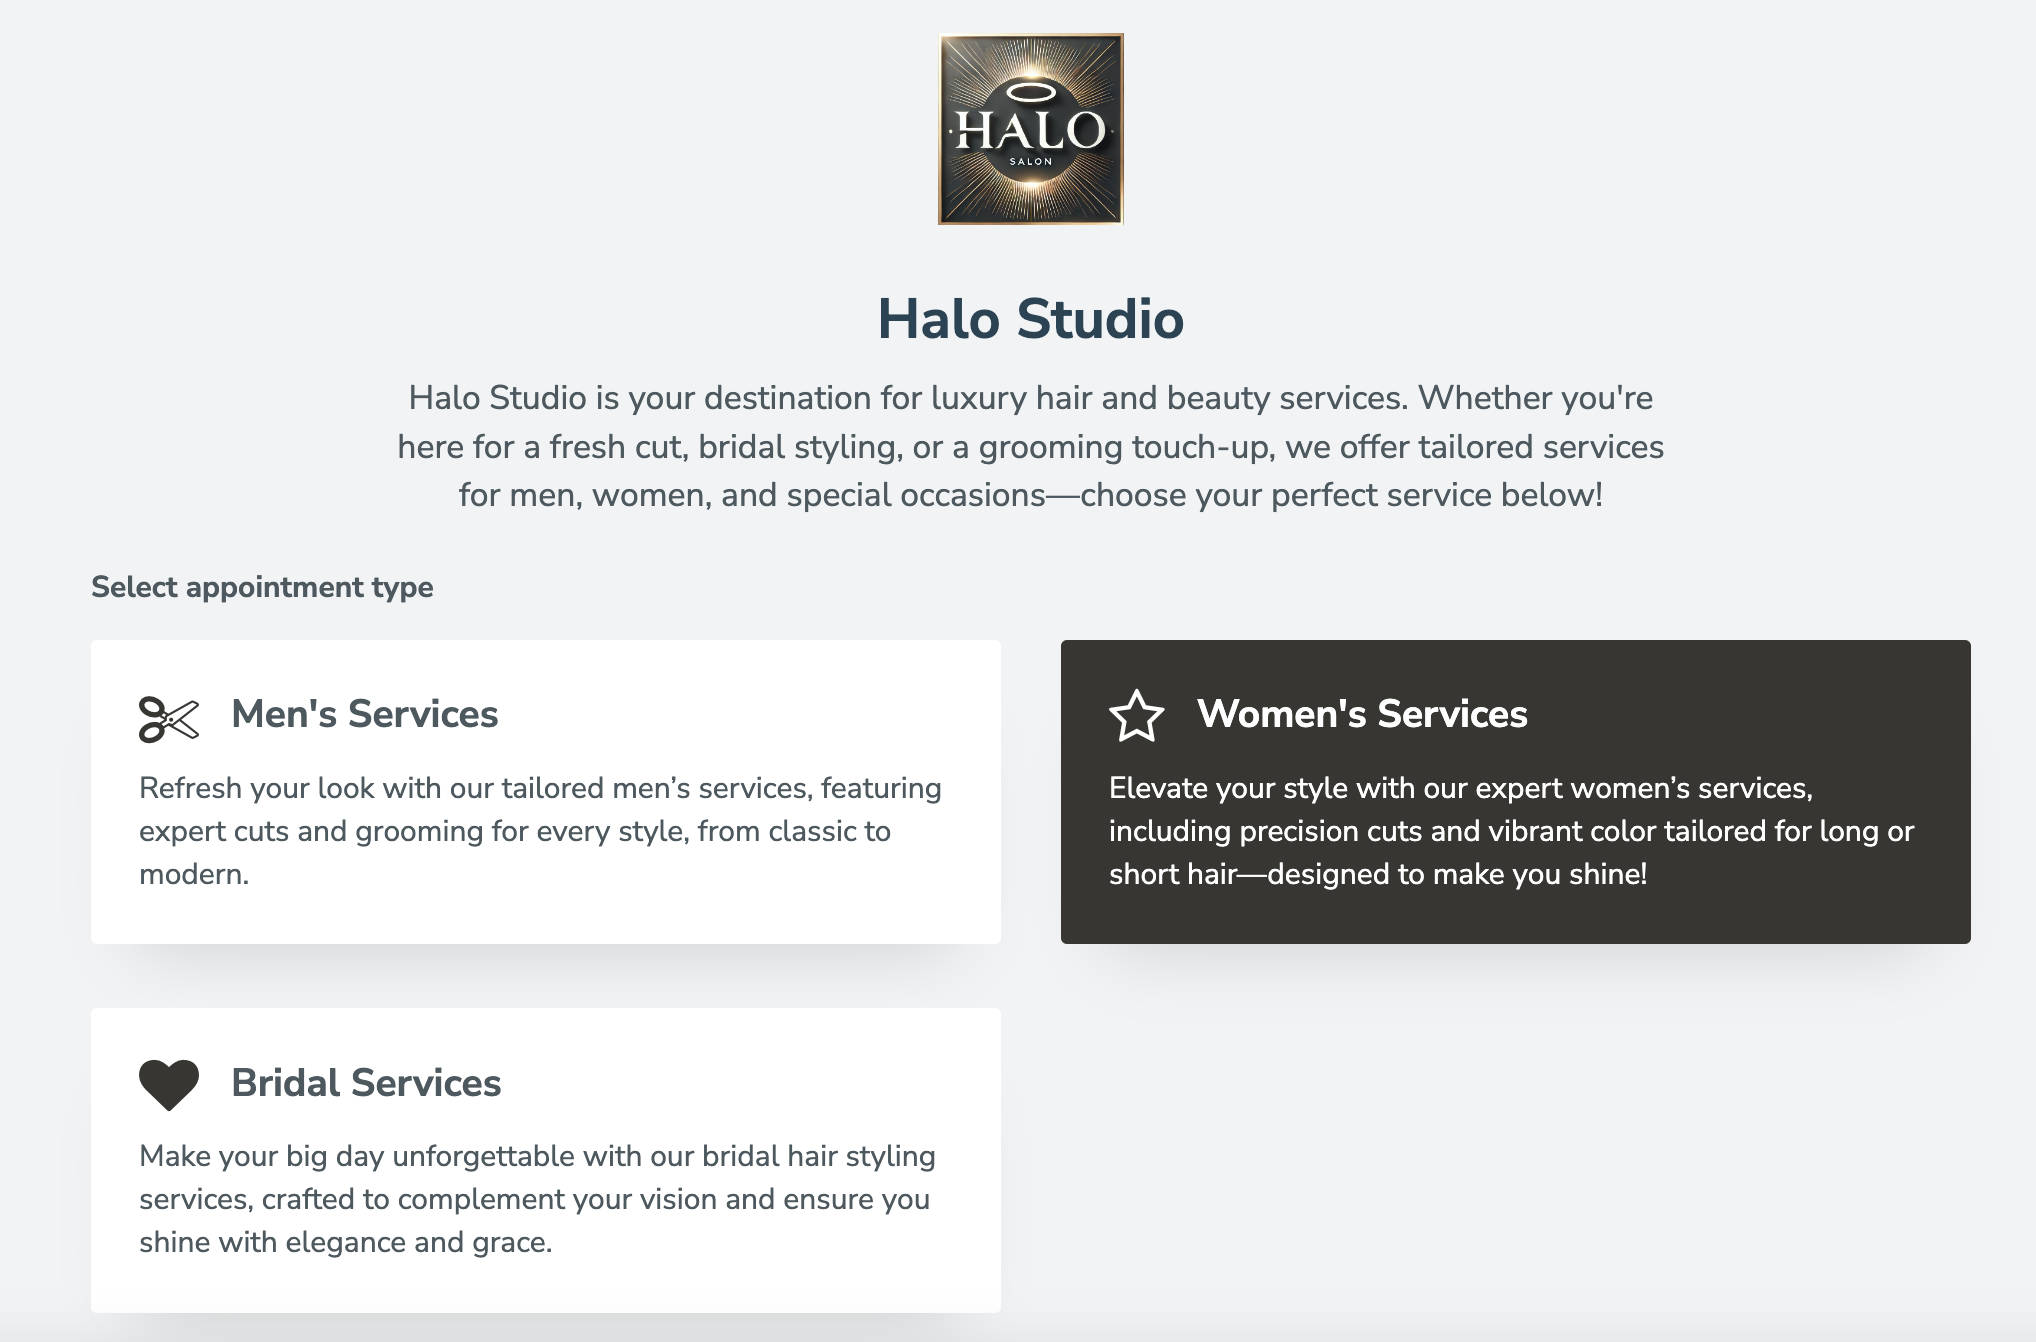
- Finally, click “Save” (or “Create” if a new page) to launch your new multi-step booking page with unique schedules by appointment type.
Best Practices for Linking Booking Pages
Use Clear Navigation Labels: Ensure the central booking page clearly explains the services and links to the appropriate sub-pages. For example, include labels like “Book a Massage,” “Schedule a Consultation,” or “Sign Up for a Class.”
Optimize for Mobile Users: Many clients book on their phones. Test the navigation between pages on mobile to ensure a seamless experience.
Set Clear Availability Parameters: Define the days and times for each service. Communicate these custom schedules directly on your booking pages if needed.
Promote Linked Pages in Campaigns: Use email or SMS campaigns to direct clients to the main booking page, emphasizing that it links to specialized services for their convenience.
Monitor and Adjust: Review booking trends regularly to optimize page performance and availability settings. For example, if one service consistently books out, consider expanding its time slots or days.
Update Availability as Needed: Schedules change, and that’s okay. If a team member’s hours change, or you need to expand when an appointment is offered, adjust the availability for that service.
Frequently Asked Questions
Yes, you can! It’s possible to create multiple layers of booking page navigation that centralize the scheduling process for your clients. To do so, you’ll want to treat each page you want to branch into additional services similar to/using the “Main Booking” page above. Pay close attention to your synced Calendars, Availability, and Bookability settings to avoid creating unintentional conflicts.
A great example of how this can be used is for a Salon. Let’s say you have a primary booking page that you’ve set up to link to “Men’s Services,” “Women’s Services,” and “Bridal Services” using the steps above. “Men’s Services” and “Bridal Services” link to their individual booking pages.
However, you want clients who navigate to “Women’s Services” to be able to select from “Long Hair (60 minutes),” “Short/Medium Hair (45 minutes),” and “Cut & Color” (180 minutes). You’ve created these booking pages and what times and days they are offered using the “Availability” tab settings. Instead of setting “Women’s Services” to “Single Option” on the Appointment Types tab, you’d set it to “Multiple Options” and repeat steps 17-26 to link each appointment type to the Women’s Services. Then, navigate to your main page and confirm everything works as expected.
If you have a particularly complicated structure or need assistance, don’t hesitate to contact support@apptoto.com.
It’s critical to make sure that you’re not creating conflicts between your calendar and booking page availabilities, bookability settings, and selectable time settings.
First, review the calendar availability settings (Settings > Calendars > Calendar Name > Gear Icon > Scheduling tab) for each calendar synced to your booking pages. Then, ensure that each calendar is set to the broadest range of hours it will accept bookings—such as an individual’s working hours for personal calendars or your business’s operating hours for service calendars.
Then, look at each of your Booking Page availability settings. Make sure the hours and days are tailored to the specific needs of that page compared to the broader range set for your calendar.
Finally, review your bookability settings and selectable times settings. Ensure that you’re not accidentally limiting appointments from showing using the “WHEN” or “IGNORE” settings. Likewise, check to make sure your appointment durations work with your scheduling. For example, your booking page will not display availability for a 180-minute “Cut & Color” appointment (see FAQ 1) if your booking page only takes appointments from 9 a.m. to 11 a.m. each day.
Drive Efficiency With Multi-Step Booking Pages
By linking multiple booking pages, you can create a streamlined and client-friendly scheduling experience that accommodates varying availability across services. Whether you manage a wellness studio, medical practice, or event planning business, this approach helps you avoid overlooking or overbooking any service.
Ready to simplify your scheduling? Sign up for a free 14-day trial of Apptoto today and start creating linked booking pages for your business. Already an Apptoto user? Implement this recipe now, and let us know how it transforms your scheduling workflow!


