Estimated reading time: 13 minutes
The holidays are here, and it’s crunch time for many businesses. Whether you’re a salon preparing for end-of-year glam sessions or a dental office encouraging patients to use their remaining insurance benefits, now is the perfect time to boost bookings. But how do you make sure clients book with you before your calendar fills up?
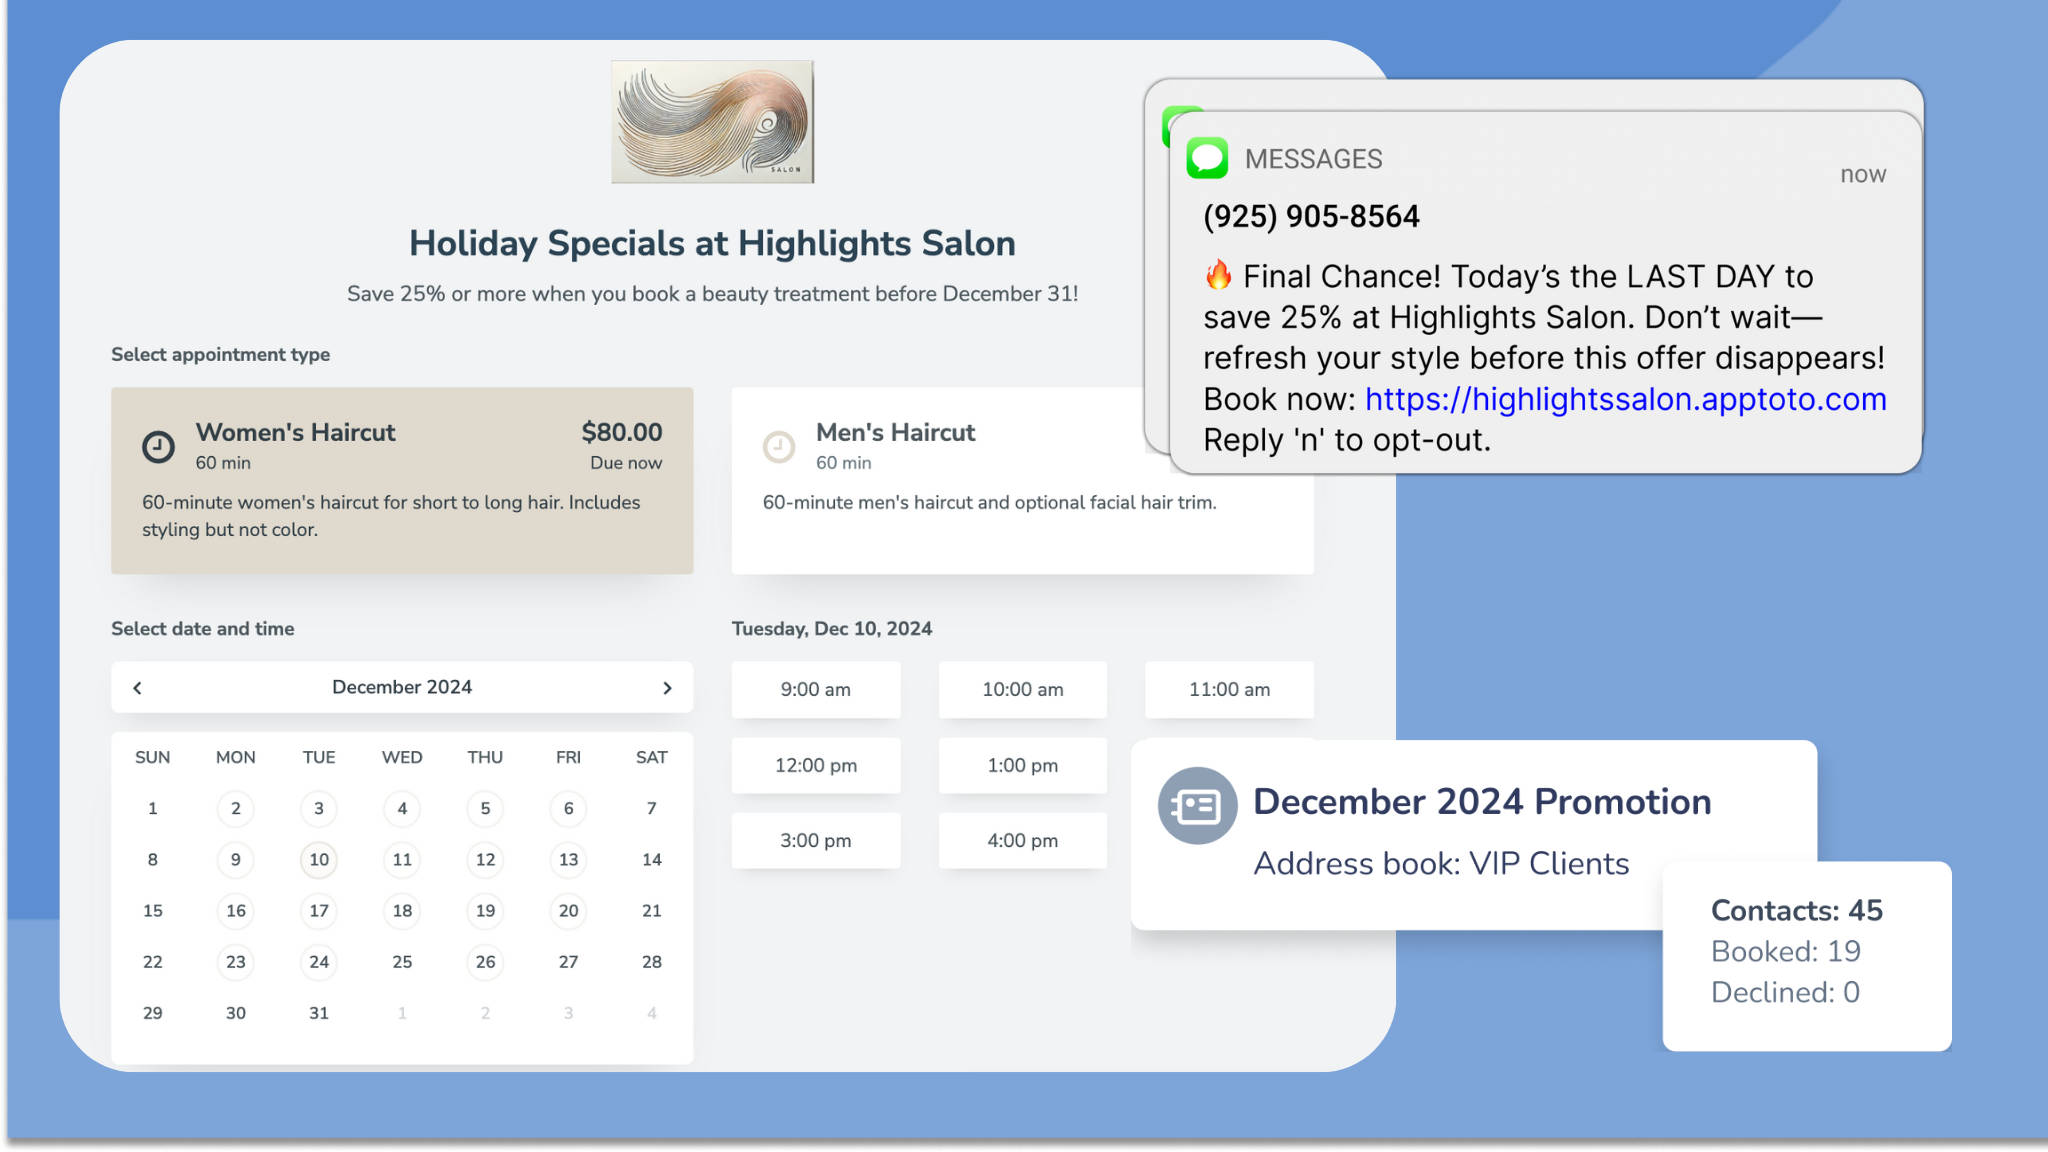
What if you could offer them a limited-time discount to create urgency and lock in those appointments? With Apptoto, you can easily create and manage time-sensitive offers that encourage your clients to take action—no added stress for you or your staff.
Whether you’re looking to fill last-minute openings, promote a seasonal special, or reward your loyal customers, limited-time discounts are a smart way to grow your bookings fast. In this Automation Recipe, you’ll learn how to set up these discounts using Apptoto, ensuring your promotions are effective and hassle-free.
What This Automation Does
This automation recipe shows you how to:
- Create a custom, limited-time booking page
- Use a Campaign to promote appointment discounts
- Automate follow-up messages to remind clients about the offer’s expiration
Industries That Benefit From Appointment Discounts
Best for:
- Salons and spas: Fill last-minute appointment slots or off-peak hours.
- Tutoring and education: Promote enrollment for group classes or seasonal sessions.
- Healthcare, Wellness & Dental offices: Maximize end-of-year bookings as patients use insurance benefits.
- Photography studios: Offer discounts on portrait sessions to fill seasonal schedules.
- Home services: Promote seasonal maintenance or inspection appointments, like HVAC tune-ups or pest control.
- Pet care providers: Reward loyal clients with discounted grooming or check-up appointments.
What You’ll Need
- An Apptoto account
- Stripe or Square Account
Instructions
Adding a Payment Processor
- Log into Apptoto and navigate to “Settings” > “Payment Processing.”
- On the “Payment Processing” screen, click Square or Stripe, depending on your payment processor. Enter your credentials and follow the prompts to sync your account with Apptoto.

- After you’ve synced your payment processor, you will see “Connected” under the payment processor logo. A new section will appear that lists the email connected to the payment processor, the date connected, and the health status.

Setting Up A Booking Page with Discounted Services
- Navigate to the “Booking Pages” tab.
- If you already have a booking page that you’d like to replicate and apply discounted prices to, click the menu and clone the page.

- Create a new booking page URL
- Then, skip to step 12 to adjust pricing for your services and “Create” your page.
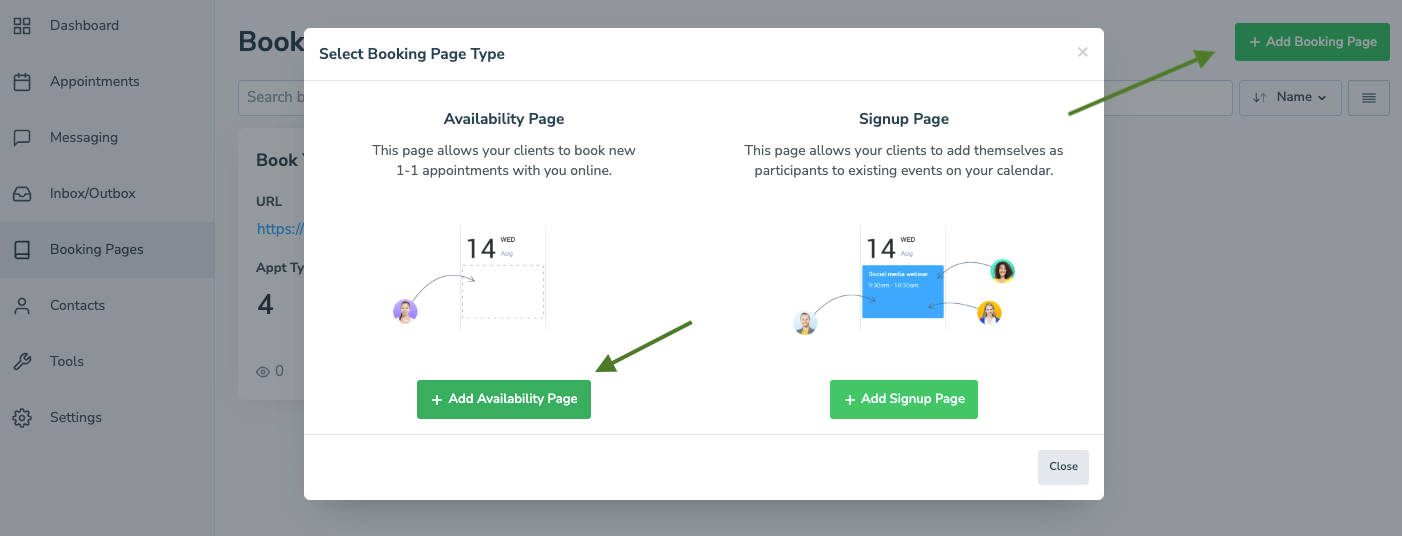
- To create a new booking page, click “Add Booking Page,” then select “+Add Availability Page.”
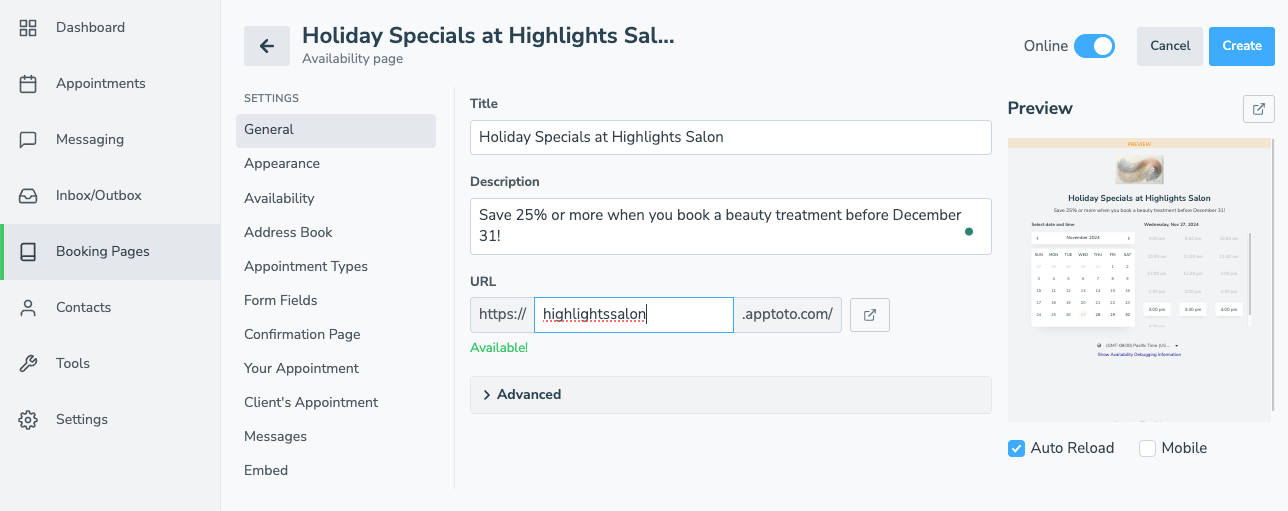
- First, add your Booking page title, description, and URL.
- Pro Tip: Promote your special in the title or description to ensure clients know about your special offer.
- Pro Tip: Promote your special in the title or description to ensure clients know about your special offer.
Choosing When/For How Long Discounted Appointments Will be Available
- Navigate to the “Availability” tab.
- Set which calendars Apptoto will look at to determine if there are available appointment slots.
- Adjust bookability settings and how often appointments are bookable using the “Selectable Times” setting.
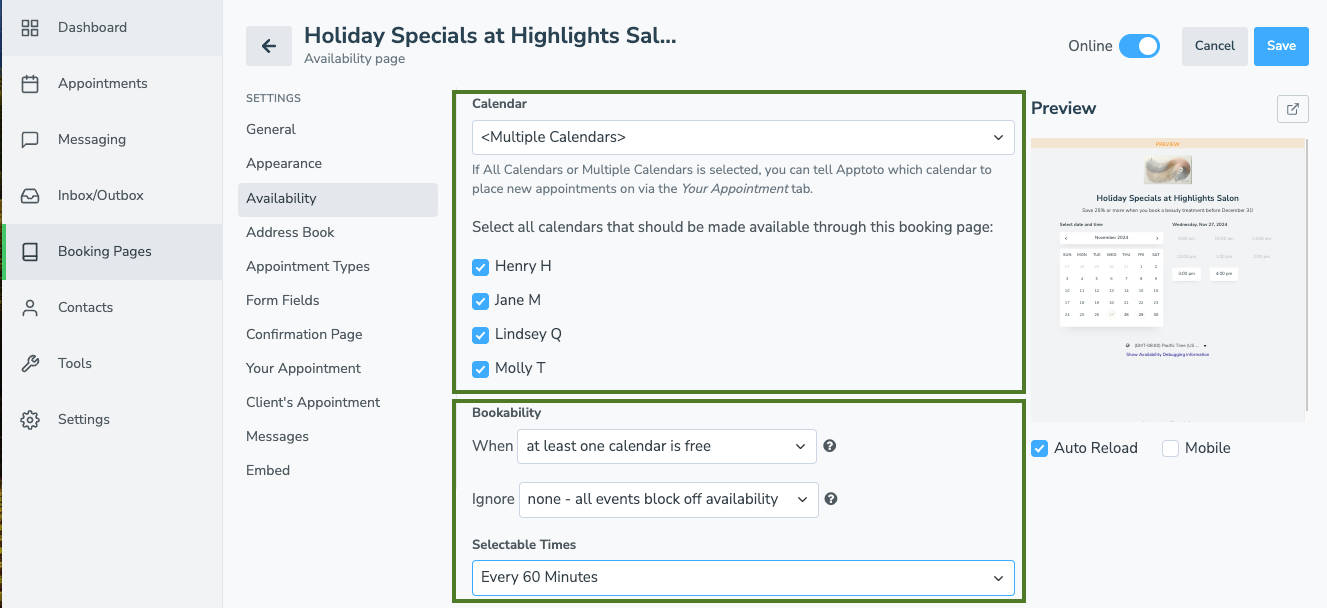
- IMPORTANT: If you want your discount to only be available for appointments booked during a specific, limited time frame, check the “Specific Date Range” setting.
- A new date field will appear. Set the exact time frame you want clients to be able to book appointments. Appointment slots will not show before or after that date range.

- A new date field will appear. Set the exact time frame you want clients to be able to book appointments. Appointment slots will not show before or after that date range.
Applying Discounts to Appointment Types
- Next, click the “Appointment Types” tab.
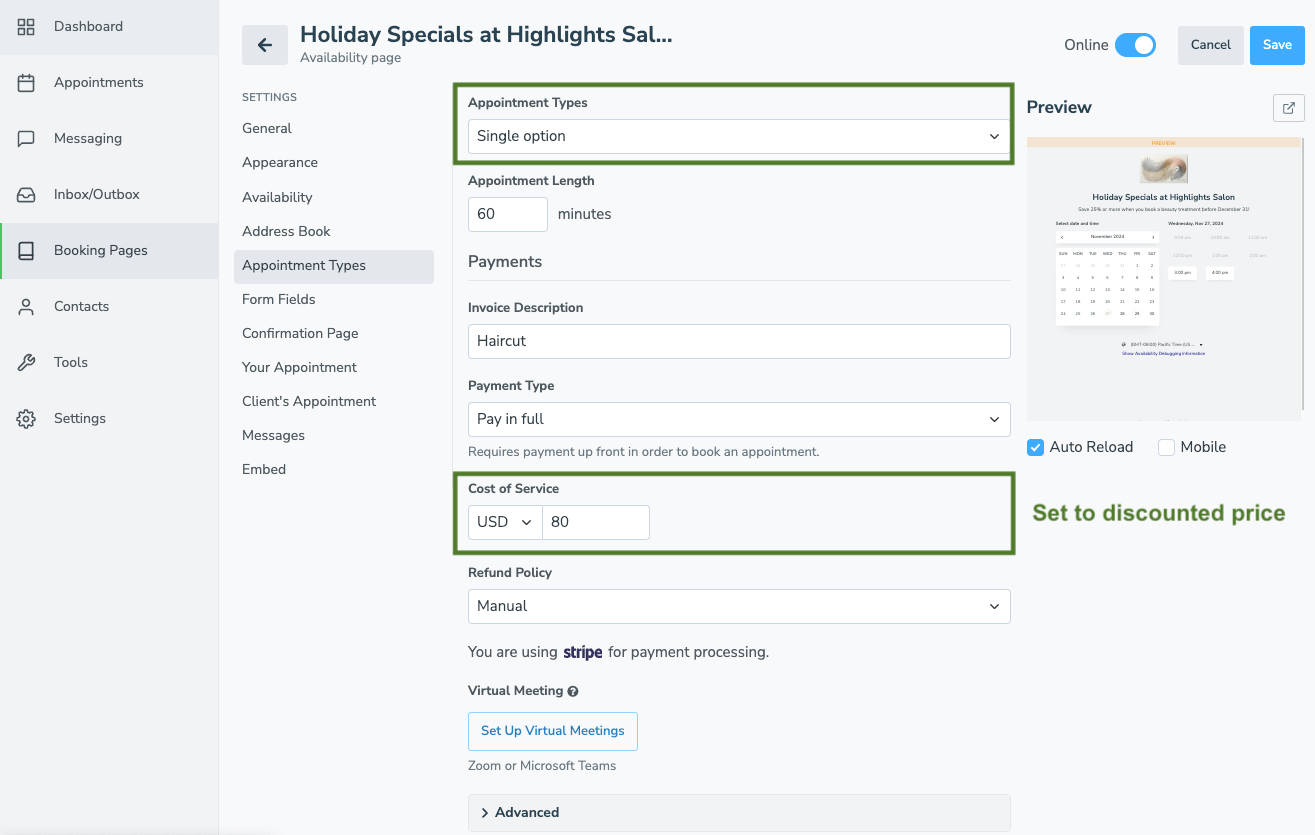
- Using the “Appointment Types” drop-down, select whether you want to offer a single appointment type on your booking page or multiple.
- If offering a single appointment, set your appointment length and whether it’s a virtual meeting. Then move on to “Payment Type.”
- If offering multiple options, click “+Add type” to add your first appointment type. Complete the other fields provided, then move to “Payment Type.”
- If offering a single appointment, set your appointment length and whether it’s a virtual meeting. Then move on to “Payment Type.”
- Choose your Payment Type. For discounted services, you can use “Pay in Full,” “Deposit,” or “Require card w/ no show fee.”**
- A “Cost of Service” field will appear. Set it to the discounted appointment rate (e.g., if your regular price is $150 and you’re offering 20% off, set the Cost of Service to $120).

- Complete the remaining settings fields and hit “Done.”
- Repeat steps 13b through 16 to add additional services if using “Multiple Appointment Types.”

Adjusting Remaining Settings for Booking Page
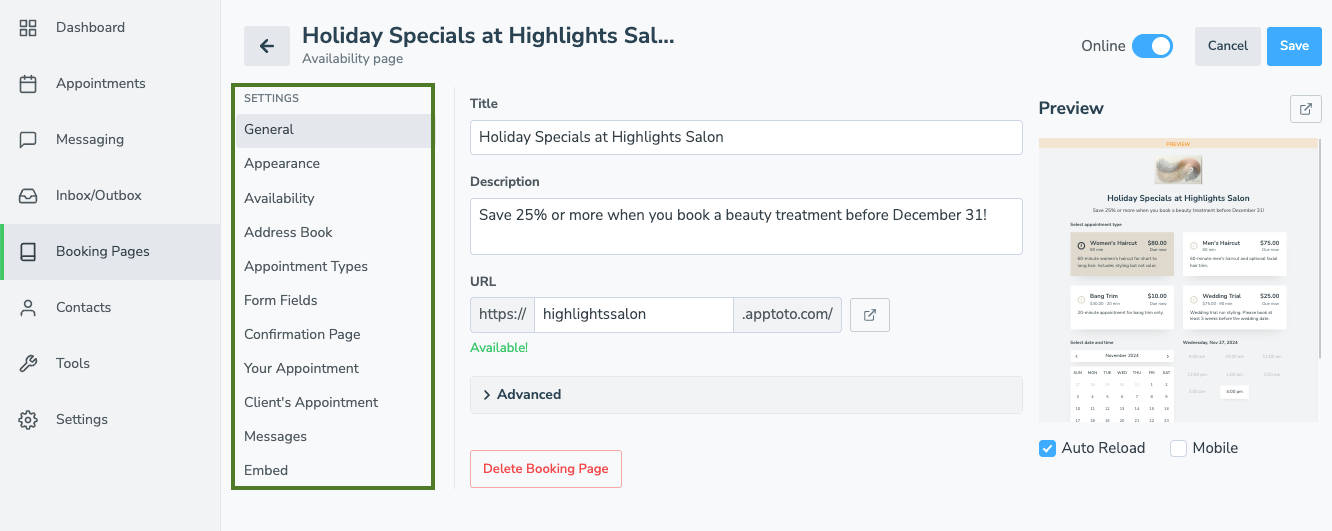
- Continue adjusting settings on the Booking Settings tab to your preferences, including:
- Appearance: to adjust the look of your booking page
- Address Book: to set which address book new contacts are added to and set an authentication method (i.e., mobile phone, email, captcha).
- Form Fields: to control what data you collect from someone when they book an appointment.
- Confirmation Page: to control the page or verbiage someone sees after booking an appointment
- Your Appointment: to control how the booked event will appear on your calendar and what details will be included.
- Client’s Appointment: to control what information is included on your client’s calendar event if they click “Add to Calendar” after receiving their booking confirmation
- Messages: to control the content of the email or text messages sent to you and your clients after they book an appointment, cancel, or reschedule.
- Embed: generate an iframe or “Book Now” button to add to your website (if you want to promote the discount to everyone).
- Click “Create” to create your page.
When someone visits your Promotional Booking Page, the page will display the discounted appointment price(s). Clients must submit full or partial payment (or credit card details) to book an appointment slot successfully.
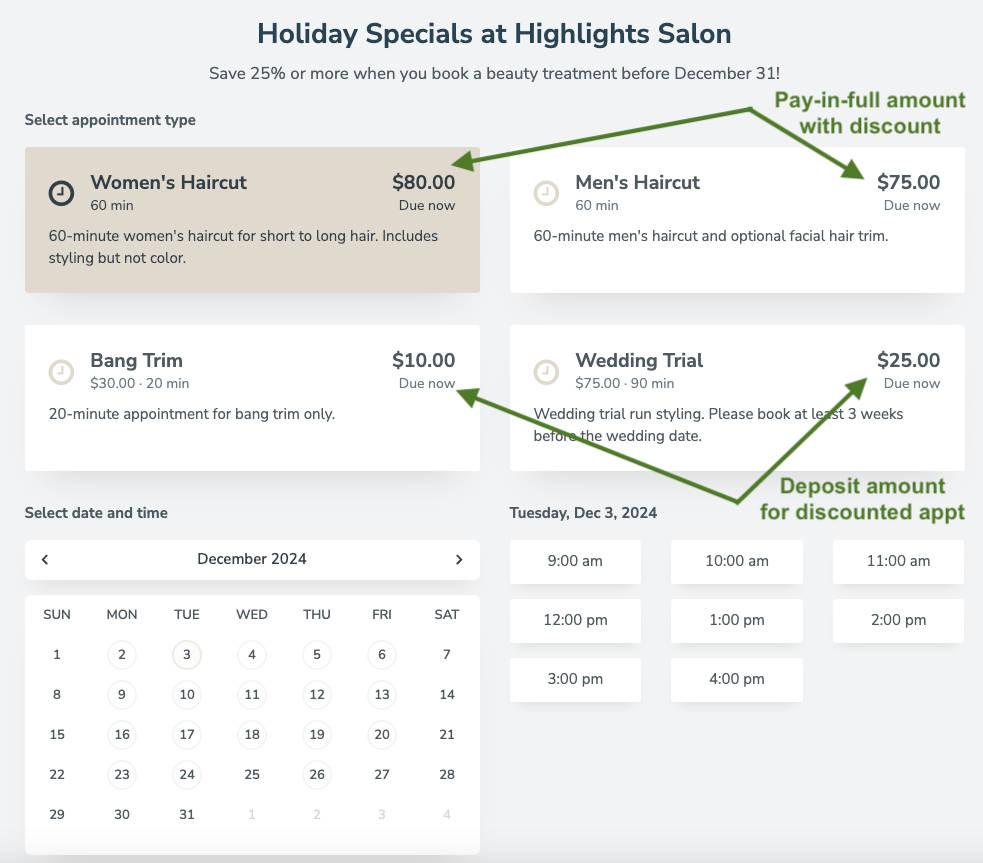
**If you use the “Deposit” or “Require card w/ No Show Fee” payment types, you must collect the remaining payment during or after the appointment, which you can do via the Apptoto dashboard.
Launch a Campaign to Promote Your Booking Specials
- Navigate to the “Messaging” tab, then click “Campaigns.”
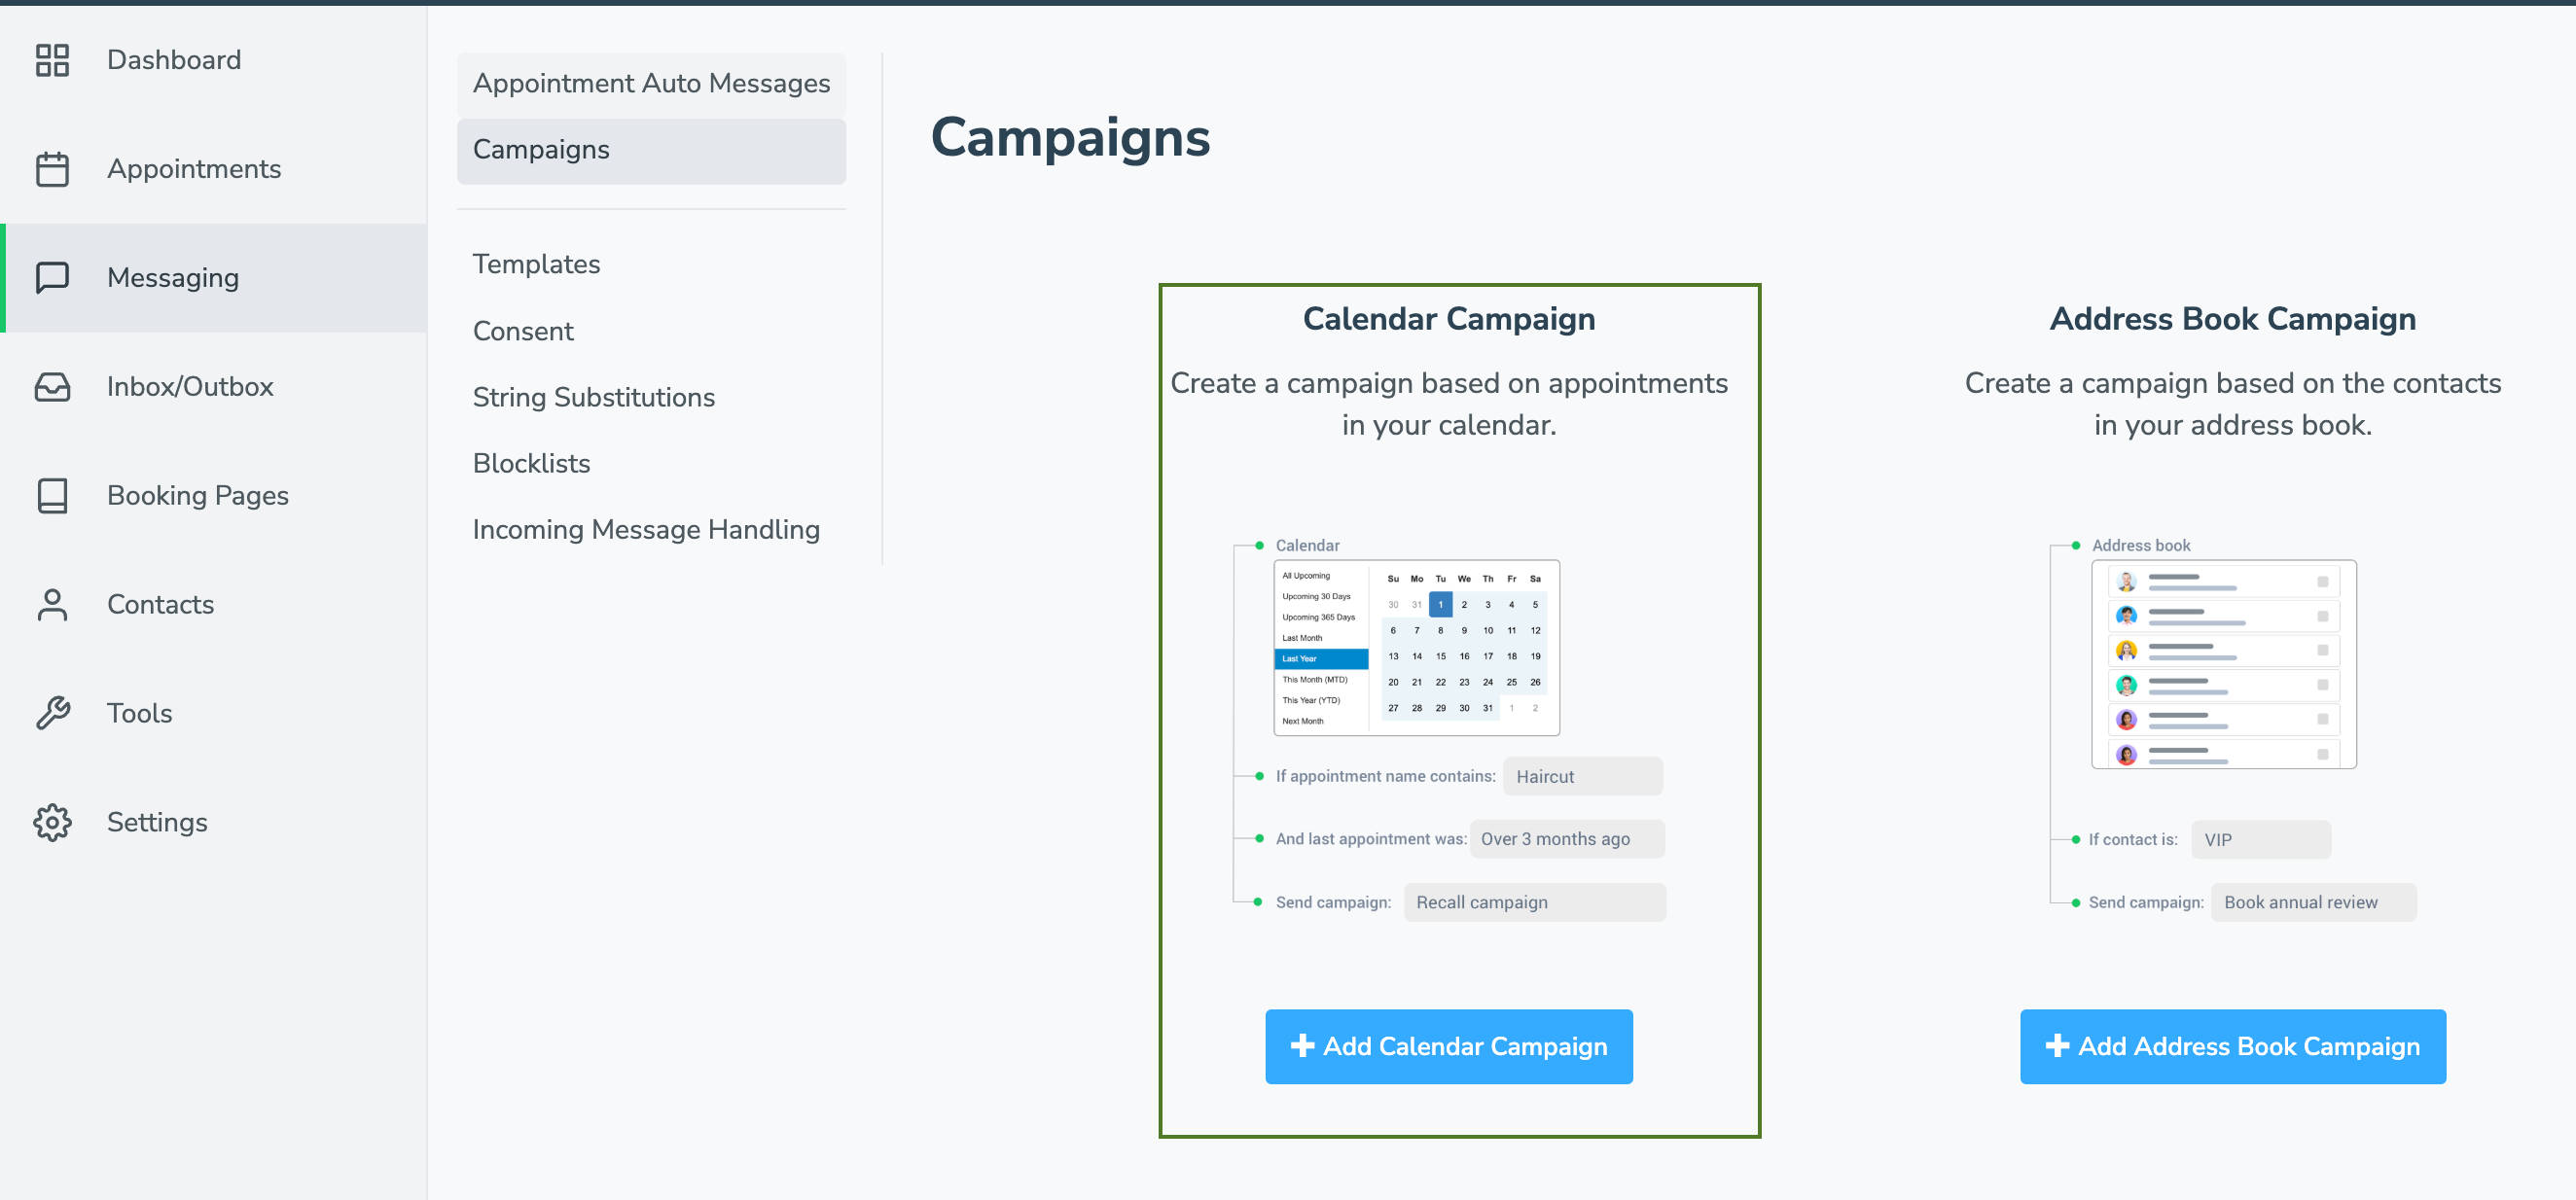
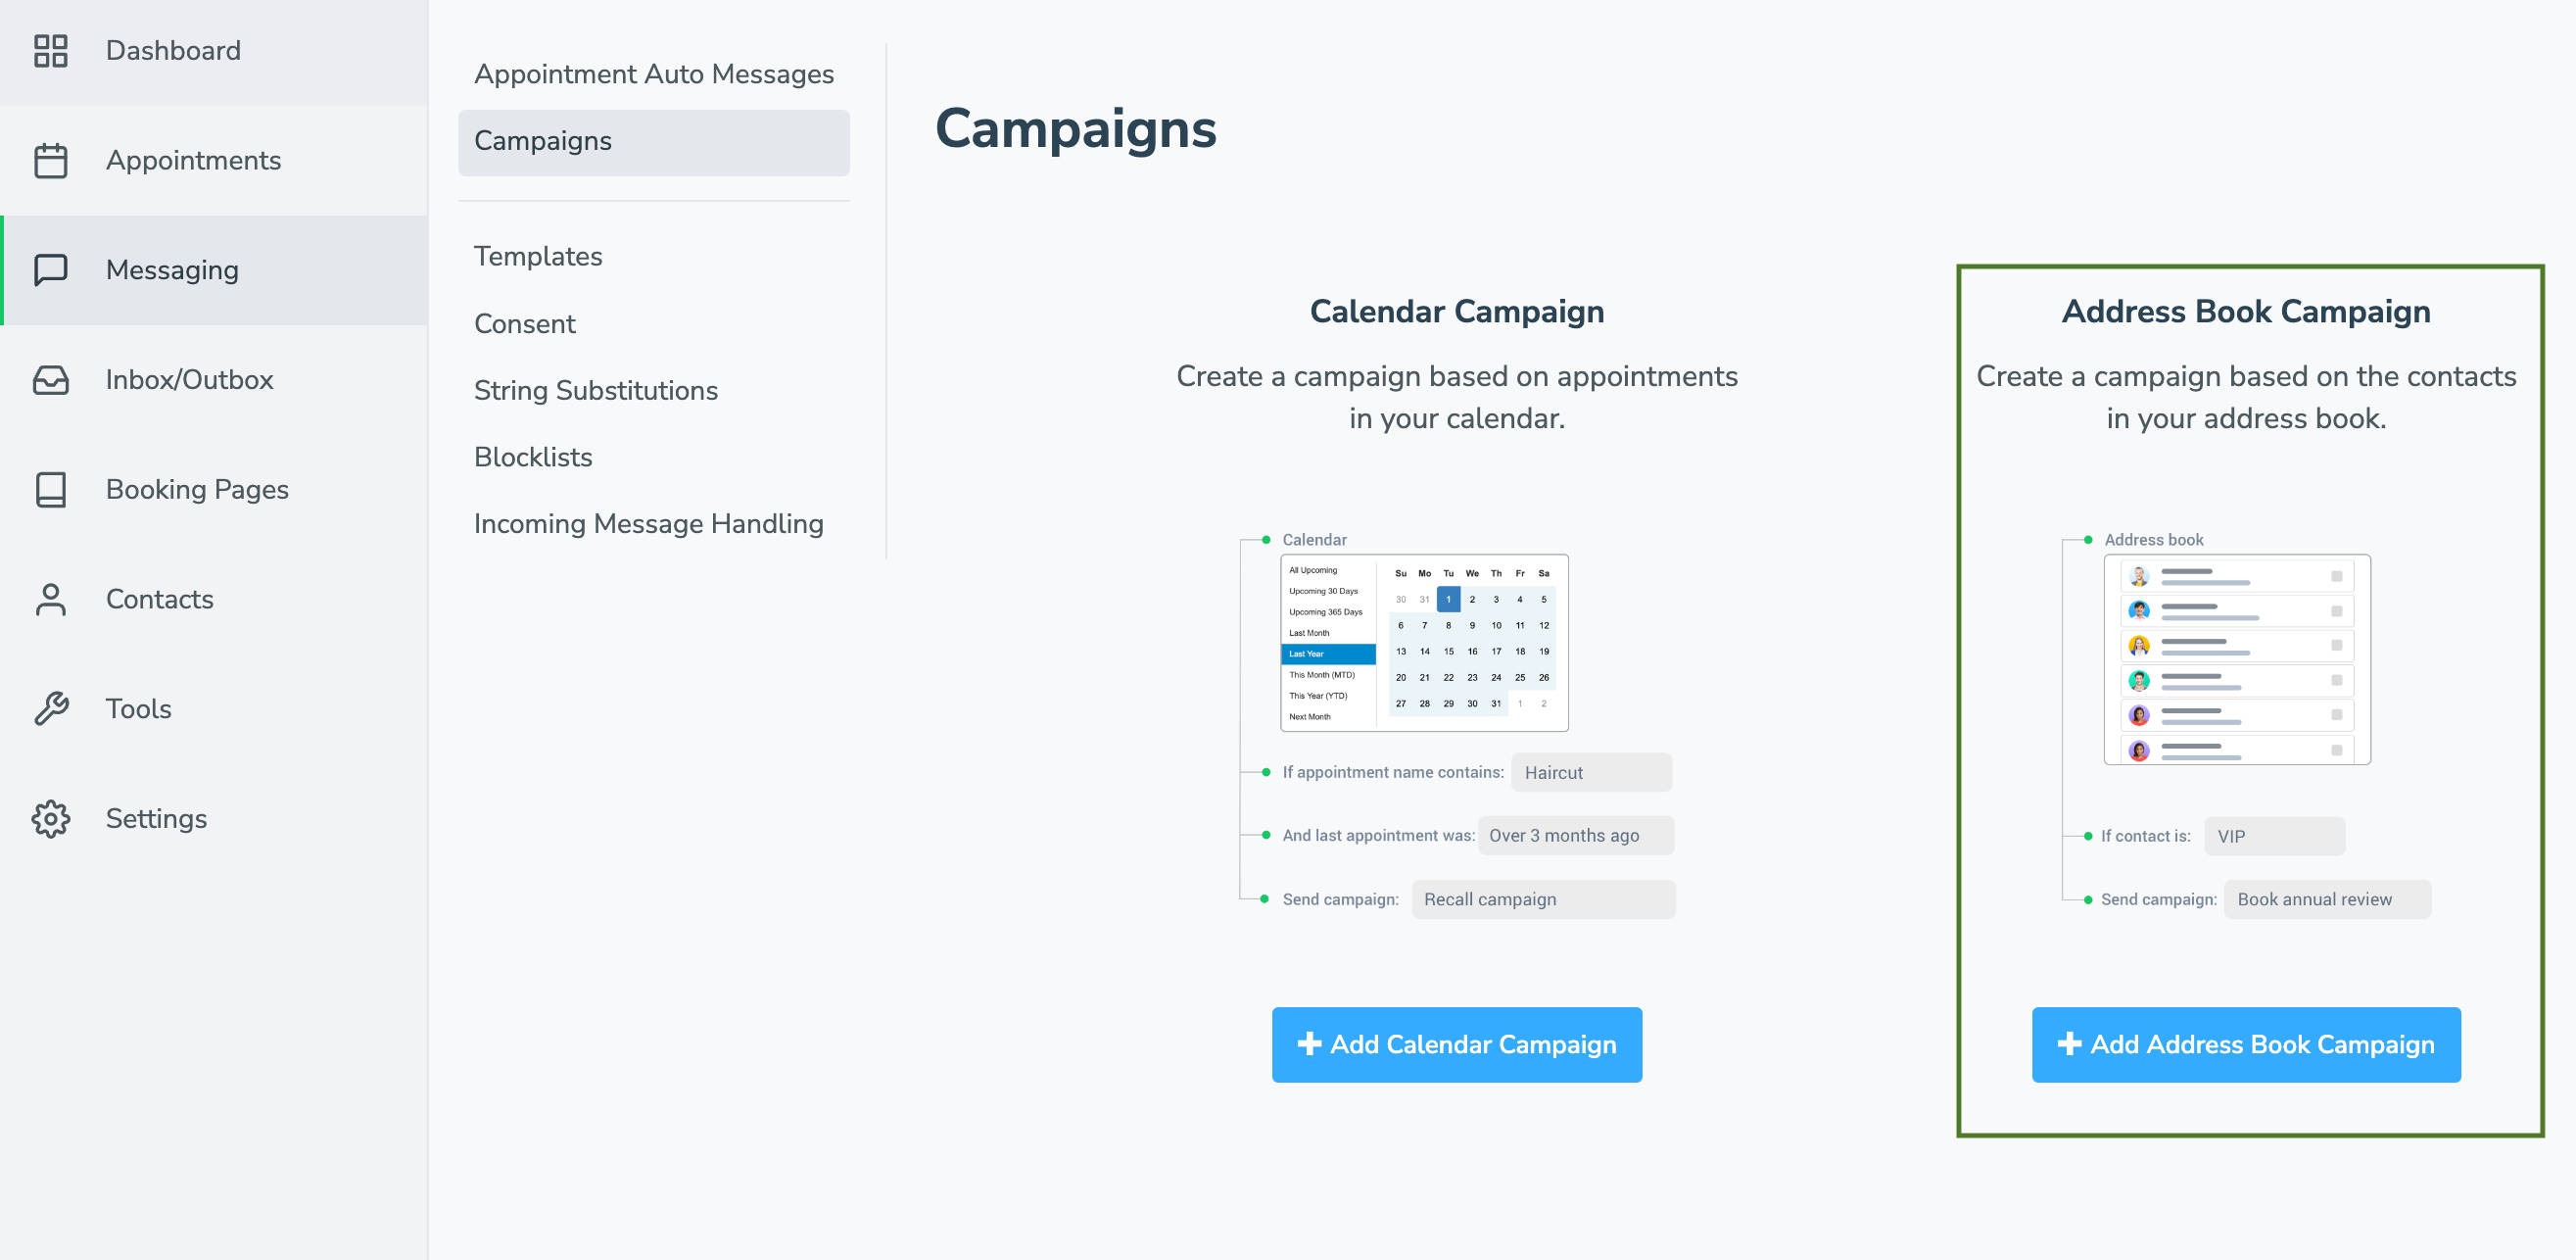
- Choose between a “Calendar Campaign” or an “Address Book Campaign.”
- A “Calendar Campaign” will send targeted messages to clients based on their last appointment booking.
- An “Address Book Campaign” will send targeted messages to anyone whose email you have stored in a synced Address Book or have imported into one.
- A “Calendar Campaign” will send targeted messages to clients based on their last appointment booking.
- Select the “Standard Booking Campaign” template.
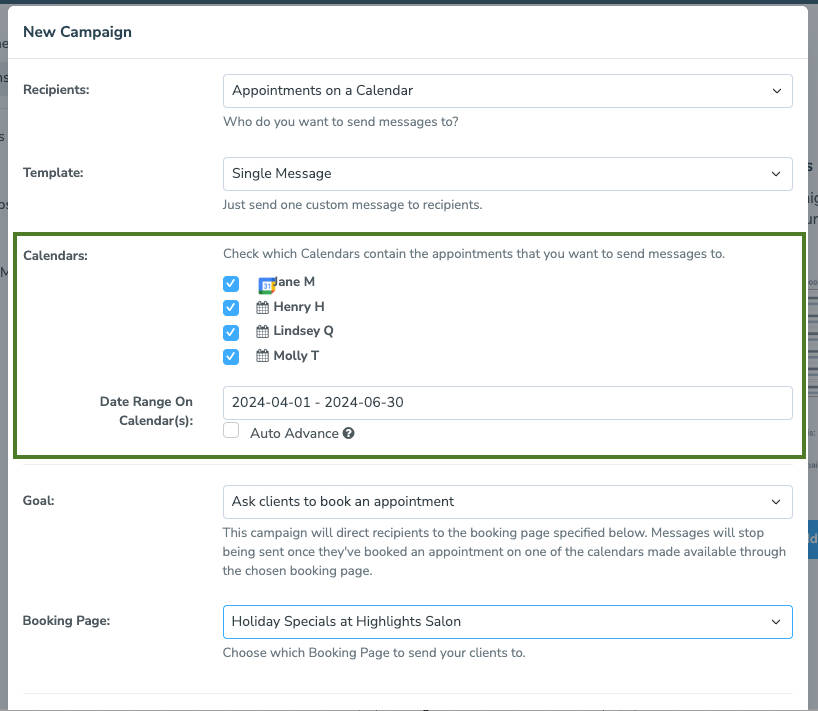
- If using a “Calendar Campaign,” you’ll be asked to select which calendar(s) the appointments you want to send messages to are booked.
- You’ll also be asked to select the date range when your clients’ last appointment occurred. Apptoto will only send messages to appointments booked during that time.
- You’ll also be asked to select the date range when your clients’ last appointment occurred. Apptoto will only send messages to appointments booked during that time.
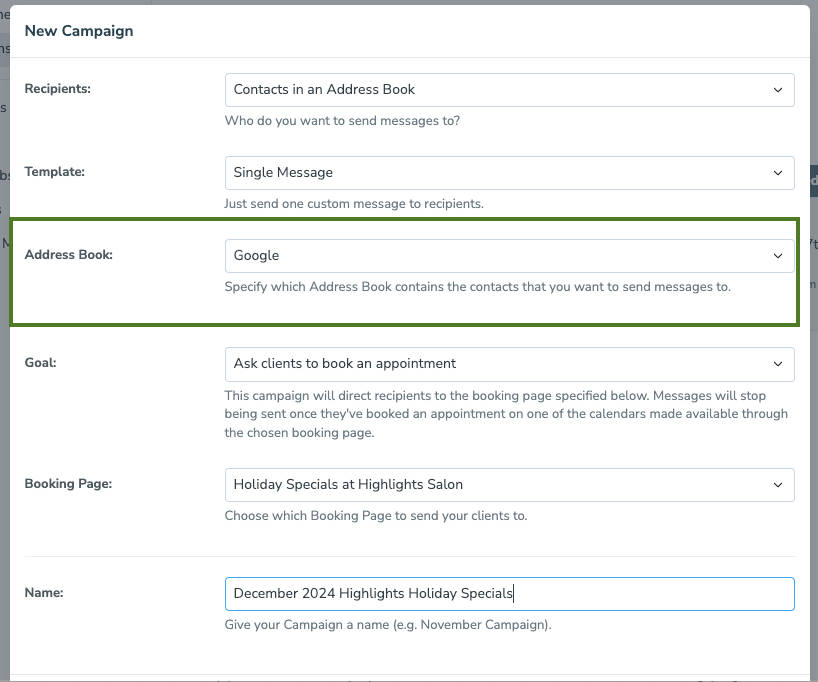
- If using an “Address Book Campaign,” please select the “Address Book” that houses all the contacts you’d like to target.
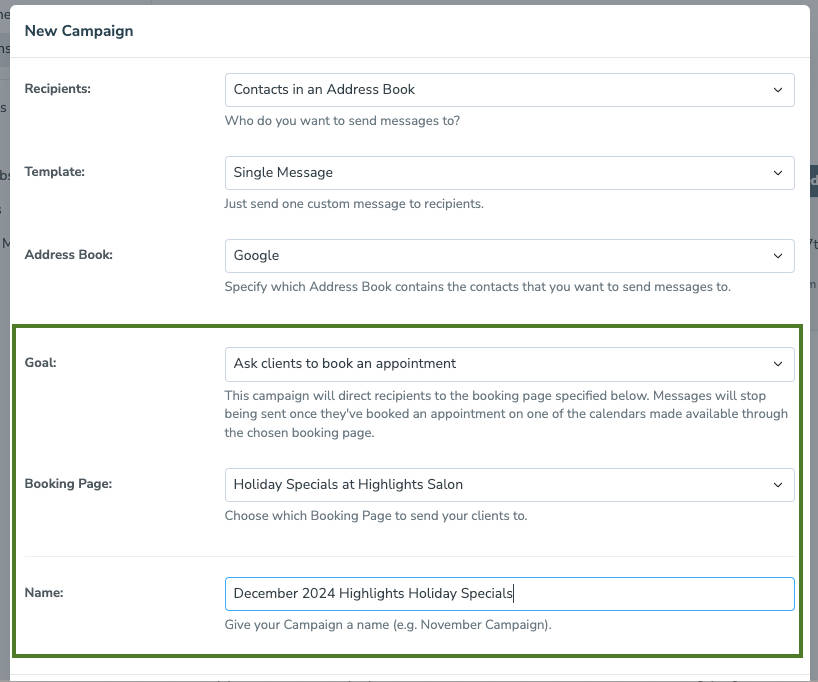
- Leave the Goal as “Ask Clients to Book an Appointment.”
- Set the “Booking Page” to the “Discount Booking” page you created in steps 4-19.
- Click “Create Campaign” and give it a name.
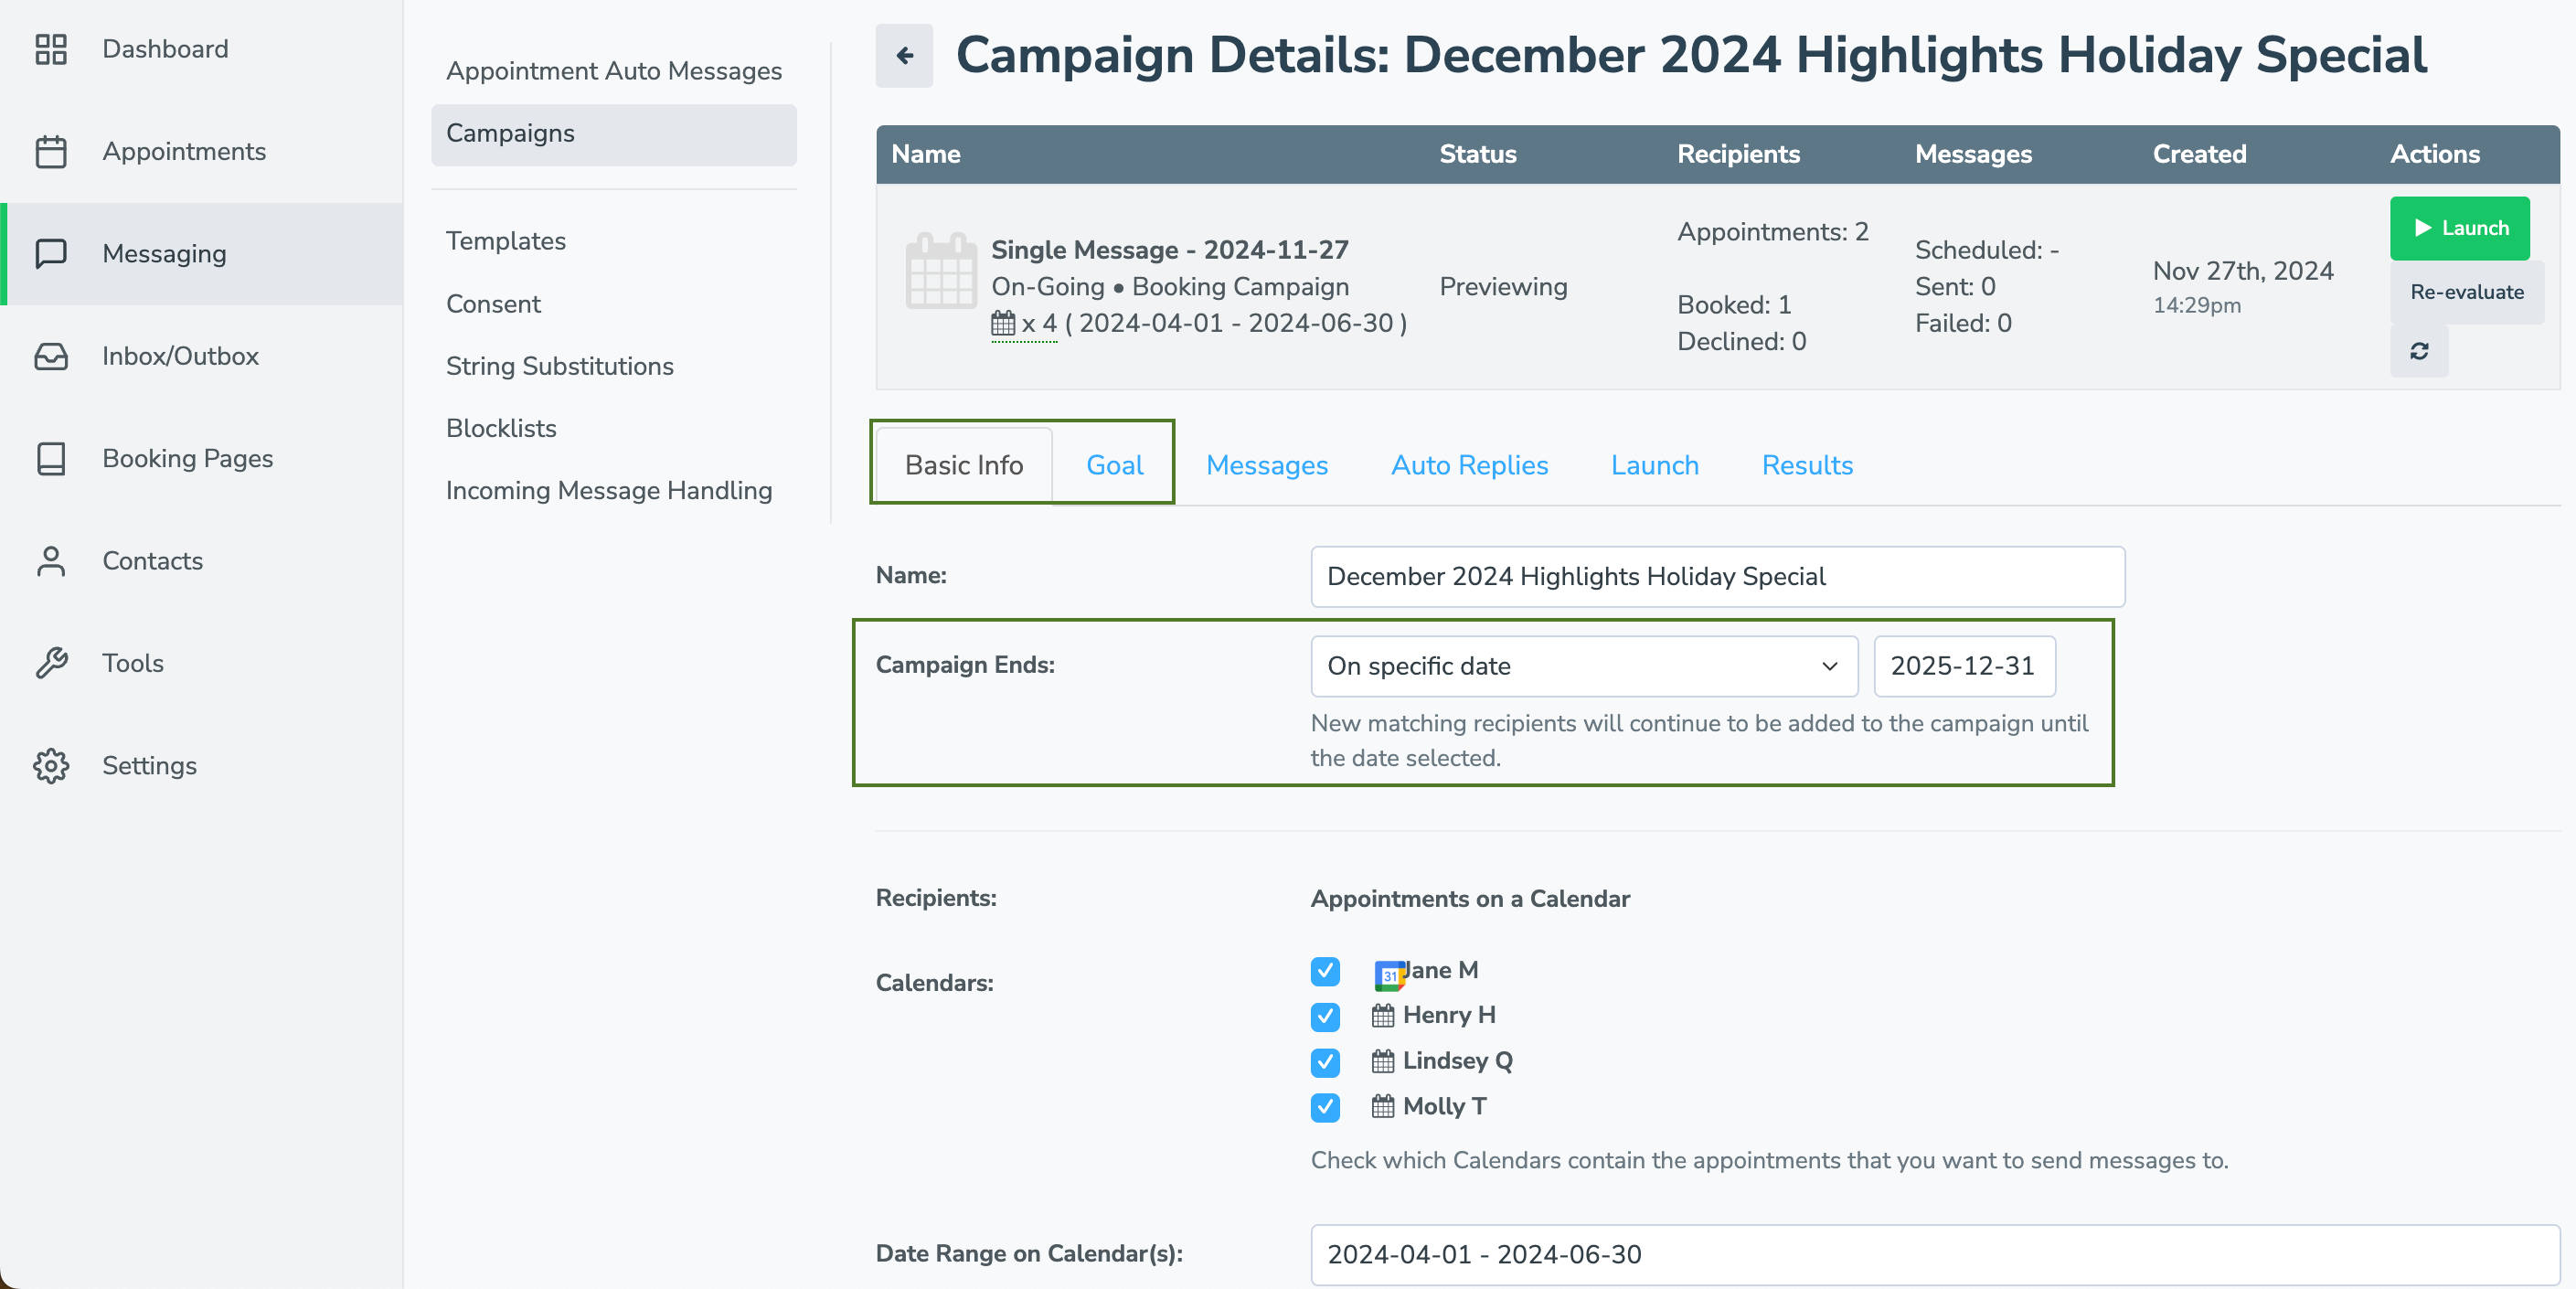
- On the “Campaign Details screen,” review the “Basic Info” and “Goal” tabs to make sure everything looks good.
- IMPORTANT: To promote the discount for a limited time, set a specific Campaign end date using the “Campaign Ends” field. The end date will be when Apptoto stops sending promotional messages to clients, enticing them to book.
- The campaign end date will likely fall near the date range you set in step 11 (the time frame when discounted appointments are available).
- The campaign end date will likely fall near the date range you set in step 11 (the time frame when discounted appointments are available).
- On the messages tab, choose the cadence, timing, and content of the SMS and email messages you want to send to target registrants, enticing them to sign up.
- Make sure to promote your special/discount in your emails or texts.
- Include {{ campaign.booking_link }} in your email and SMS messages. Apptoto will auto-populate the field with the “Discount Booking page” link (see step 26).
- Add or remove messages to your cadence as needed.

- Use the “Auto Replies” tab to craft automated responses to your registrants if they respond to your email or SMS messages.
- Review all your settings to ensure they look correct.
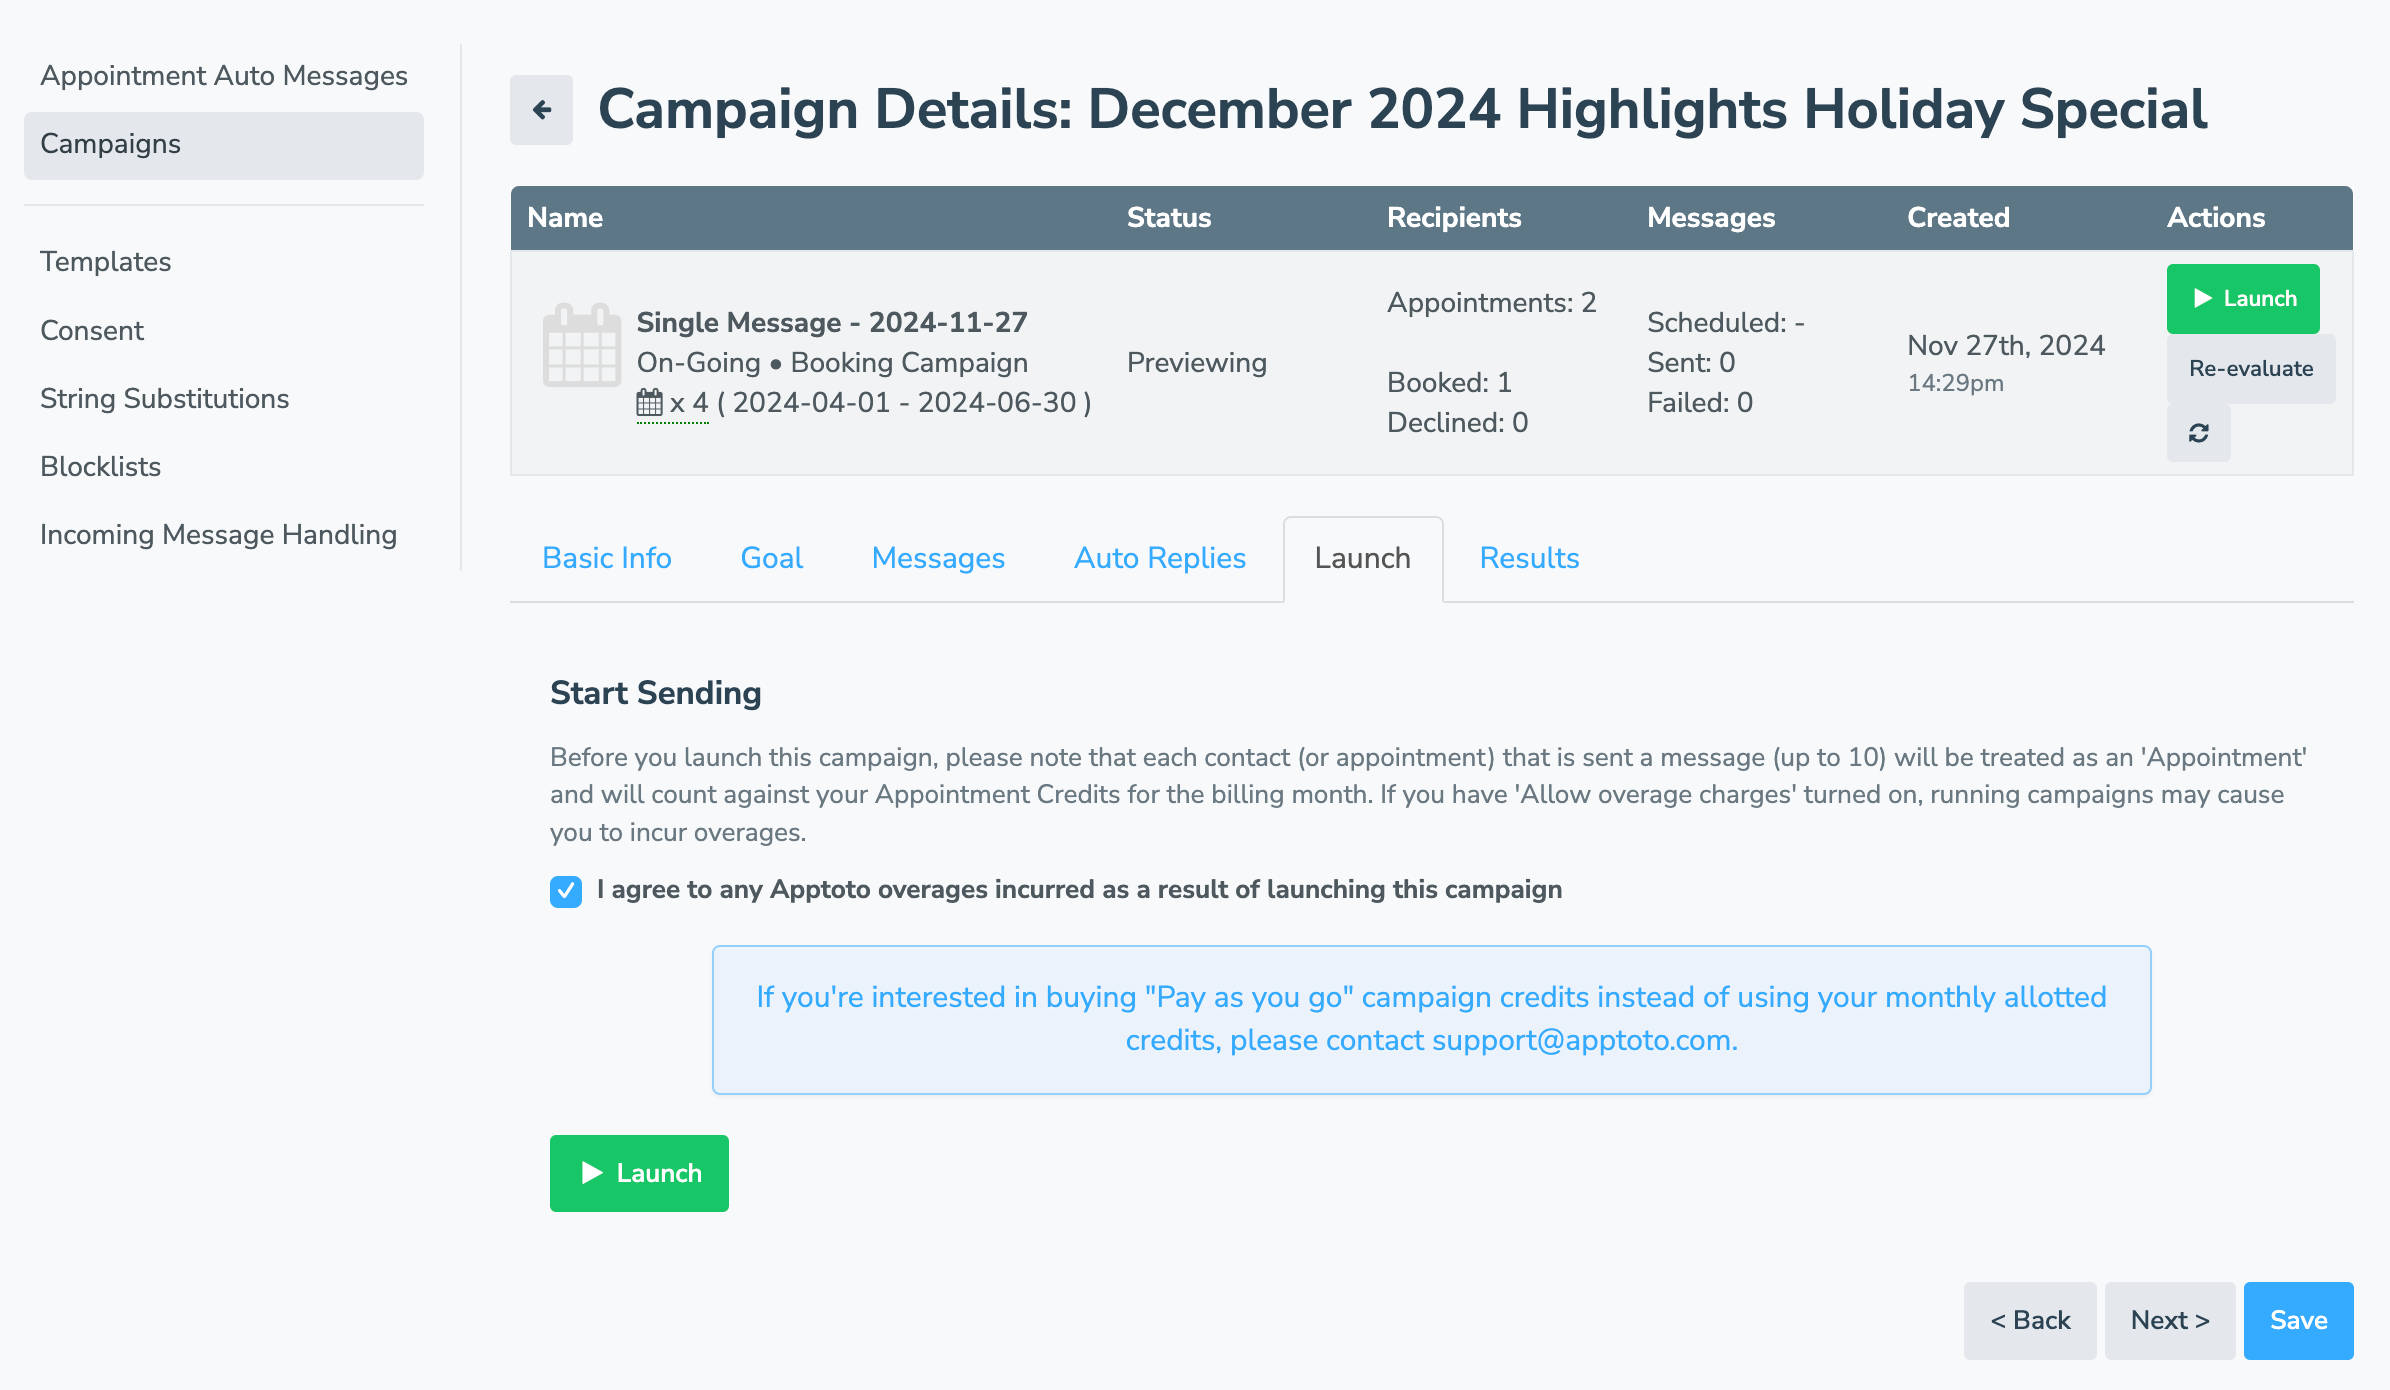
- Click launch, and Apptoto will automatically contact your clients with a link to your discount booking page.
- Pro Tip: Once a contact from your target discount list books an appointment, Apptoto will stop sending campaign messages asking them to book.
- Pro Tip: Once a contact from your target discount list books an appointment, Apptoto will stop sending campaign messages asking them to book.
Optional: Promotional Appointment Reminders
After you’ve secured new bookings via your promotional campaign, your existing appointment reminders will kick in to remind your clients about their upcoming appointments.
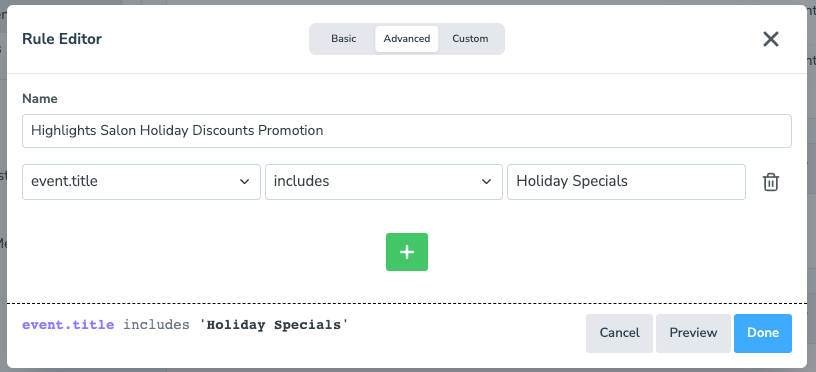
If you want to create a reminder sequence that specifically mentions your promotional special, navigate to Messages > Appointment Auto Rules and create a new rule for your Promotion. For example, you could set up a rule for any appointment with “Black Friday Promotion” in the Event Title or “25% off” in the Event Description. Then create your appointment reminder and follow-up sequence as desired.
Best Practices for Offering Limited-Time Discounts
Only Send Messages to Clients that Opt to Receive Promotional Messages
- When reviewing “Campaign Goals” during setup (step 28), make sure to toggle “For Marketing” to “Yes.” Apptoto will only send messages to phone numbers or emails of clients who’ve opted to receive promotional Marketing messages (added under Settings > Consent > Marketing).
Set Clear Offer Parameters
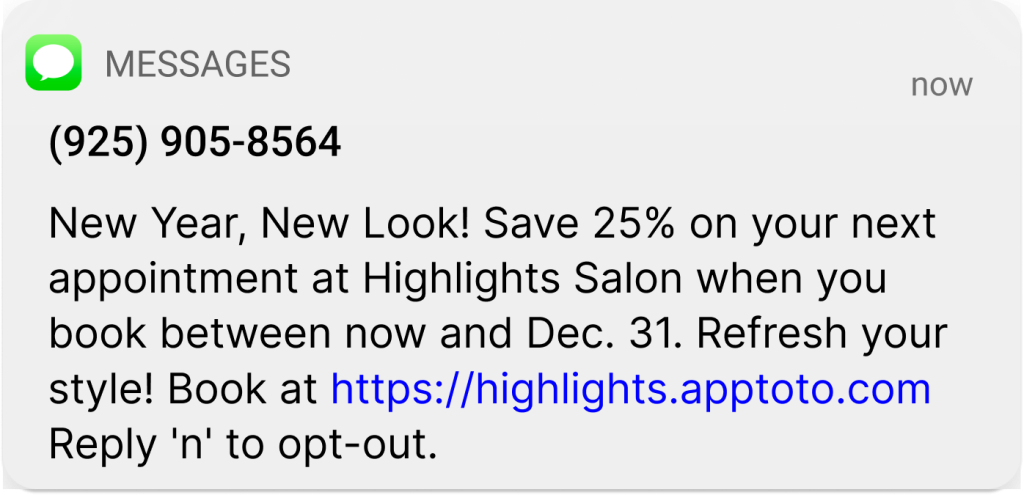
- Define the start and end dates of your discount period. Communicate these dates in your promotional messages.
- Limit the discount to specific appointment types or times if needed.
Personalize Messaging for Impact
- Use client names, appointment histories, or past interactions to tailor discount promotions and make them more compelling. Do this by using dynamic fields in your messages. You can also segment clients into different address books (Address Book Campaigns) or target specific Appointment Types (Calendar Campaigns) via the “Appointment Filter” (step 28).
- Include a clear call to action like “Book Now to Save 20% on Your Next Visit!”
Automate Follow-Ups
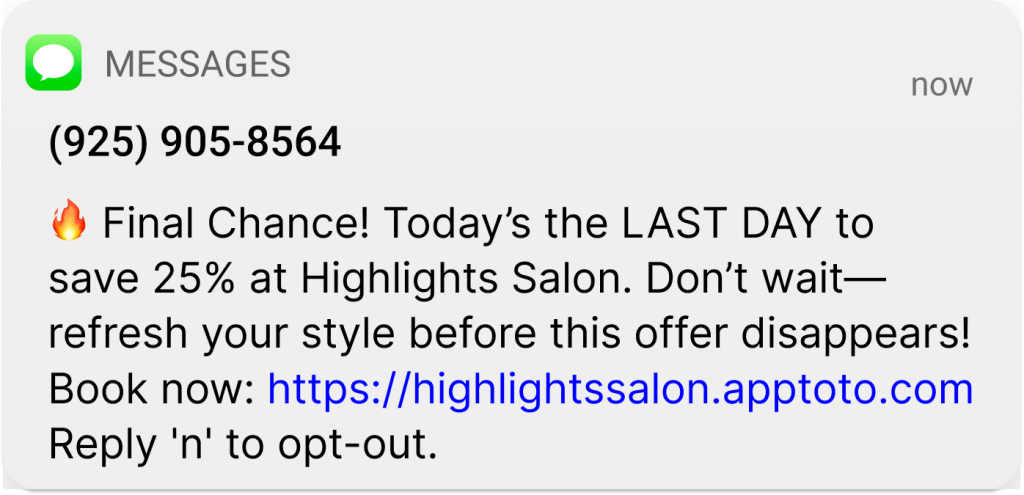
- Use the “Campaigns” Message tab to send a final reminder to clients who haven’t yet booked on the last day of your campaign. Emphasize the urgency of the offer. For example, “Only 24 hours left to claim your discount!”
Monitor and Optimize
- Track how many bookings your discount promotion generates using the stats on your Booking Page tab.
- Analyze which clients responded to your promotion and adjust future offers accordingly.
Drive Client Bookings With Appointment Discounts
Limited-time appointment discounts are a powerful way to drive bookings and keep your calendar full. By automating your offers with Apptoto, you save your staff valuable time keeping track of the most recent discount code you’re using or applying discounts manually at checkout.
Ready to start filling your schedule faster? Sign up for a free 14-day trial of Apptoto today to see how appointment discounts can grow your business. Already an Apptoto user? Try this recipe today, and let us know what you want us to automate next!
