Estimated reading time: 10 minutes
A client calls in wanting to book an appointment with you. 🎉
You require a deposit to reserve the appointment slot. No big deal…usually. But today, you’re slammed, and taking the client’s payment details on the spot is not ideal.
You don’t want to risk losing the client to a competitor by telling them they need to book online (just so they can enter their payment information). So you schedule the appointment anyway and leave yourself a note to follow up on payment, adding one more task to your to-do list and hoping it doesn’t slip through the cracks.
While online scheduling tools can streamline appointment bookings and secure payments upfront, not every client books online. So why limit yourself to a system that only collects payments for appointments booked through it? Whether clients call in, book online, or you add their appointments manually, collecting payments should be automatic and easy.
Our newest automation recipe will show you how to set up Apptoto to remind and accept online payments for any appointment on your calendar, no matter how it was booked. This way, you secure more payments upfront, reduce cancellations, and keep your booking flow efficient and organized without extra manual steps.
What This Automation Does
This automation recipe teaches you how to:
- Sync your payment processor to Apptoto
- Add payment amounts and types to appointment events
- Automatically request payments using Messaging Rules
- Monitor payment statuses in Apptoto’s dashboard
Industries That Benefit from Payment Automation
Apptoto’s flexible payment system is ideal for various industries, especially those with multiple ways of booking appointments:
Best for: Healthcare Providers, Legal and Financial Services, Consulting Businesses, Personal Care Services, Beauty/Wellness Services, and Other Appointment-Based Businesses.
What You’ll Need
- Existing Stripe or Square Account
- Apptoto’s Desktop Portal
Instructions
Remember: This process is for collecting payments for appointments you or your staff have added to your calendar. If you want to automatically collect a payment or fee when a client schedules via your online booking page, check out Payments on Booking Pages and Payments on Signup Pages.
Adding a Payment Processor
- Log into Apptoto and navigate to “Settings” > “Payment Processing.”
- On the “Payment Processing” screen, click Square or Stripe, depending on your payment processor. Enter your credentials and follow the prompts provided by your payment processor to sync your account with Apptoto.

- After you’ve synced your payment processor, you will see “Connected” under the payment processor logo. A new section will appear that lists the email connected to the payment processor, the date connected, and the health status.

Setting Your Appointment Payment Settings
IMPORTANT: Your “Appointment Payments” settings (including invoice description and payment type) will automatically apply to all appointments. If each appointment will have a different invoice and payment type, please contact support@apptoto.com for assistance.
- Navigate to “Settings” > “Appointment Payments.”

- Enter the description you want to appear on your invoices under “Invoice Description.”
- Next, select what type of payment will be required for your appointments. You can choose:
- Pay in Full
- Deposit
- Require Card with No Show Fee
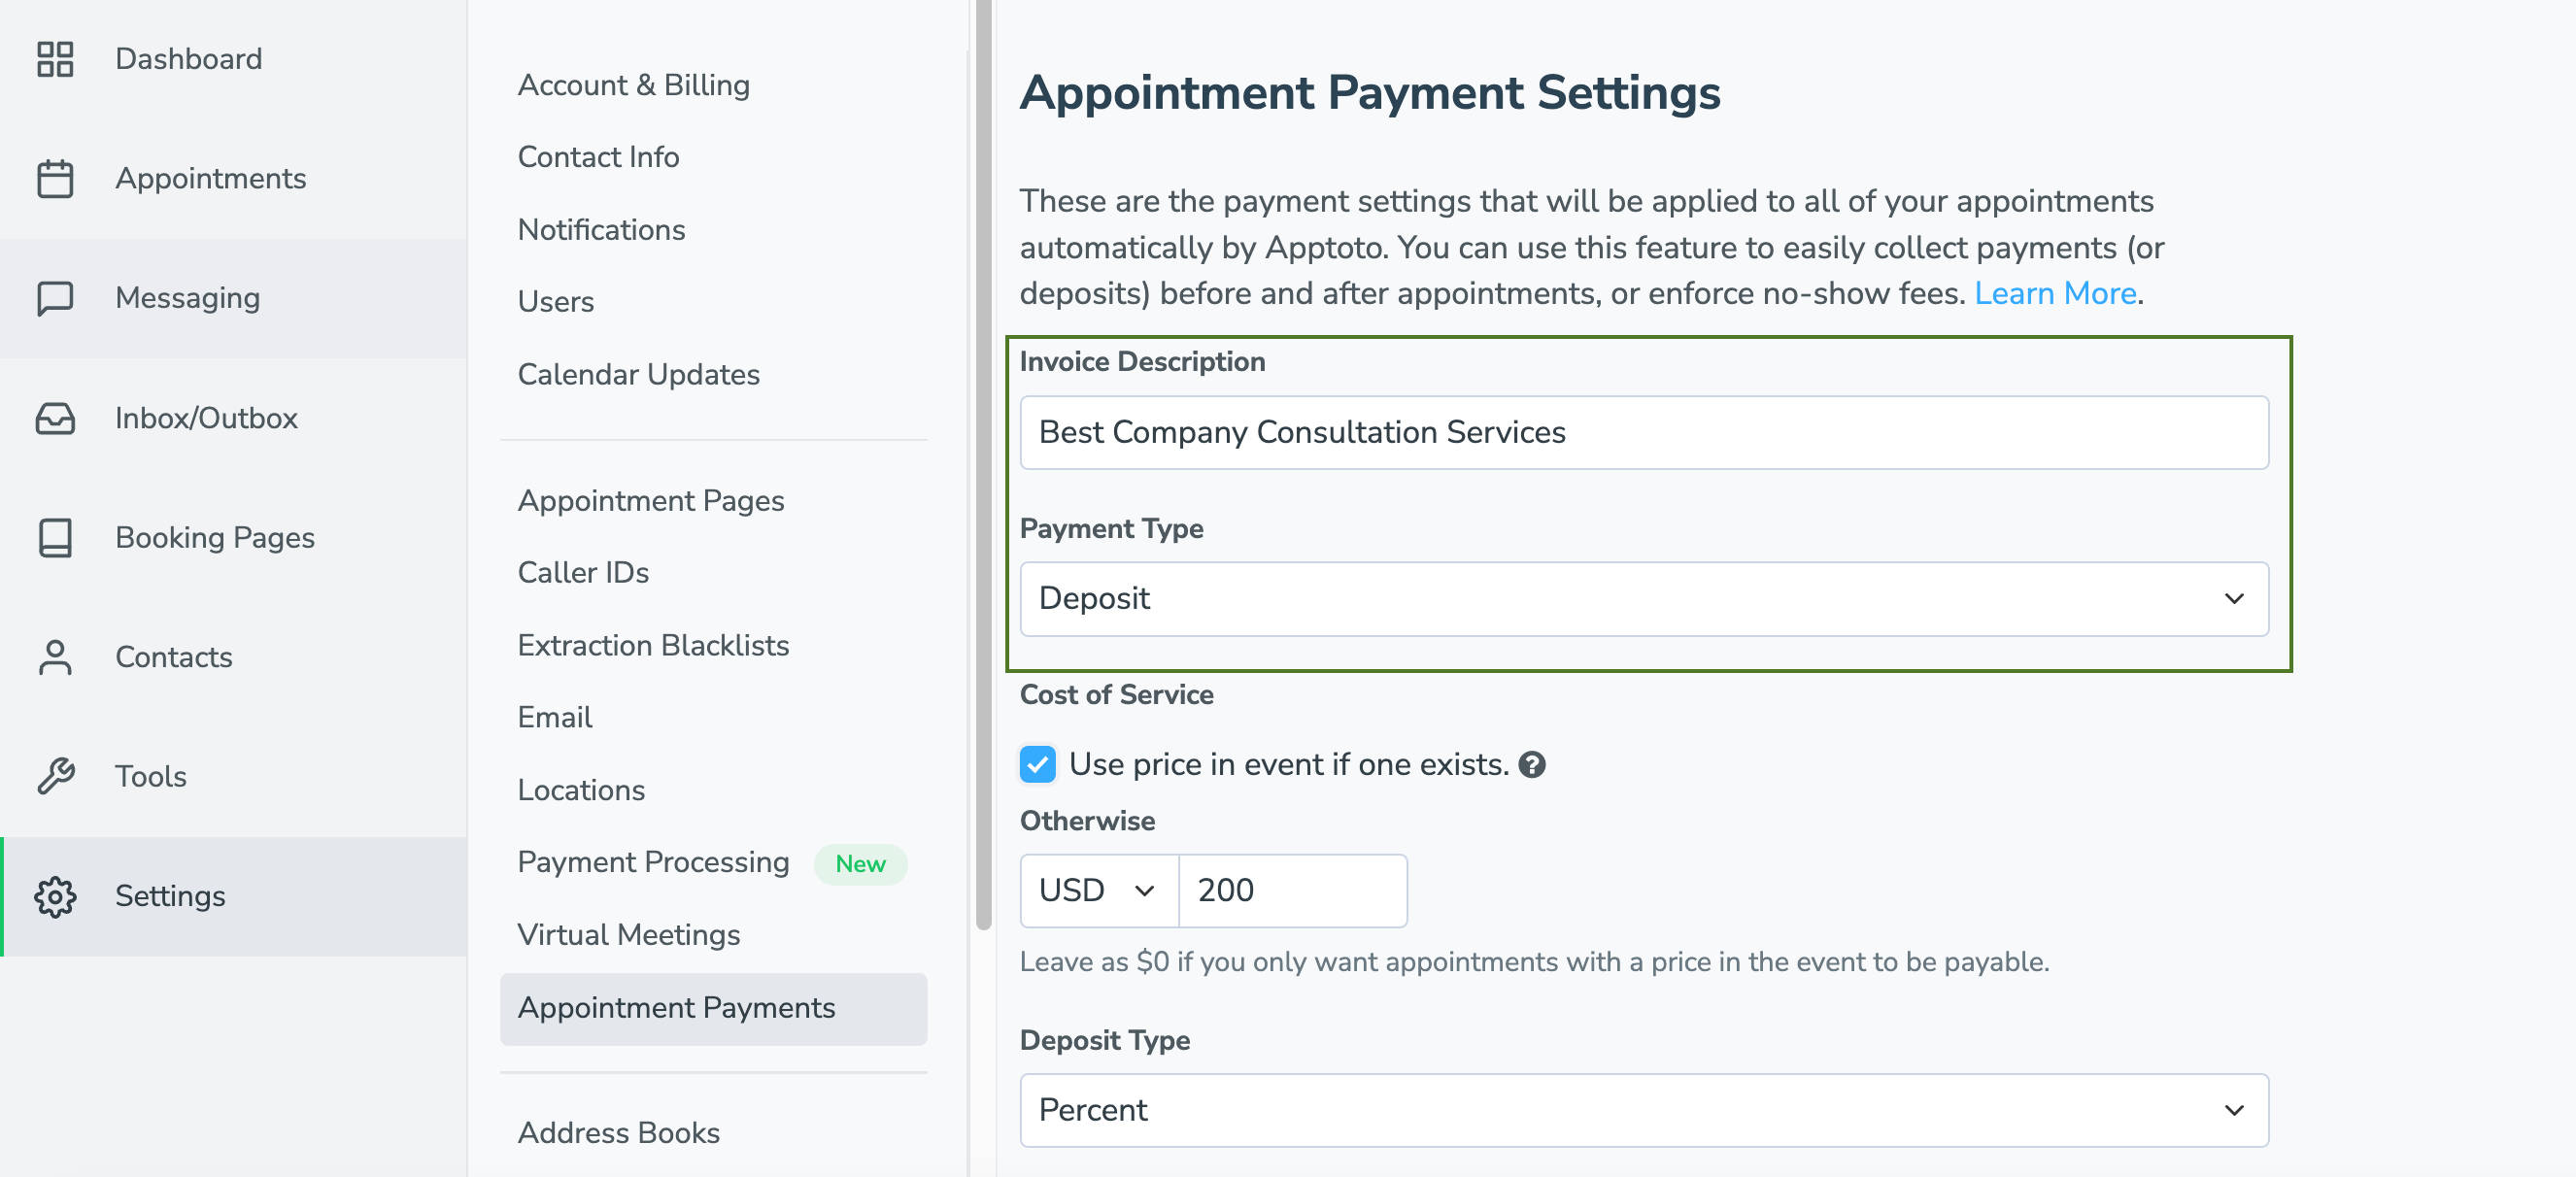
- Set the price/fee for each appointment using the “Cost of Service” section.
- If each appointment will have a different price/fee, leave “Use price in event if one exists” checked.
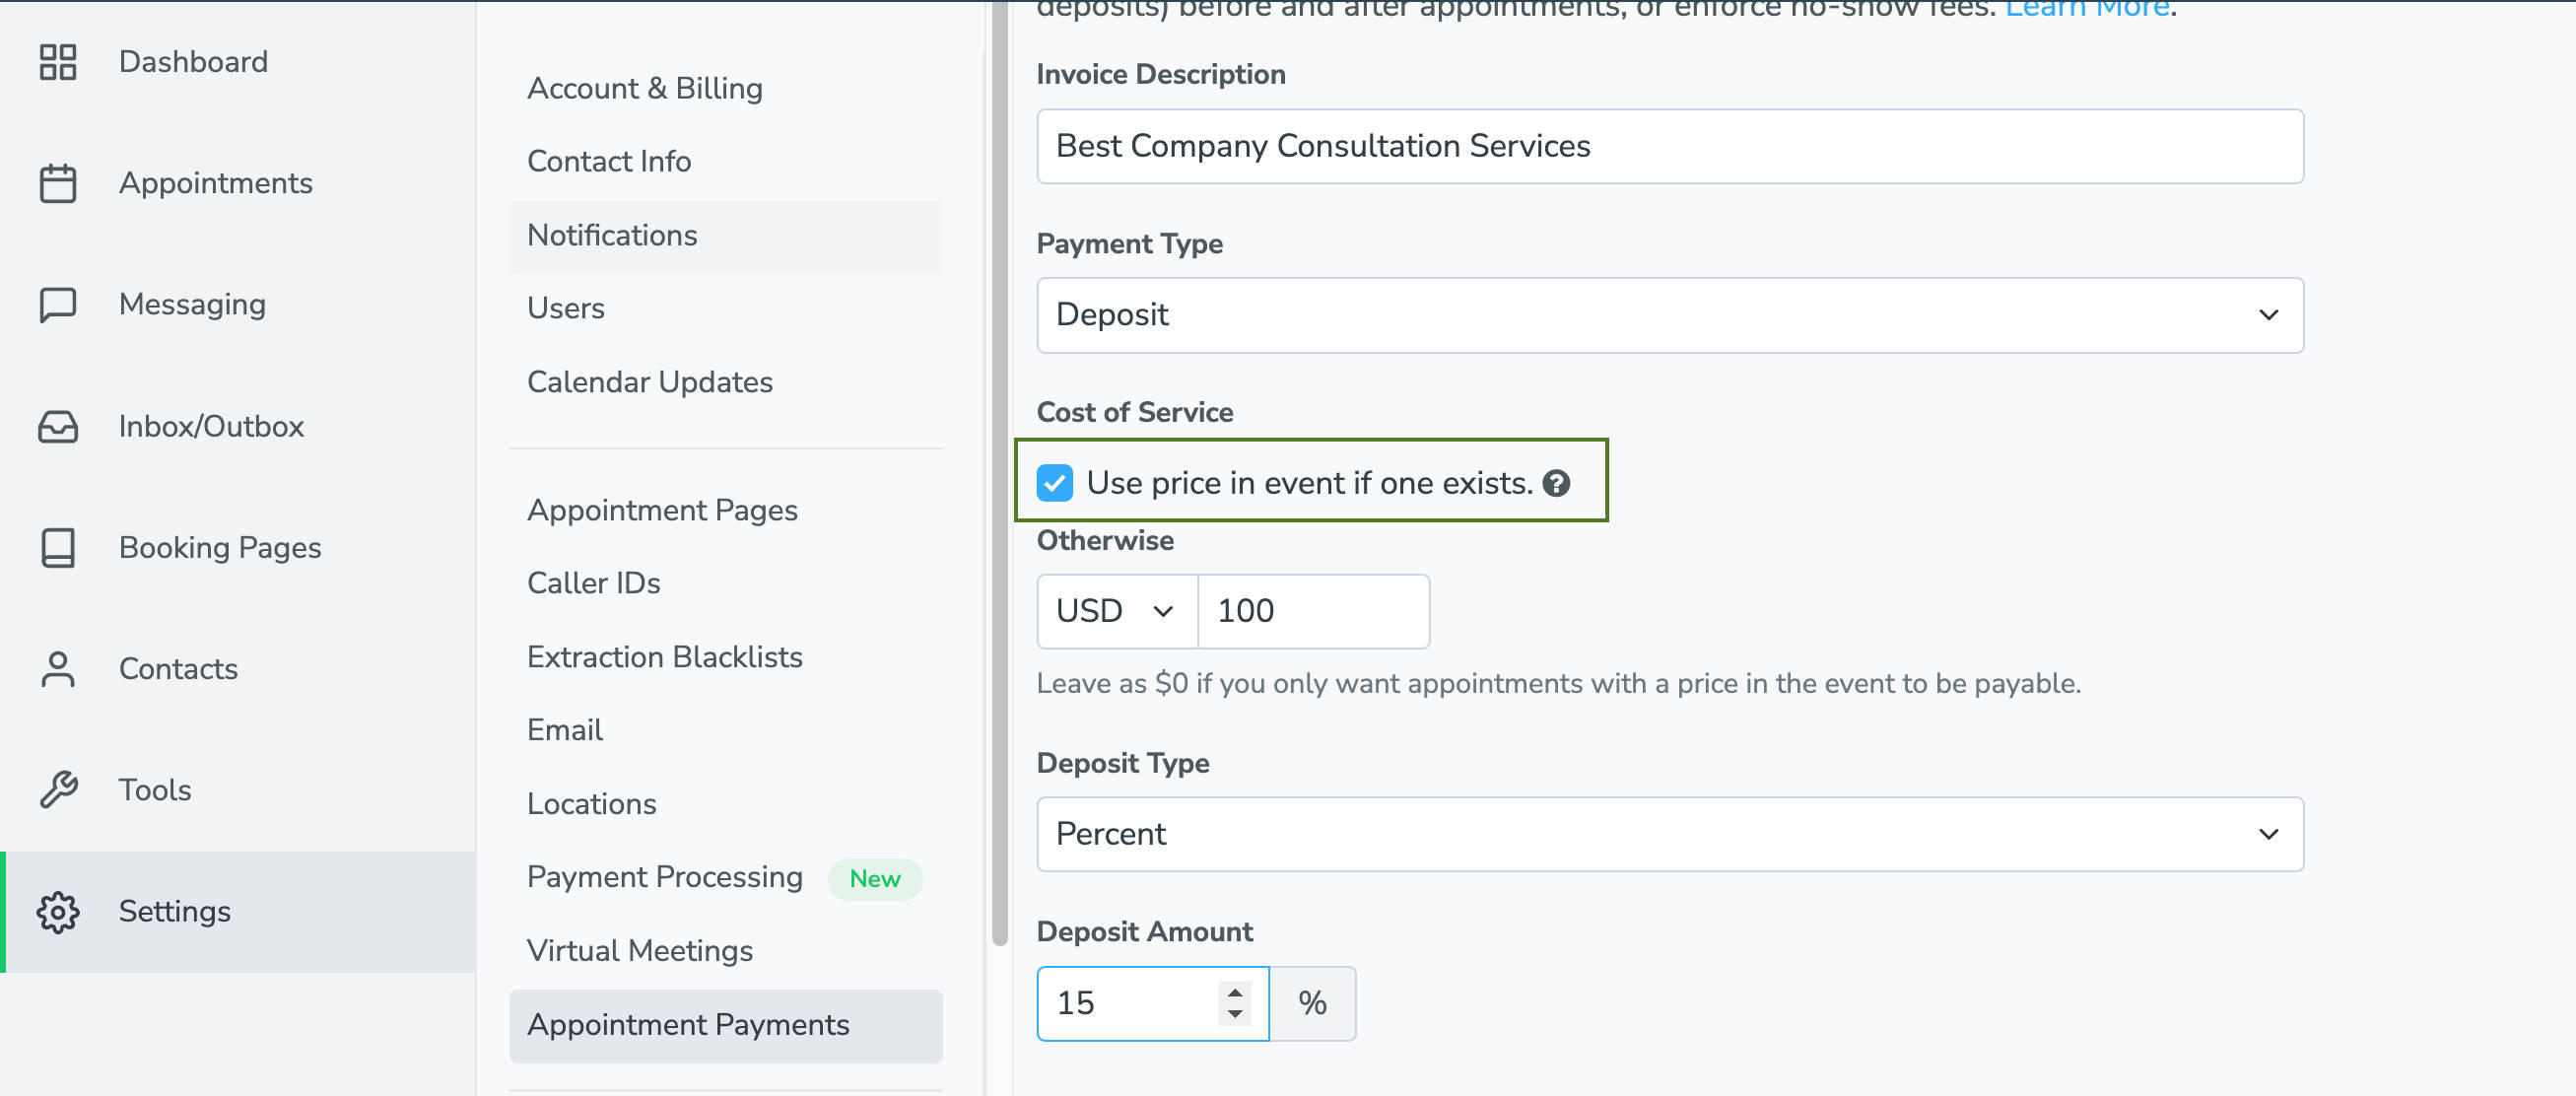
- Use “Otherwise” to set the amount billed for any appointment without a price in the event title/body. Or, set it to $0 to turn off payments on appointments without a price listed.
- If all appointments have the same price/fee, then uncheck “Use price in event if one exists.”
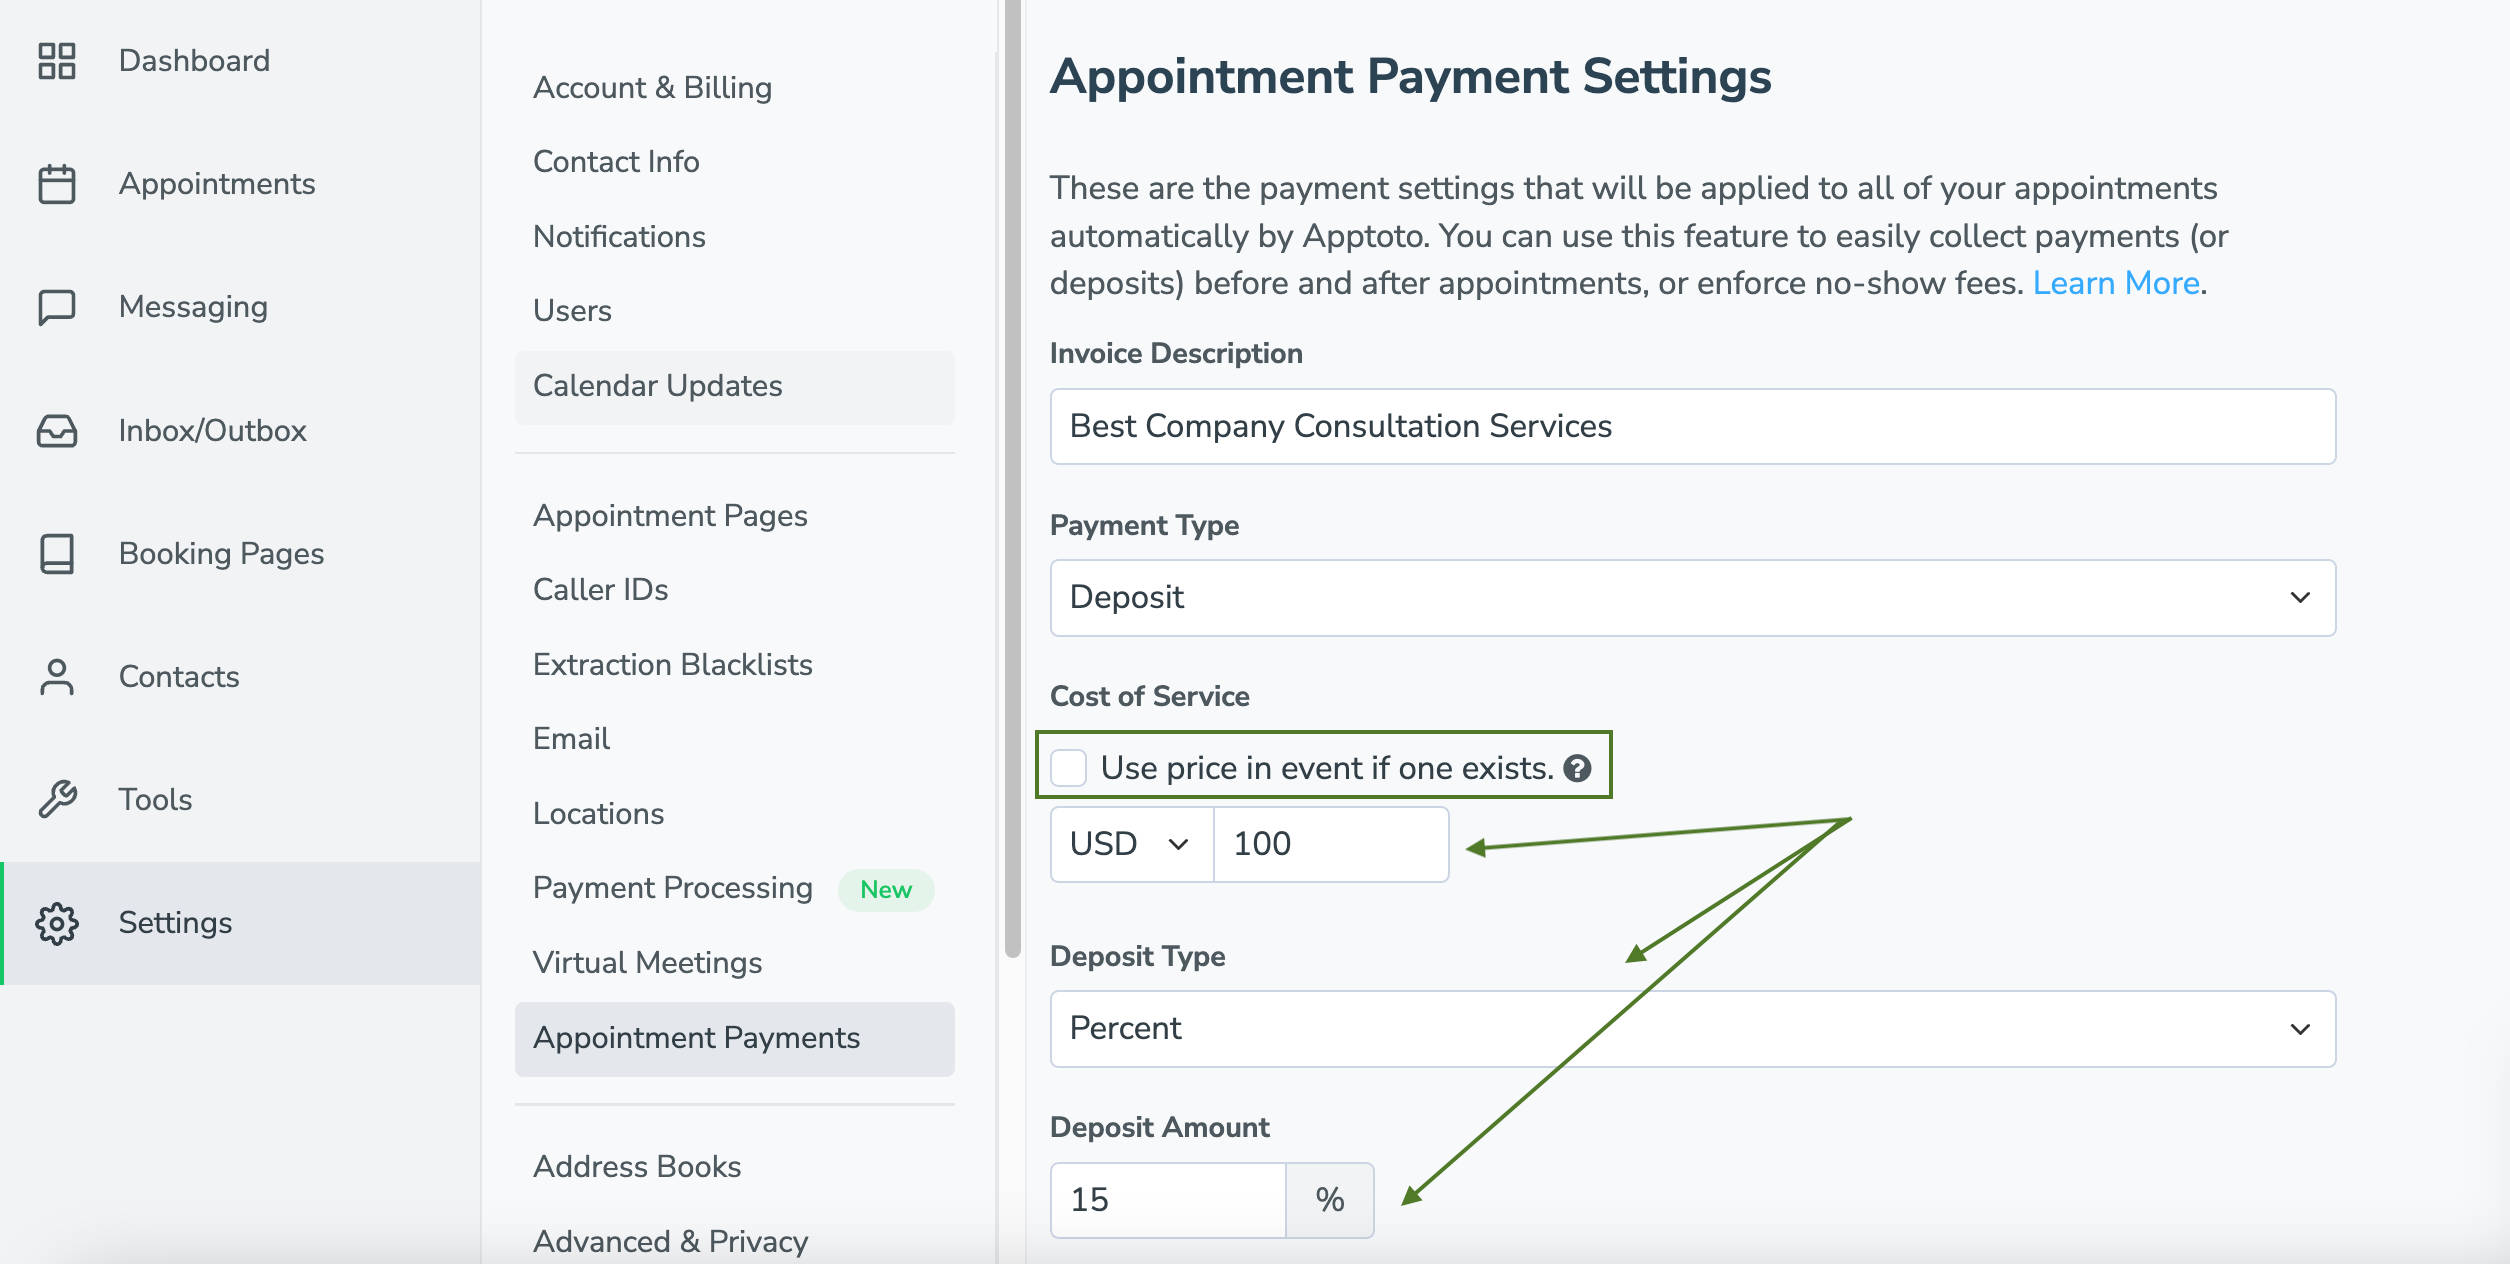
- Set the currency and total cost you will charge for all appointments.
- Depending on the payment type you selected in Step 6, you must set additional payment preferences such as a “No Show Fee,” or “Deposit Amount” and “Deposit Type.”
- Click “Save Settings.”
- If each appointment will have a different price/fee, leave “Use price in event if one exists” checked.
Setting Prices for Your Appointments
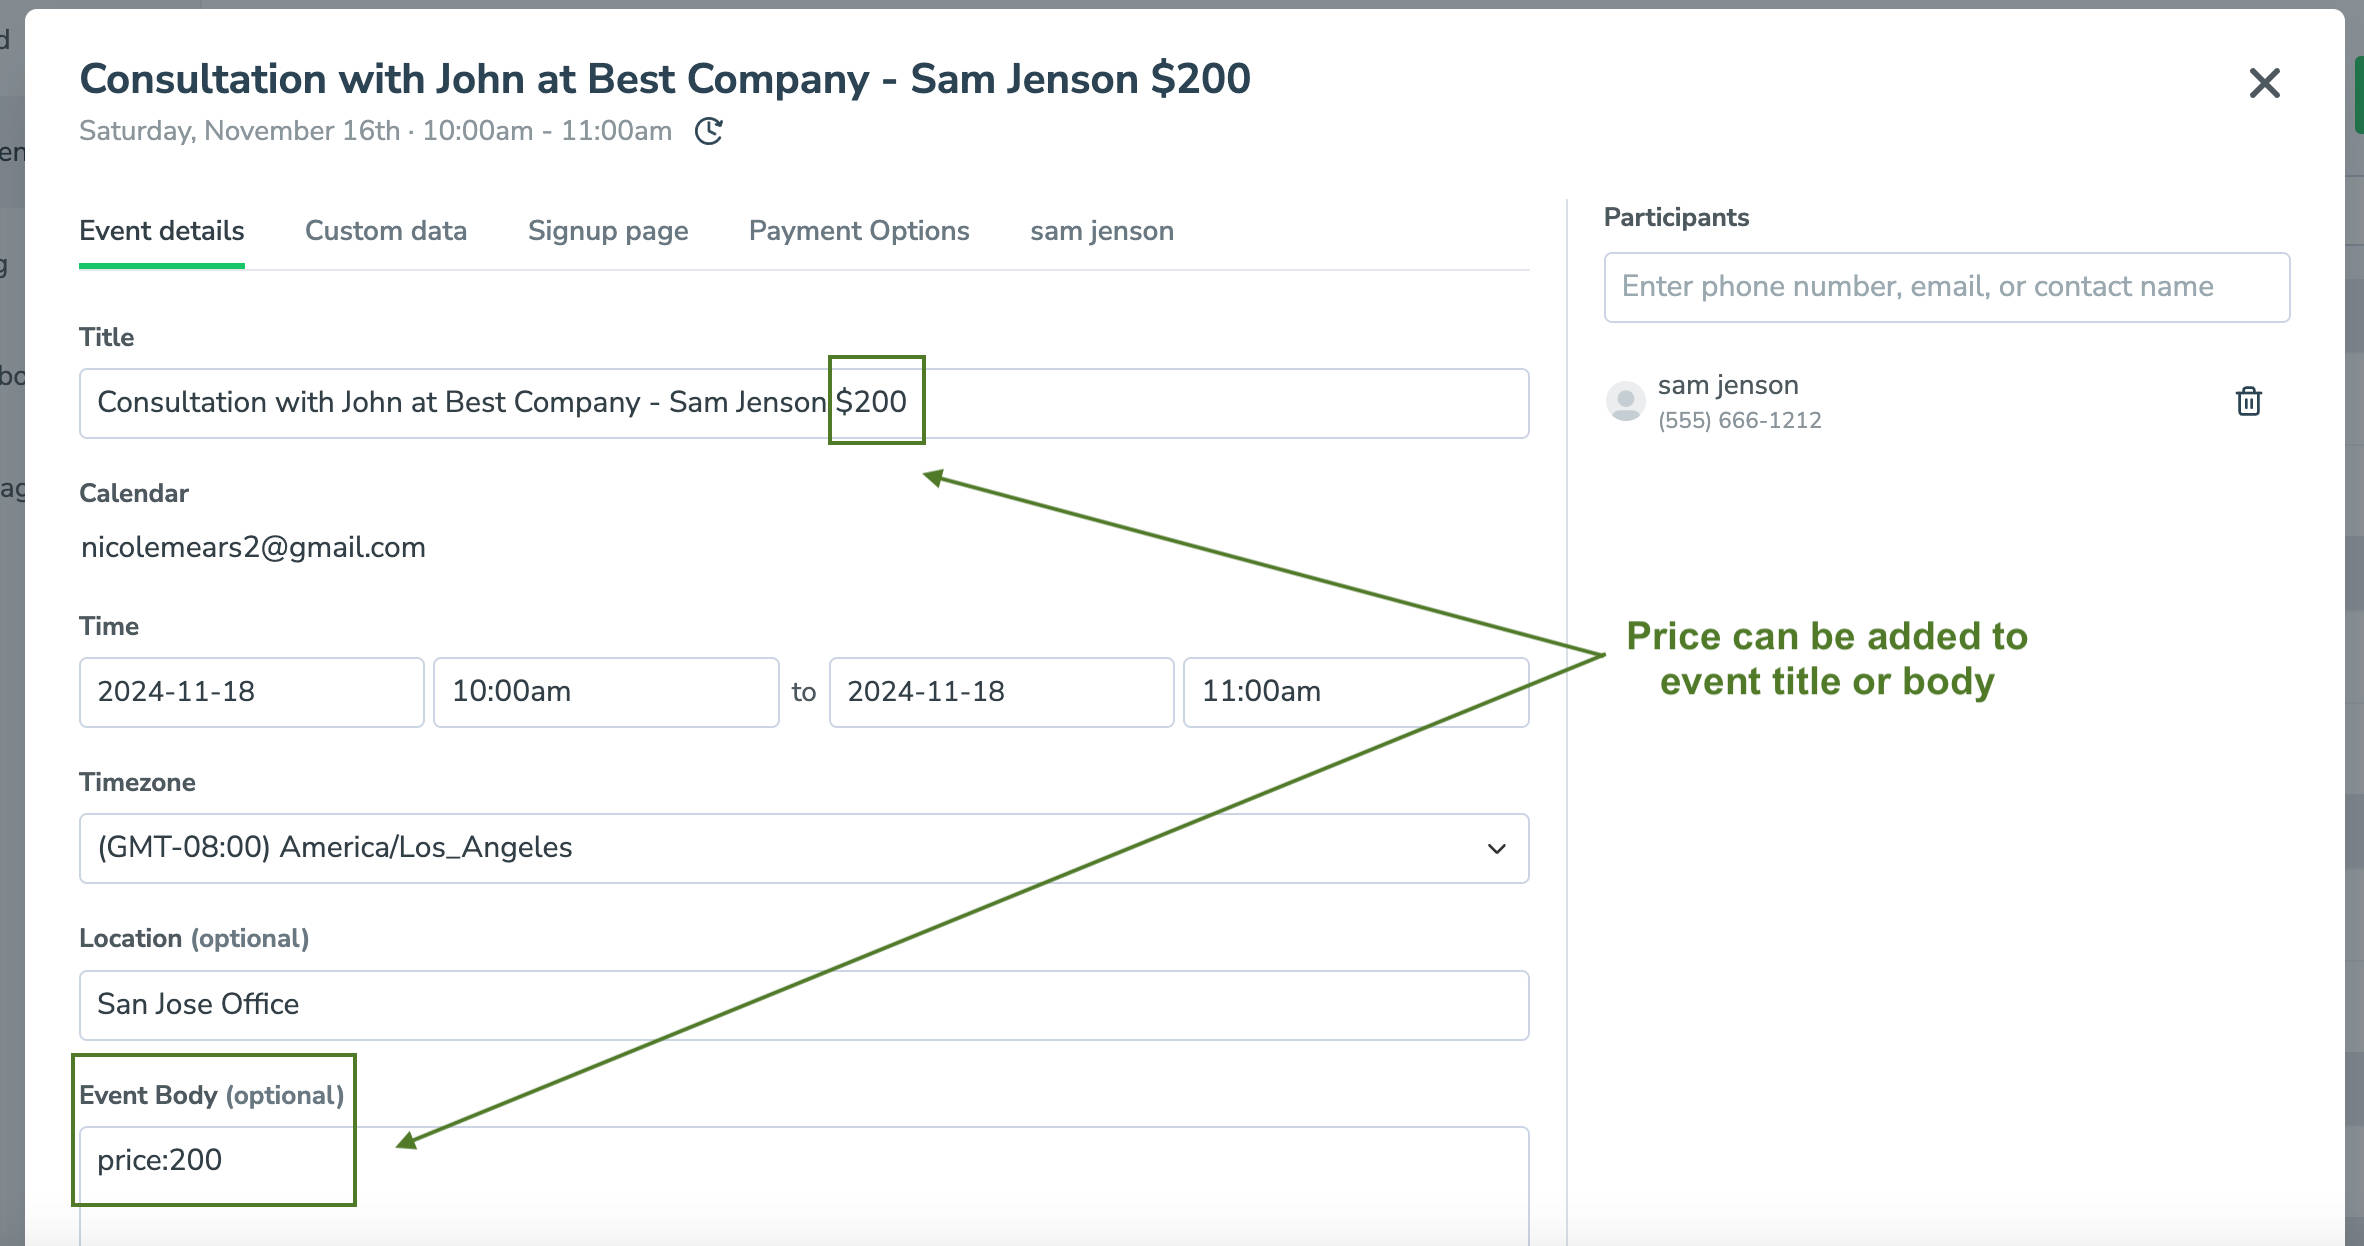
- If you choose to “Use Price in event if one exists” (7A), you have two options:
- Enter the price into the title, location, or body fields of each appointment you wish to bill for. (e.g., $25 or $25.00)
- Add a custom field named “price:” into the body of your appointment (e.g., price:25)
- If you choose to set a default price for all appointments (7B), you don’t need to do anything. Your pricing settings from 7B will automatically be applied to every new appointment you create.
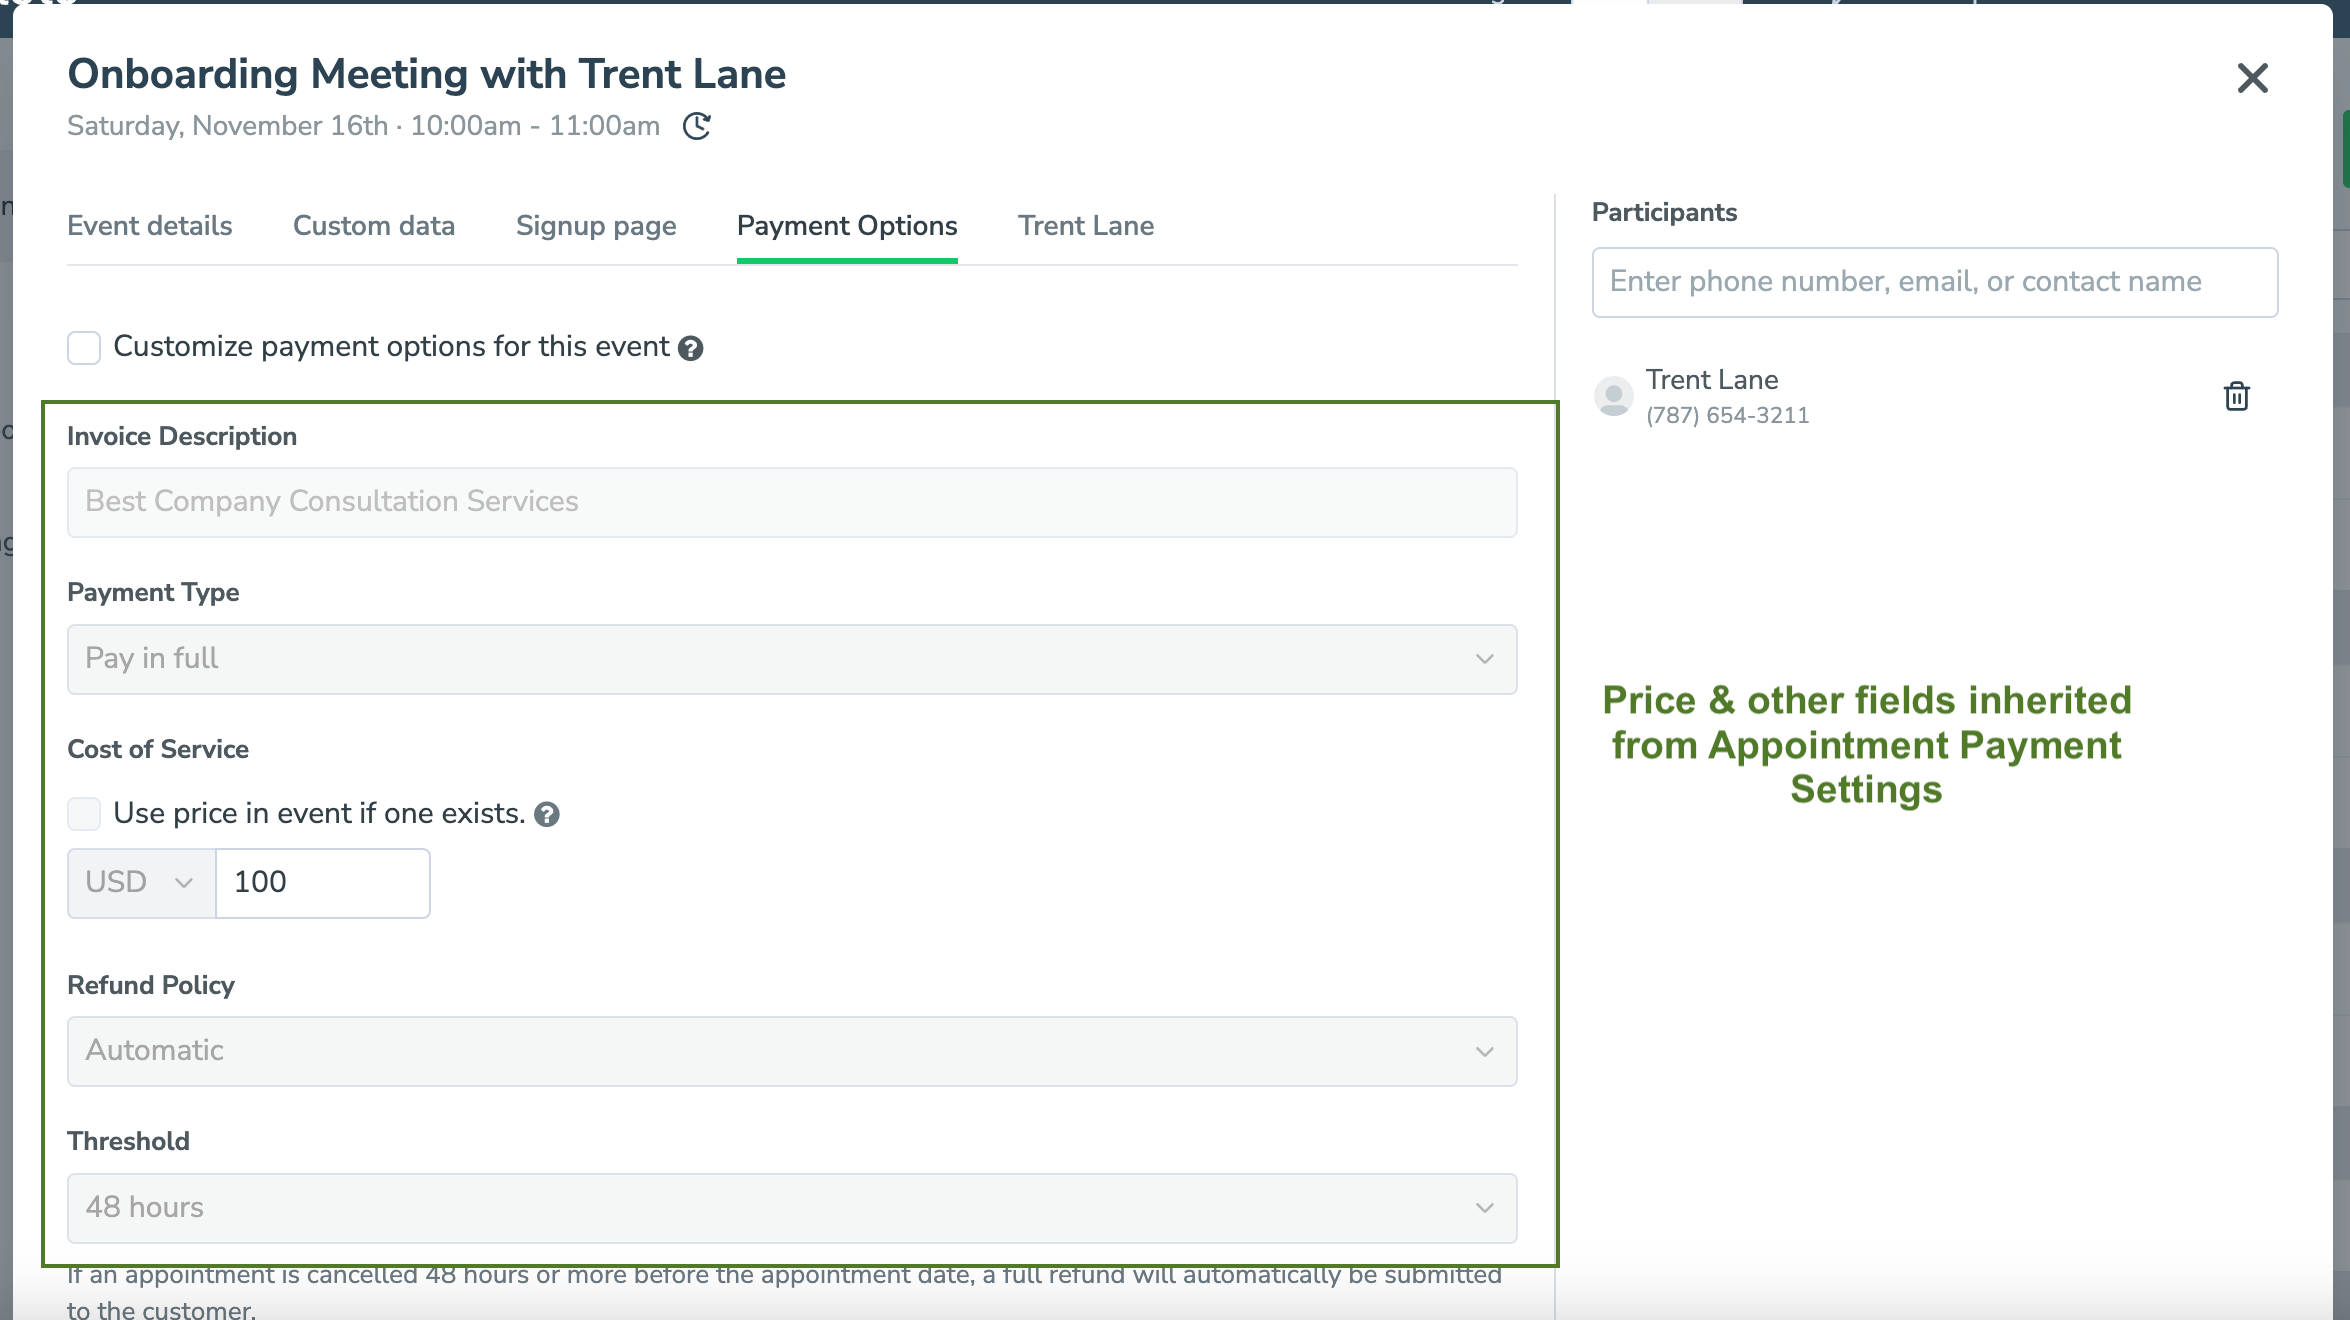
- Pro Tip: If you occasionally need to charge a different price, use a new invoice description, or set a different payment type for an appointment, click on the appointment name on the “Appointments tab.” Select the “Payment Options” tab. Check “Customize payment options for this event” and adjust settings accordingly.
- Any appointments on your calendar that require billing will now display a $ symbol to the right of the invitees’ names.

Optional: Manually Collecting Payments
- If you don’t want to use automated payment collection messages (or wish to collect payment before the auto-message is sent), simply click the $ to the right of the invitee’s name on the “Appointments” tab.
- Select “Request Payment” to send a manual payment request.
- You can also choose to “Mark as Paid Externally” or “Change Payment Options.”

- You can also choose to “Mark as Paid Externally” or “Change Payment Options.”
Automating Payment Request Messages
- Navigate to the “Messaging” tab > “Appointment Auto Messages”
- Click “+Add Rule” and then the “Advanced” tab. Name your rule.
- Set the fields to “payment.is_due” “==” “true” and add any other defining rules if needed. Click “Done.”

- Under your new rule, click “+Add Message or Sub-Rule” and select “Text” or “Email.”
- Create a message that uses the {{payment.prompt}} field in the body of the message.
- Choose the message purpose:
- Booking Confirmation: sent when the event is first booked
- Reminder: Sent leading up to the appointment
- Follow Up: Sent after the appointment
- Edit the message or email body, then insert the Payment Prompt by clicking “Field” > “Payment” > “Prompt.”**

- Adjust all other message settings and auto-replies (if needed), then click “Done and Save.”
- Repeat steps A-C if you want multiple payment message types or timings.
- Choose the message purpose:
- Once you’re happy with your automated payment messages, ensure “Auto Messages” are turned on.
**Pro Tip: If your client has submitted a payment through Apptoto, and their payment information is stored with your payment processor, they’ll be prompted with a message that includes: ”…Reply ‘p’ to pay $X.XX using card ending in ####…” If their information is not stored, the message will include the payment details and prompt them to submit their payment information.
Best Practices for Collecting Booking Payments
Clearly Communicate Payment Policies
Ensure your clients know upfront that payment is required to confirm their appointment. To minimize misunderstandings, include this information on your booking page, in reminder messages, and in follow-ups.
Leverage Automated Payment Reminders
Set up automated email or SMS reminders that include payment links. These reminders help gently nudge clients to take action while reducing manual follow-ups and improving payment completion rates.

Set Clear Deadlines for Payments
Define a specific timeframe for clients to make payments, such as within 24 hours of booking or X days before the appointment. Clients are less likely to cancel at the last minute if they’ve already committed financially.
Simplify the Payment Process
Use direct, clickable payment prompts in your automated messages. Don’t add complicated payment instructions or add too many details to SMS messages (in particular).
Monitor Payment Status Regularly
Check your Appointments Dashboard frequently to ensure payments were not missed or forgotten. Follow up quickly if payment is overdue.
- A black $ indicates a client has not submitted a payment.
- A green $ indicates a client has submitted a payment.

Be Transparent About Refunds and Cancellations
Clearly outline refund and cancellation policies with clients to avoid disputes.
Train Your Team
Educate your staff on how to use the payment system effectively, including how to request payments manually and handle exceptions.
Ready to Accept Online Payments for All Appointments?
Setting up an online appointment payment option makes life easier for you and your clients. You see fewer cancellations, your team has more time to focus on their work, and your clients appreciate the ease and convenience.
Unlike platforms that only allow you to collect payments for appointments booked through their platform, Apptoto empowers you to collect payments for any scheduled appointment regardless of how it was booked. Plus, with automated reminders and confirmations, collecting booking payments has never been easier, providing a professional, cohesive experience.
Looking to simplify payment collection? Sign up for a free 14-day trial of Apptoto today and see how Apptoto’s flexible appointment management solutions can improve your payment collection process, minimize no-shows, and create a stress-free experience for your clients.
